

Linux Foundation CKA試験情報と無料練習テストはこちら
合格させるLinux Foundation CKAプレミアムお試しセットテストエンジンPDFで無料問題集セット
CKA試験では、インストールと構成、アプリケーションライフサイクル管理、ネットワーキング、セキュリティ、ストレージなど、さまざまなKubernetesの概念における候補者の習熟度を評価します。これは、一連の実践的なタスクを通じて、現実世界のシナリオでスキルを実証することを候補者に要求するパフォーマンスベースの試験です。試験はオンラインで実施され、候補者にはライブKubernetesクラスターにアクセスするコマンドラインインターフェイスが提供されます。試験はタイミングがあり、候補者は割り当てられたタスクを完了するために3時間あります。 CKA認定は、専門家がKubernetesの専門知識を実証し、業界でのスキルの認識を得るための優れた方法です。
CKA試験は、Kubernetes管理に関連するさまざまなタスクを実行する能力を個人がテストする厳密で実践的な評価です。試験は、Kubernetesクラスターの管理、アプリケーションのデプロイ、および問題のトラブルシューティングにおける候補者のスキルをデモンストレーションする必要がある実践的なシナリオで構成されています。試験はオンラインで実施され、3時間以内に完了する必要がある24のタスクで構成されています。タスクは、Kubernetes管理者が一般的に遭遇する現実世界のシナリオをシミュレートするように設計されており、候補者はコマンドラインツールとKubernetes APIの使用能力を示さなければなりません。試験に合格すると、候補者は、テック業界で有価値な資格として認められているCKA認定を受け取ります。
質問 # 30
You have a Deployment that runs a containerized application. The application requires access to a specific service running in a different namespace. You need to define a NetworkPolicy to allow traffic from the application's Pods to the service in the other namespace only on port 8080.
正解:
解説:
See the solution below with Step by Step Explanation.
Explanation:
Solution (Step by Step) :
1. Network Policy Definition:
2. Explanation: - 'apiVersion: networking.k8s.io/v1 Specifies the API version for NetworkPolicy resources. - 'kind: NetworkPolicy': Specifies that this is a NetworkPolicy resource. - 'metadata.name: allow-service-access': Sets the name of the NetworkPolicy. - 'metadata.namespace: Specifies the namespace where the NetworkPolicy is applied. Replace with the actual namespace where your deployment is running. - 'spec.podSelector.matchLabels: app: application': This selector targets Pods labeled with 'app: application', ensuring the NetworkPolicy applies to the application Pods. - 'spec.egress.to.namespaceSelector.matchLabels: service-namespace: This allows outgoing traffic only to the namespace labeled with 'service-namespace: Replace with the actual namespace of the service. - 'spec.egress.ports.port: 8080': This allows communication only on port 8080. - 'spec.egress.ports.protocol: TCP': Specifies the protocol (TCP) for the allowed port. 3. How it works: - This NetworkPolicy allows outgoing traffic from the application Pods only to the specified service in the different namespace and only on port 8080. It effectively restricts communication from the application Pods to only the intended target service. 4. Implementation: - Apply the YAML using 'kubectl apply -f allow-service-access.yaml' 5. Verification: After applying the NetworkPolicy, test the connectivity from the application Pods to the service in the other namespace on port 8080. You should observe that the NetworkPolicy successfully enforces the restrictions, allowing access only to the specified port and service.]
質問 # 31
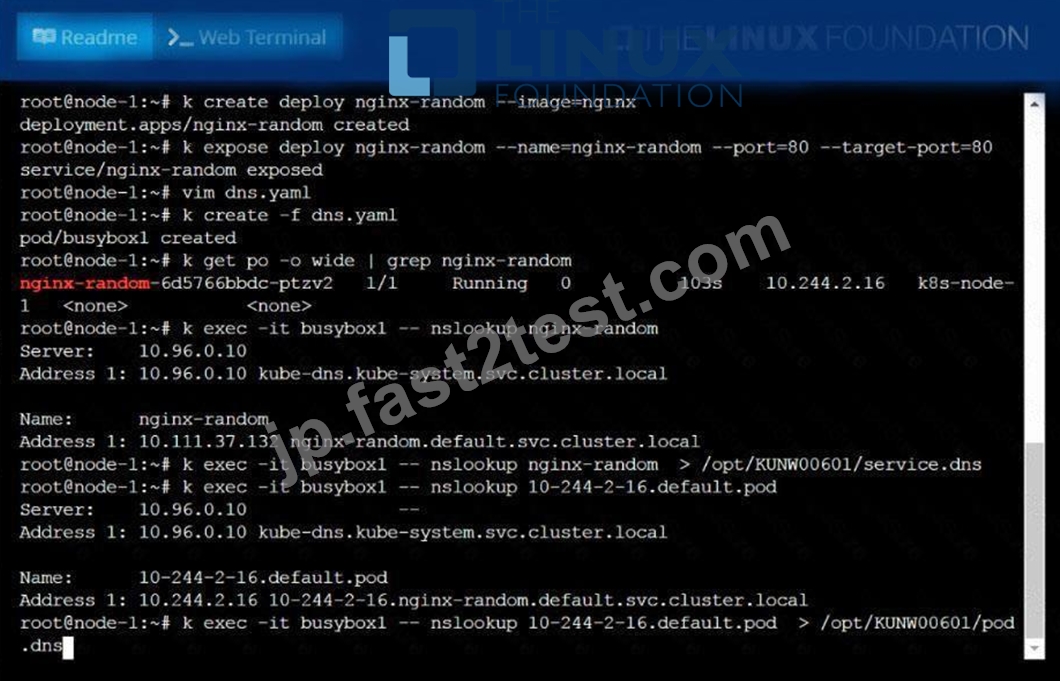
Create a deployment as follows:
* Name:nginx-random
* Exposed via a servicenginx-random
* Ensure that the service & podare accessible via theirrespective DNS records
* The container(s) within anypod(s) running as a part of thisdeployment should use thenginxImage Next, use the utilitynslookupto lookup the DNS records of the service &pod and write the output to
/opt/KUNW00601/service.dnsand/opt/KUNW00601/pod.dnsrespectively.
正解:
解説:
See the solution below.
Explanation
Solution:

質問 # 32
Create a pod that having 3 containers in it? (Multi-Container)
- A. image=nginx, image=redis, image=consul
Name nginx container as "nginx-container"
Name redis container as "redis-container"
Name consul container as "consul-container"
Create a pod manifest file for a container and append container
section for rest of the images
kubectl run multi-container --generator=run-pod/v1 --image=nginx --
dry-run -o yaml > multi-container.yaml
# then
vim multi-container.yaml
labels:
run: multi-container
name: multi-container
spec:
containers:
- image: nginx
name: nginx-container
- image: redis
name: consul-container
restartPolicy: Always - B. image=nginx, image=redis, image=consul
Name nginx container as "nginx-container"
Name redis container as "redis-container"
Name consul container as "consul-container"
Create a pod manifest file for a container and append container
section for rest of the images
kubectl run multi-container --generator=run-pod/v1 --image=nginx --
dry-run -o yaml > multi-container.yaml
# then
vim multi-container.yaml
apiVersion: v1
kind: Pod
metadata:
labels:
run: multi-container
name: multi-container
spec:
containers:
- image: nginx
name: nginx-container
- image: redis
name: redis-container
- image: consul
name: consul-container
restartPolicy: Always
正解:B
質問 # 33
Ensure a single instance of podnginxis running on each node of theKubernetes cluster wherenginxalso represents the Image name whichhas to be used. Do not override anytaints currently in place.
UseDaemonSetto complete thistask and useds-kusc00201asDaemonSet name.
正解:
解説:
See the solution below.
Explanation
solution


質問 # 34
Delete the pod without any delay (force delete)
正解:
解説:
Kubect1 delete po "POD-NAME" --grace-period=0 --force
質問 # 35
List all service account and create a service account called "admin"
- A. kubectl get sa
kubectl get sa --all-namespaces
//Verify
kubectl get sa admin -o yaml - B. kubectl get sa
kubectl get sa --all-namespaces
kubectl create sa admin
//Verify
kubectl get sa admin -o yaml
正解:B
質問 # 36
List all the pods that are serviced by the service "webservice" and copy the output in /opt/$USER/webservice.targets Note: You need to list the endpoints
正解:
解説:
kubectl descrive svc webservice | grep -i "Endpoints" > /opt/$USER/webservice.targets kubectl get endpoints webservice > /opt/$USER/webservice.targets
質問 # 37
Create a pod as follows:
Name: non-persistent-redis
container Image: redis
Volume with name: cache-control
Mount path: /data/redis
The pod should launch in the staging be persistent.
正解:
解説:
See the solution below.
Explanation
solution
F:\Work\Data Entry Work\Data Entry\20200827\CKA\13 B.JPG
F:\Work\Data Entry Work\Data Entry\20200827\CKA\13 C.JPG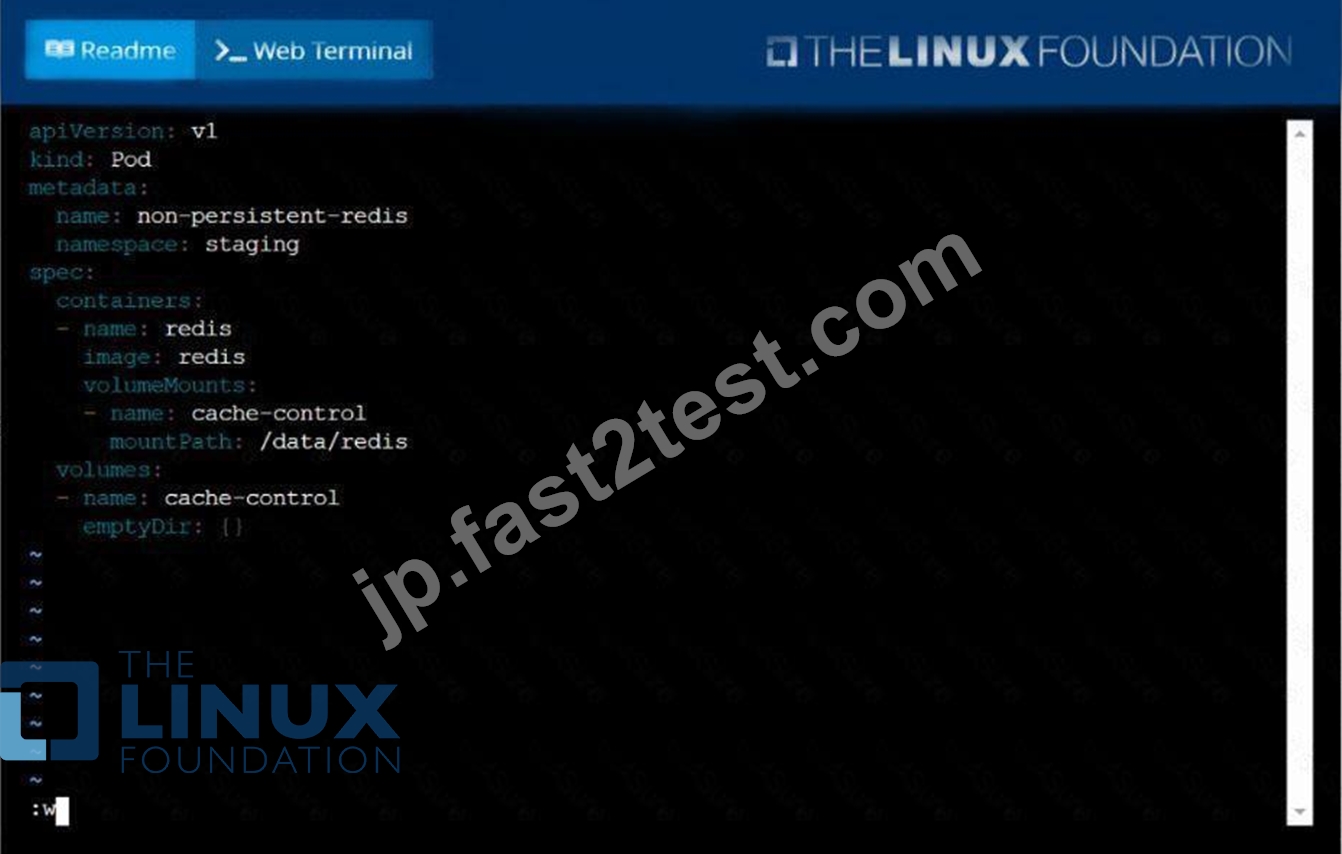
F:\Work\Data Entry Work\Data Entry\20200827\CKA\13 D.JPG
質問 # 38
Score: 13%
Task
A Kubernetes worker node, named wk8s-node-0 is in state NotReady. Investigate why this is the case, and perform any appropriate steps to bring the node to a Ready state, ensuring that any changes are made permanent.
正解:
解説:
Solution:
sudo -i
systemctl status kubelet
systemctl start kubelet
systemctl enable kubelet
質問 # 39
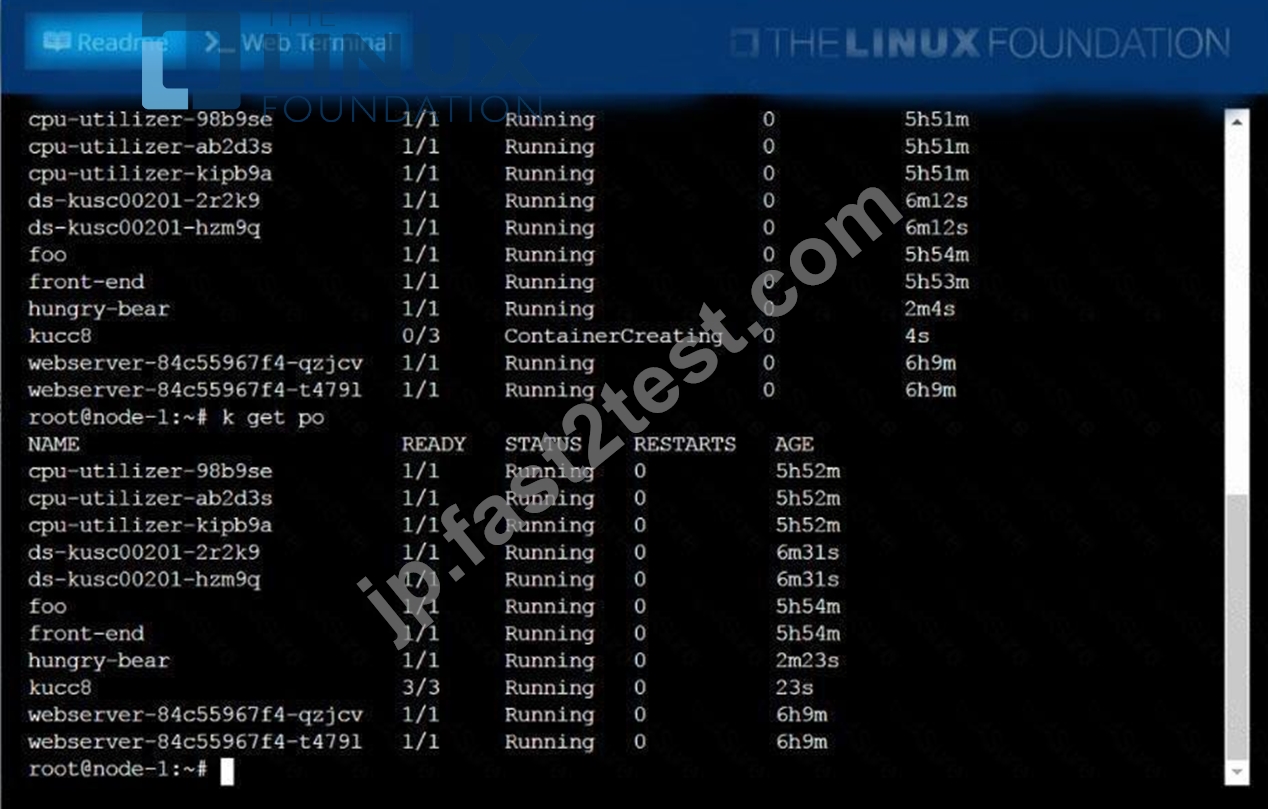
Create a pod namedkucc8with asingle app container for each of the
following images running inside(there may be between 1 and 4images specified):
nginx + redis + memcached.
正解:
解説:
See the solution below.
Explanation
solution

質問 # 40
From the pod label name=cpu-utilizer, find pods running high CPU workloads and write the name of the pod consuming most CPU to the file /opt/KUTR00102/KUTR00102.txt (which already exists).
正解:
解説:
See the solution below.
Explanation
solution

質問 # 41
You need to deploy a microservice application that uses a custom DNS service for internal communication between microservices. This DNS service is not a standard Kubernetes DNS service. How would you configure Kubernetes to use your custom DNS service for the internal communication of your application?
正解:
解説:
See the solution below with Step by Step Explanation.
Explanation:
Solution (Step by Step) :
1. Create a ConfigMap for DNS Configuration:
- Create a ConfigMap to store the DNS configuration details for your custom DNS service.
- Example:
- Replace '10.0.0.1 ,10.0.0.2 with the IP addresses of your custom DNS servers and 'my-app.svc.cluster.local' with the search domain for your application. 2. Create a DaemonSet for DNS Configuration: - Create a DaemonSet that will inject the custom DNS configuration into all pods in your cluster. - Example:
- This DaemonSet will use a 'busybox' container to write the DNS configuration from the 'custom-dns-config' ConfigMap to the '/etc/resolv.conf file in every pod. 3. Deploy your Application: - Deploy your microservice application with the appropriate labels to ensure that the DaemonSet injects the custom DNS configuration into your application's pods. 4. Verify DNS Resolution: - Verify that your application's pods can resolve internal DNS names using your custom DNS service. - Example: - You can use the 'nslookup command within a pod to test DNS resolution. 5. Configure Security: - Implement appropriate security measures to protect your custom DNS service and prevent unauthorized access to your application's internal services. - Example: - Consider using a firewall to restrict access to the custom DNS servers. - Configure access control lists to limit access to the DNS service.
質問 # 42
Create an nginx pod and set an env value as 'var1=val1'. Check the env value existence within the pod
- A. kubectl run nginx --image=nginx --restart=Never --env=var1=val1
# then
kubectl exec -it nginx -- env
# or
kubectl run nginx --restart=Never --image=nginx --env=var1=val1
-it --rm -- env - B. kubectl run nginx --image=nginx --restart=Never --env=var1=val1
# then
kubectl exec -it nginx -- env
# or
kubectl exec -it nginx -- sh -c 'echo $var1'
# or
kubectl describe po nginx | grep val1
# or
kubectl run nginx --restart=Never --image=nginx --env=var1=val1
-it --rm - env
正解:B
質問 # 43
Check to see how many worker nodes are ready (not including nodes taintedNoSchedule) and write the number to/opt/KUCC00104/kucc00104.txt.
正解:
解説:
See the solution below.
Explanation
solution

質問 # 44
Create a redis pod and mount "redis-config" as "redis.conf"
inside redis container, name the config volume as "redis-volume"
redis-config path - /opt/redis-config
- A. Pending
- B. 0
- C. 1
正解:A
質問 # 45
......
更新された公式認定はCKA認証済みのCKA問題集でPDF:https://jp.fast2test.com/CKA-premium-file.html
2025年最新の実際に出るCKA問題集テストエンジン試験問題はここにある:https://drive.google.com/open?id=1M1XIQ0tgHZA8nIM5OjEF8T7R6gdm1bln