

無料Linux Foundation CKAテスト練習問題試験問題集
試験準備には欠かさない!トップクラスのLinux Foundation CKA試験最新版アプリ学習ガイドで練習
CKA試験は、Kubernetes管理に関連するタスクを実行する能力を個人が評価する実践的な試験です。試験は、3時間以内に完了する必要がある一連の実践的なタスクで構成されています。この試験は、個人のKubernetes管理に関連する実際のタスクを実行する能力を評価するために設計されています。
質問 # 33
Ensure a single instance of pod nginx is running on each node of the Kubernetes cluster where nginx also represents the Image name which has to be used. Do not override any taints currently in place.
Use DaemonSet to complete this task and use ds-kusc00201 as DaemonSet name.
正解:
解説:
solution


質問 # 34
// Create a configmap
kubectl create configmap redis-config --from-file=/opt/redisconfig
// Verify
kubectl get configmap redis-config -o yaml
// first run this command to save the pod yml
kubectl run redis-pod --image=redis --restart=Always --dry-run
-o yaml > redis-pod.yml
// edit the yml to below file and create
apiVersion: v1
kind: Pod
metadata:
name: redis
spec:
containers:
- name: redis
image: redis
env:
- name: MASTER
value: "true"
ports:
- containerPort: 6379
volumeMounts:
- mountPath: /redis-master-data
name: data
- mountPath: /redis-master
name: config
volumes:
- name: data
emptyDir: {}
- name: config
configMap:
name: example-redis-config
- A. items:
- key: redis-config
path: redis.conf
cf
kk kubectl apply -f redis-pod.yml
// // Verify
K kubectl exec -it redis - cat /redis-master-data/redis.conf - B. items:
- key: redis-config
path: redis.conf
cf
// // Verify
K kubectl exec -it redis - cat /redis-master-data/redis.conf
正解:A
質問 # 35
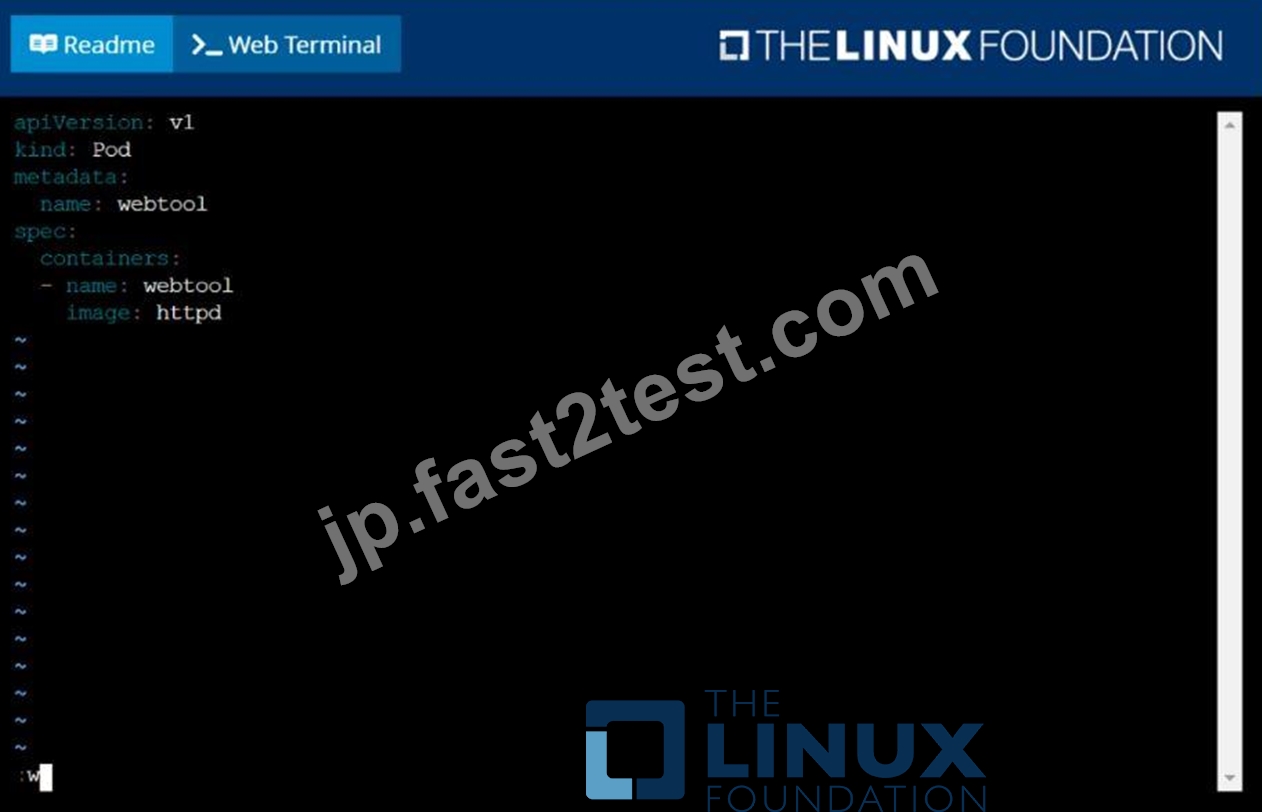
Configure the kubelet systemd- managed service, on the node labelled with name=wk8s-node-1, to launch a pod containing a single container of Image httpd named webtool automatically. Any spec files required should be placed in the /etc/kubernetes/manifests directory on the node.
You can ssh to the appropriate node using:
[student@node-1] $ ssh wk8s-node-1
You can assume elevated privileges on the node with the following command:
[student@wk8s-node-1] $ | sudo -i
正解:
解説:



質問 # 36
Evict all existing pods from a node-1 and make the node unschedulable for new pods.
- A. kubectl get nodes
kubectl drain node-1 #It will evict pods running on node-1 to
other nodes in the cluster
// Verify
kubectl get no
When you cordon a node, the status shows "SchedulingDisabled" - B. kubectl get nodes
kubectl drain node-1 #It will evict pods running on node-1 to
other nodes in the cluster
kubectl cordon node-1 # New pods cannot be scheduled to the
node
// Verify
kubectl get no
When you cordon a node, the status shows "SchedulingDisabled"
正解:B
質問 # 37
How can an administrator configure the NGFW to automatically quarantine a device using Global Protect?
- A. by exporting the list of quarantined devices to a pdf or csv file by selecting PDF/CSV at the bottom of the Device Quarantine page and leveraging the appropriate XSOAR playbook.
- B. by adding the device's Host ID to a quarantine list and configure GlobalProtect to prevent users from connecting to the GlobalProtect gateway from a quarantined device.
- C. by using security policies, log forwarding profiles, and log settings.
- D. There is no native auto-quarantine feature so a custom script would need to be leveraged.
正解:B
質問 # 38
You have a StatefulSet named 'database-statefulset' that runs a database service. The database requires persistent data storage. You are experiencing a problem where the database pods are crashing repeatedly, and the database data is getting lost. You suspect that there is an issue with the persistent volume claim (PVC) used by the StatefulSet. How would you troubleshoot and potentially fix this problem?
正解:
解説:
See the solution below with Step by Step Explanation.
Explanation:
Solution (Step by Step) :
1. Check the PVC:
- Use 'kubectl describe pvc (replace with the name of the PVC used by the 'database-statefulset') to check the PVC details.
- Look for any errors or warnings related to provisioning or access.
- Verify that the PVC's 'Status' field is 'Bound' (indicating the volume is successfully attached to a pod).
2. Investigate the Persistent Volume (PV):
- Use 'kubectl get pv' to list all persistent volumes in the cluster.
- Find the PV that is bound to your PVC (the PV's 'Claim' field should match the name of your PVC).
- Use 'kubectl describe pv to examine the details of the PV. Look for:
- StorageClass: Check if the storage class used by the PV is appropriate for the database workload (e.g., is it provisioned with enough capacity, appropriate 1/0 performance, etc.).
- AccessModes: Ensure the access modes of the PV match the requirements of the database (e.g.,
'ReadWriteOnce' if the database is a single instance).
- Errors: Look for any error messages or warnings related to the PV.
3. Examine Pod Logs:
- Use 'kubectl logs (replace with the name of a crashing database pod) to examine the pod's logs. Look for any error messages related to the volume or database startup.
4. Check for Pod Events:
- Use 'kubectl describe pod to check the events for the pod. Events might provide clues about why the pod is crashing or why the volume is not properly mounted.
5. Possible Solutions:
- Recreate the PVC: If there is an error with the PVC itself, you can try recreating it. Delete the existing PVC, and then create a new one with the same specifications.
- Update StorageClass: If the storage class is not appropriate, consider switching to a different storage class that better meets the database's requirements.
- Increase Storage Capacity: If the database runs out of storage, increase the storage capacity of the PVC.
- Change AccessModes: If the PV access modes are not compatible with the database, update the access modes to match.
- Repair or Replace the PV: If the PV itself has issues, consider repairing the volume (if possible) or replacing it with a new one.
6. Monitor and Iterate:
- After making any changes, monitor the database pods to see if they are now able to start and run without crashing.
- Make sure that the database data is being persisted correctly by checking the volume's contents.
質問 # 39
Ensure a single instance of pod nginx is running on each node of the Kubernetes cluster where nginx also represents the Image name which has to be used. Do not override any taints currently in place.
Use DaemonSet to complete this task and use ds-kusc00201 as DaemonSet name.
正解:
解説:
See the solution below.
Explanation
solution
F:\Work\Data Entry Work\Data Entry\20200827\CKA\3 B.JPG
F:\Work\Data Entry Work\Data Entry\20200827\CKA\3 C.JPG
F:\Work\Data Entry Work\Data Entry\20200827\CKA\3 D.JPG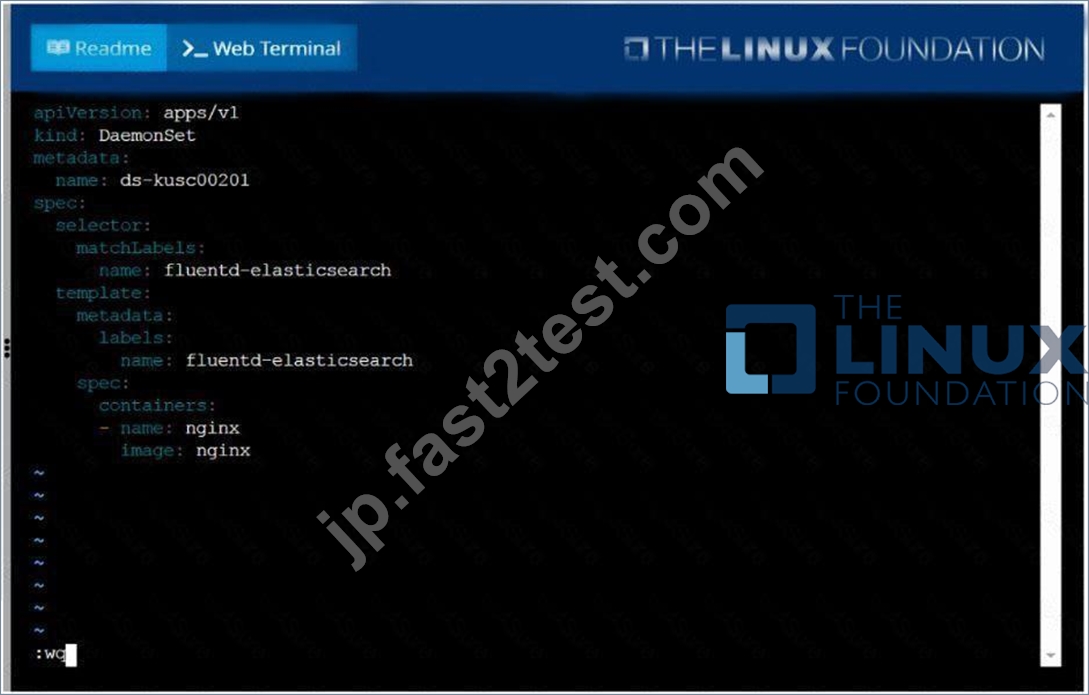
F:\Work\Data Entry Work\Data Entry\20200827\CKA\3 E.JPG
質問 # 40
Perform the following tasks:
* Add an init container tohungry-bear(which has beendefined in spec file
/opt/KUCC00108/pod-spec-KUCC00108.yaml)
* The init container should createan empty file named/workdir/calm.txt
* If/workdir/calm.txtis notdetected, the pod should exit
* Once the spec file has beenupdatedwith the init containerdefinition, the pod should becreated
正解:
解説:
See the solution below.
Explanation
solution


質問 # 41
Set the node namedek8s-node-1asunavailable and reschedule all thepods running on it.
正解:
解説:
See the solution below.
Explanation
solution
質問 # 42
You must connect to the correct host.
Failure to do so may result in a zero score.
[candidate@base] $ ssh Cka000056
Task
Review and apply the appropriate NetworkPolicy from the provided YAML samples.
Ensure that the chosen NetworkPolicy is not overly permissive, but allows communication between the frontend and backend Deployments, which run in the frontend and backend namespaces respectively.
First, analyze the frontend and backend Deployments to determine the specific requirements for the NetworkPolicy that needs to be applied.
Next, examine the NetworkPolicy YAML samples located in the ~/netpol folder.
Failure to comply may result in a reduced score.
Do not delete or modify the provided samples. Only apply one of them.
Finally, apply the NetworkPolicy that enables communication between the frontend and backend Deployments, without being overly permissive.
正解:
解説:
Task Summary
* Connect to host cka000056
* Review existing frontend and backend Deployments
* Choose one correct NetworkPolicy from the ~/netpol directory
* The policy must:
* Allow traffic only from the frontend Deployment to the backend Deployment
* Avoid being overly permissive
* Apply the correct NetworkPolicy without modifying any sample files
Step-by-Step Instructions
Step 1: SSH into the correct node
ssh cka000056
Step 2: Inspect the frontend Deployment
Check the labels used in the frontend Deployment:
kubectl get deployment -n frontend -o yaml
Look under metadata.labels or spec.template.metadata.labels. Note the app or similar label (e.g., app:
frontend).
Step 3: Inspect the backend Deployment
kubectl get deployment -n backend -o yaml
Again, find the labels assigned to the pods (e.g., app: backend).
Step 4: List and review the provided NetworkPolicies
List the available files:
ls ~/netpol
Check the contents of each policy file:
cat ~/netpol/<file-name>.yaml
Look for a policy that:
* Has kind: NetworkPolicy
* Applies to the backend namespace
* Uses a podSelector that matches the backend pods
* Includes an ingress.from rule that references the frontend namespace using a namespaceSelector (and optionally a podSelector)
* Does not allow traffic from all namespaces or all pods
Here's what to look for in a good match:
apiVersion: networking.k8s.io/v1
kind: NetworkPolicy
metadata:
name: allow-frontend-to-backend
namespace: backend
spec:
podSelector:
matchLabels:
app: backend
ingress:
- from:
- namespaceSelector:
matchLabels:
name: frontend
Even better if the policy includes:
- namespaceSelector:
matchLabels:
name: frontend
podSelector:
matchLabels:
app: frontend
This limits access to pods in the frontend namespace with a specific label.
Step 5: Apply the correct NetworkPolicy
Once you've identified the best match, apply it:
kubectl apply -f ~/netpol/<chosen-file>.yaml
Apply only one file. Do not alter or delete any existing sample.
ssh cka000056
kubectl get deployment -n frontend -o yaml
kubectl get deployment -n backend -o yaml
ls ~/netpol
cat ~/netpol/*.yaml # Review carefully
kubectl apply -f ~/netpol/<chosen-file>.yaml
Command Summary
ssh cka000056
kubectl get deployment -n frontend -o yaml
kubectl get deployment -n backend -o yaml
ls ~/netpol
cat ~/netpol/*.yaml # Review carefully
kubectl apply -f ~/netpol/<chosen-file>.yaml
質問 # 43
You are deploying a new microservice to your Kubernetes cluster. This service needs to communicate with another service within the same cluster. You want to ensure that the communication between the two services is secure and reliable. Which container network interface plugin would you choose for this scenario and why?
正解:
解説:
See the solution below with Step by Step Explanation.
Explanation:
Solution (Step by Step) :
1 . Choose the appropriate Container Network Interface Plugin:
- For secure and reliable communication between services within the same Kubernetes cluster, the Calico container network interface plugin is a recommended choice.
2. Reasons for choosing Calico:
- Security: Calico provides robust network security features like network policies that allow you to define fine- grained access control rules between pods and services. This ensures secure communication only between authorized entities.
- Reliability: Calico offers high availability and reliability. It uses a distributed architecture and supports BGP for efficient routing and load balancing, leading to resilient network connectivity.
- Ease of Use: Calico integrates seamlessly with Kubernetes and is easy to configure and manage.
- Scalability: It's highly scalable, enabling you to manage large and complex Kubernetes environments.
3. Example Implementation:
- Install Calico: Use the 'kubectl' command to install Calico on your Kubernetes cluster:
kubectl apply -f https://docs.projectcalico.org/v3.19/getting-
started/kubernetes/installation/l .8+/manifests/calico.yaml
- Define Network Policies: Create network policies to control communication between your services. Here's an example:
This policy allows pods labeled 'app: microservice? to communicate with pods labeled 'app: microservice? within the 'default' namespace. 4. Verify the Configuration: - Use 'kubectl get networkpolicies' to list the defined network policies. - Test communication between your services. Note: Calico is a popular and highly regarded choice for Kubernetes networking. However, other plugins like Flannel and Weave are also viable options, depending on your specific requirements and preferences. ,
質問 # 44
You have a Deployment named 'web-app' running 3 replicas of a web server. You need to define a PodDisruptionBudget (PDB) that ensures at least 2 replicas of the 'web-app' are always available during a planned or unplanned disruption. Write the YAML definition for the PDB and explain how it helps to ensure availability.
正解:
解説:
See the solution below with Step by Step Explanation.
Explanation:
Solution (Step by Step) :
1. PDB YAML Definition:
2. Explanation: - 'apiVersion: policy/vl Specifies the API version for the PodDisruptionBudget resource. - 'kind: PodDisruptionBudget': Specifies the type of resource, which is a PodDisruptionBudget. - 'metadata.name: web-app-pdb': Sets the name of the PDB. - 'spec.selector.matchLabels: app: web-app': This selector targets the Pods labeled with 'app: web-app' , ensuring the PDB applies to the 'web-app' Deployment's Pods. - 'spec.minAvailable: 2: Specifies the minimum number of Pods (replicas) that must remain available during a disruption. In this case, at least 2 replicas of 'web-app' must be running. 3. How it ensures availability: - Planned Disruptions: If you need to perform a maintenance operation that requires taking down a Pod, the Kubernetes scheduler will not allow it if doing so would violate the PDB. For example, if you try to delete a Pod belonging to 'web-app' , the scheduler will prevent it because deleting it would reduce the available replicas below the 'minAvailable' threshold. - Unplanned Disruptions: In case of node failures, the PDB helps to protect the application by ensuring that the minimum required number of Pods remain running on other healthy nodes. 4. Implementation: - Apply the YAML using 'kubectl apply -f web-app-pdb.yamr 5. Verification: You can verify the PDB's effectiveness by trying to delete Pods or simulate a node failure. You should observe that the scheduler prevents actions that would violate the 'minAvailable' constraint.
質問 # 45
Score: 13%
Task
A Kubernetes worker node, named wk8s-node-0 is in state NotReady. Investigate why this is the case, and perform any appropriate steps to bring the node to a Ready state, ensuring that any changes are made permanent.
正解:
解説:
Solution:
sudo -i
systemctl status kubelet
systemctl start kubelet
systemctl enable kubelet
質問 # 46
You have a Deployment named 'database-deployment' with 2 replicas of a database container. You want to implement a rolling update strategy that allows for a maximum of one pod to be unavailable at any given time. However, you also want to ensure that the database container is restarted automatically when it encounters a failure or crashes. This restart policy should be applied only to the database containers within the deployment and not affect any other containers in the same pod.
正解:
解説:
See the solution below with Step by Step Explanation.
Explanation:
Solution (Step by Step) :
1. Update the Deployment YAML:
- Update the 'replicas' to 2.
- Define 'maxUnavailable: 1' and 'maxSurge: 0' in the strategy.rollingUpdate' section to control the rolling update process.
- Configure a 'strategy.type' to 'RollingUpdate' to trigger a rolling update when the deployment is updated.
- Set 'spec.template.spec.containers[0].restartPolicy: Always' to ensure the database container restarts automatically when it encounters a failure.
2. Create the Deployment: - Apply the updated YAML file using 'kubectl apply -f database-deployment.yaml' 3. Verify the Deployment: - Check the status of the deployment using 'kubectl get deployments database-deployment' to confirm the rollout and updated replica count. 4. Test the Restart Policy: - Trigger a failure in the 'database' container within one of the pods. This can be done by sending a SIGKILL signal to the container or by simulating a crash within the container itself. - Observe that the 'database' container will be restarted automatically while other containers in the same pod will remain unaffected. 5. Trigger the Automatic Update: - Push a new image to the 'my-database-image:latest registry. 6. Monitor the Deployment: - Use "kubectl get pods -l app=database' to monitor the pod updates during the rolling update process. 7. Check for Successful Update: - Once the deployment is complete, use 'kubectl describe deployment database-deployment' to see that the 'updatedReplicas' field matches the 'replicas' field, indicating a successful update.
質問 # 47
Monitor the logs of pod foo and:
* Extract log lines corresponding to error
unable-to-access-website
* Write them to/opt/KULM00201/foo
正解:
解説:

Step 0: Set the correct Kubernetes context
If you're given a specific context (k8s in this case), you must switch to it:
kubectl config use-context k8s
## Skipping this can cause you to work in the wrong cluster/namespace and cost you marks.
Step 1: Identify the namespace of the pod foo
First, check if foo is running in a specific namespace or in the default namespace.
kubectl get pods --all-namespaces | grep foo
Assume the pod is in the default namespace if no namespace is mentioned.
Step 2: Confirm pod foo exists and is running
kubectl get pod foo
You should get output similar to:
NAME READY STATUS RESTARTS AGE
foo 1/1 Running 0 1h
If the pod is not running, logs may not be available.
Step 3: View logs and filter specific error lines
We're looking for log lines that contain:
unable-to-access-website
Command:
kubectl logs foo | grep "unable-to-access-website"
Step 4: Write the filtered log lines to a file
Redirect the output to the required path:
kubectl logs foo | grep "unable-to-access-website" > /opt/KULM00201/foo
# This creates or overwrites the file /opt/KULM00201/foo with the filtered logs.
# You may need sudo if /opt requires elevated permissions. But in most exam environments, you're already the root or privileged user.
Step 5: Verify the output file (optional but smart)
Check that the file was created and has the correct content:
cat /opt/KULM00201/foo
# Final Answer Summary:
kubectl config use-context k8s
kubectl logs foo | grep "unable-to-access-website" > /opt/KULM00201/foo
質問 # 48
Create a Pod with main container busybox and which executes this
"while true; do echo 'Hi I am from Main container' >>
/var/log/index.html; sleep 5; done" and with sidecar container
with nginx image which exposes on port 80. Use emptyDir Volume
and mount this volume on path /var/log for busybox and on path
/usr/share/nginx/html for nginx container. Verify both containers
are running.
- A. // create an initial yaml file with this
kubectl run multi-cont-pod --image=busbox --restart=Never --
dry-run -o yaml > multi-container.yaml
// edit the yml as below and create it
kubectl create -f multi-container.yaml
vim multi-container.yaml
apiVersion: v1
kind: Pod
metadata:
labels:
run: multi-cont-pod
name: multi-cont-pod
spec:
volumes:
- image: busybox
command: ["/bin/sh"]
args: ["-c", "while true; do echo 'Hi I am from Main
container' >> /var/log/index.html; sleep 5;done"]
name: main-container
volumeMounts:
- name: var-logs
mountPath: /var/log
- image: nginx
name: sidecar-container
ports:
mountPath: /usr/share/nginx/html
restartPolicy: Never
// Create Pod
kubectl apply -f multi-container.yaml
//Verify
kubectl get pods - B. // create an initial yaml file with this
kubectl run multi-cont-pod --image=busbox --restart=Never --
dry-run -o yaml > multi-container.yaml
// edit the yml as below and create it
kubectl create -f multi-container.yaml
vim multi-container.yaml
apiVersion: v1
kind: Pod
metadata:
labels:
run: multi-cont-pod
name: multi-cont-pod
spec:
volumes:
- name: var-logs
emptyDir: {}
containers:
- image: busybox
command: ["/bin/sh"]
args: ["-c", "while true; do echo 'Hi I am from Main
container' >> /var/log/index.html; sleep 5;done"]
name: main-container
volumeMounts:
- name: var-logs
mountPath: /var/log
- image: nginx
name: sidecar-container
ports:
- containerPort: 80
volumeMounts:
- name: var-logs
mountPath: /usr/share/nginx/html
restartPolicy: Never
// Create Pod
kubectl apply -f multi-container.yaml
//Verify
kubectl get pods
正解:B
質問 # 49
Create 5 nginx pods in which two of them is labeled env=prod and
three of them is labeled env=dev
- A. kubectl run nginx-dev1 --image=nginx --restart=Never --
labels=env=dev
kubectl run nginx-dev2 --image=nginx --restart=Never --
labels=env=dev
kubectl run nginx-prod1 --image=nginx --restart=Never --
labels=env=prod
kubectl run nginx-prod2 --image=nginx --restart=Never --
labels=env=prod - B. kubectl run nginx-dev1 --image=nginx --restart=Never --
labels=env=dev
kubectl run nginx-dev2 --image=nginx --restart=Never --
labels=env=dev
kubectl run nginx-dev3 --image=nginx --restart=Never --
labels=env=dev
kubectl run nginx-prod1 --image=nginx --restart=Never --
labels=env=prod
kubectl run nginx-prod2 --image=nginx --restart=Never --
labels=env=prod
正解:B
質問 # 50
......
今すぐCKA問題を使おうCKA問題集PDF:https://jp.fast2test.com/CKA-premium-file.html
問題集練習試験問題学習ガイドはCKA試験にはこれ:https://drive.google.com/open?id=1RvDZG4jdQlvfTKLS3XkRqfreTJhliFv1