

[2023年最新] リアルなRedHat問題集を使って 100%無料EX294試験問題集
リアルEX294問題集で最新のRedHat練習テスト問題集
質問 # 12
Create a jinja template in /home/sandy/ansible/ and name it hosts.j2. Edit this file so it looks like the one below. The order of the nodes doesn't matter. Then create a playbook in /home/sandy/ansible called hosts.yml and install the template on dev node at /root/myhosts
正解:
解説:
Solution as:
質問 # 13
Create a file called specs.empty in home/bob/ansible on the local machine as follows:
HOST=
MEMORY=
BIOS=
VDA_DISK_SIZE=
VDB_DISK_SIZE=
Create the playbook /home/bob/ansible/specs.yml which copies specs.empty to all remote nodes' path /root/specs.txt. Using the specs.yml playbook then edit specs.txt on the remote machines to reflect the appropriate ansible facts.
- A. Solution as:

- B. Solution as:


正解:A
質問 # 14
Create a playbook called issue.yml in /home/sandy/ansible which changes the file /etc/issue on all managed nodes: If host is a member of (lev then write "Development" If host is a member of test then write "Test" If host is a member of prod then write "Production"
- A. Solution as:

- B. Solution as:

正解:A
質問 # 15
Install and configure Ansible on the control-node control.realmX.example.com as
follows:
-------------------------------------------------------------------------------------------
--> Install the required packages
--> Create a static inventory file called /home/admin/ansible/inventory as follows:
node1.realmX.example.com is a member of the dev host group
node2.realmX.example.com is a member of the test host group
node3.realmX.example.com & node4.realmX.example.com are members of the prod
host group
node5.realmX.example.com is a member of the balancers host group.
prod group is a member of the webservers host group
--> Create a configuration file called ansible.cfg as follows:
--> The host inventory file /home/admin/ansible/inventory is defined
--> The location of roles used in playbooks is defined as /home/admin/ansible/ roles
正解:
解説:
Solution as:
Through physical host, login to workstation.lab.example.com with user root.
# ssh [email protected]
# hostname
workstation.lab.example.com
# yum install platform-python*
# su - admin
# pwd
/home/admin/
# vim .vimrc
# mkdir -p ansible/roles
# cd ansible
# vim inventory
[dev]
servera.lab.example.com
[test]
serverb.example.com
[prod]
serverc.example.com
serverd.example.com
[balancer]
serverd.lab.example.com
[webservers:children]
prod
:!wq
# vim ansible.cfg
[defaults]
inventory = ./inventory
role_path = ./roles
remote_user = admin
ask_pass = false
[privilege_escalation]
become = true
become_method = sudo
become_user = root
become_ask_pass = false
:!wq
# ansible all --list-hosts
質問 # 16
Create a playbook called timesvnc.yml in /home/sandy/ansible using rhel system role timesync. Set the time to use currently configured nip with the server 0.uk.pool.ntp.org. Enable burst. Do this on all hosts.
正解:
解説:
Solution as: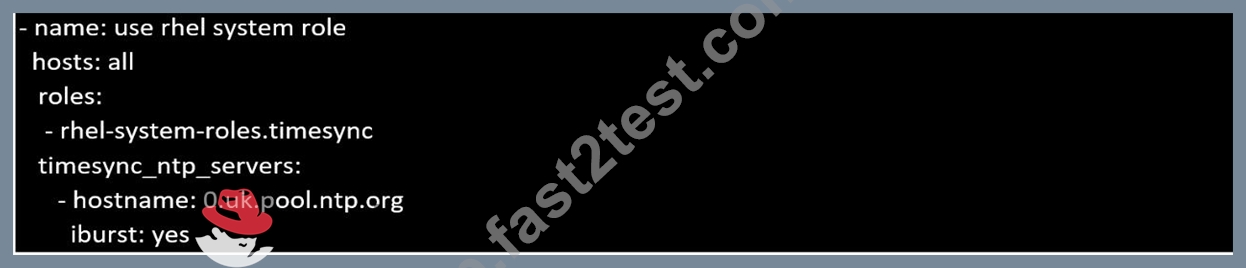
質問 # 17
Create a playbook called issue.yml in /home/sandy/ansible which changes the file /etc/issue on all managed nodes: If host is a member of (lev then write "Development" If host is a member of test then write "Test" If host is a member of prod then write "Production"
正解:
解説:
Solution as:
質問 # 18
Create user accounts
------------------------
--> A list of users to be created can be found in the file called user_list.yml
which you should download from http://classroom.example.com/user_list.yml and
save to /home/admin/ansible/
--> Using the password vault created elsewhere in this exam, create a playbook called
create_user.yml
that creates user accounts as follows:
--> Users with a job description of developer should be:
--> created on managed nodes in the "dev" and "test" host groups assigned the
password from the "dev_pass"
variable and these user should be member of supplementary group "devops".
--> Users with a job description of manager should be:
--> created on managed nodes in the "prod" host group assigned the password from
the "mgr_pass" variable
and these user should be member of supplementary group "opsmgr"
--> Passwords should use the "SHA512" hash format. Your playbook should work using
the vault password file
created elsewhere in this exam.
while practising you to create these file hear. But in exam have to download as per
questation.
user_list.yml file consist:
---
user:
- name: user1
job: developer
- name: user2
job: manager
正解:
解説:
Solution as:
# pwd
/home/admin/ansible
# wget http://classroom.example.com/user_list.yml
# cat user_list.yml
# vim create_user.yml
---
- name:
hosts: all
vars_files:
- ./user_list.yml
- ./vault.yml
tasks:
- name: creating groups
group:
name: "{{ item }}"
state: present
loop:
- devops
- opsmgr
- name: creating user
user:
name: "{{ item.name }}"
state: present
groups: devops
password: "{{ dev_pass|password_hash ('sha512') }}"
loop: "{{ user }}"
when: (inventory_hostname in groups['dev'] or inventory_hostname in
groups['test']) and item.job == "developer"
- name: creating user
user:
name: "{{ item.name }}"
state: present
groups: opsmgr
password: "{{ mgr_pass|password_hash ('sha512') }}"
loop: "{{ user }}"
when: inventory_hostname in groups['prod'] and item.job == "manager"
:wq!
# ansible-playbook create_user.yml --vault-password-file=password.txt --syntax-check
# ansible-playbook create_user.yml --vault-password-file=password.txt
質問 # 19
Create a file called packages.yml in /home/sandy/ansible to install some packages for the following hosts. On dev, prod and webservers install packages httpd, mod_ssl, and mariadb. On dev only install the development tools package. Also, on dev host update all the packages to the latest.
正解:
解説:
Solution as:
** NOTE 1 a more acceptable answer is likely 'present' since it's not asking to install the latest
state: present
** NOTE 2 need to update the development node
- name: update all packages on development node
yum:
name: '*'
state: latest
質問 # 20
Create and run an Ansible ad-hoc command.
--> As a system administrator, you will need to install software on the managed
nodes.
--> Create a shell script called yum-pack.sh that runs an Ansible ad-hoc command to
create yum-repository on each of the managed nodes as follows:
--> repository1
-----------
1. The name of the repository is EX407
2. The description is "Ex407 Description"
3. The base URL is http://content.example.com/rhel8.0/x86_64/dvd/BaseOS/
4. GPG signature checking is enabled
5. The GPG key URL is http://content.example.com/rhel8.0/x86_64/dvd/RPM-GPG-KEYredhat-
release
6. The repository is enabled
--> repository2
-----------
1. The name of the repository is EXX407
2. The description is "Exx407 Description"
3. The base URL is http://content.example.com/rhel8.0/x86_64/dvd/AppStream/
4. GPG signature checking is enabled
5. The GPG key URL is http://content.example.com/rhel8.0/x86_64/dvd/ RPM-GPG-KEYredhat-
release
6. The repository is enabled
正解:
解説:
Solution as:
# pwd
/home/admin/ansible
# vim yum-pack.sh
#!/bin/bash
ansible all -m yum_repository -a 'name=EX407 description="Ex407 Description"
baseurl=http://content.example.com/rhel8.0/x86_64/dvd/BaseOS/ gpgcheck=yes
gpgkey=http://content.example.com/rhel8.0/x86_64/dvd/RPM-GPG-KEY-redhat-release
enabled=yes'
ansible all -m yum_repository -a 'name=EXX407 description="Exx407 Description"
baseurl=http://content.example.com/rhel8.0/x86_64/dvd/AppStream/ gpgcheck=yes
gpgkey=http://content.example.com/rhel8.0/x86_64/dvd/RPM-GPG-KEY-redhat-release
enabled=yes'
:!wq
# chmod +x yum-pack.sh
# bash yum-pack.sh
# ansible all -m command -a 'yum repolist all'
質問 # 21
Create the users in the file usersjist.yml file provided. Do this in a playbook called users.yml located at /home/sandy/ansible. The passwords for these users should be set using the lock.yml file from TASK7. When running the playbook, the lock.yml file should be unlocked with secret.txt file from TASK 7.
All users with the job of 'developer' should be created on the dev hosts, add them to the group devops, their password should be set using the pw_dev variable. Likewise create users with the job of 'manager' on the proxy host and add the users to the group 'managers', their password should be set using the pw_mgr variable.
正解:
解説:
ansible-playbook users.yml -vault-password-file=secret.txt
質問 # 22
Install and configure ansible
User sandy has been created on your control node with the appropriate permissions already, do not change or modify ssh keys. Install the necessary packages to run ansible on the control node. Configure ansible.cfg to be in folder /home/sandy/ansible/ansible.cfg and configure to access remote machines via the sandy user. All roles should be in the path /home/sandy/ansible/roles. The inventory path should be in /home/sandy/ansible/invenlory.
You will have access to 5 nodes.
node1.example.com
node2.example.com
node3.example.com
node4.example.com
node5.example.com
Configure these nodes to be in an inventory file where node I is a member of group dev. nodc2 is a member of group test, node3 is a member of group proxy, nodc4 and node 5 are members of group prod. Also, prod is a member of group webservers.
正解:
解説:
In/home/sandy/ansible/ansible.cfg
[defaults]
inventory=/home/sandy/ansible/inventory
roles_path=/home/sandy/ansible/roles
remote_user= sandy
host_key_checking=false
[privilegeescalation]
become=true
become_user=root
become_method=sudo
become_ask_pass=false
In /home/sandy/ansible/inventory
[dev]
node 1 .example.com
[test]
node2.example.com
[proxy]
node3 .example.com
[prod]
node4.example.com
node5 .example.com
[webservers:children]
prod
質問 # 23
In /home/sandy/ansible/ create a playbook called logvol.yml. In the play create a logical volume called Iv0 and make it of size 1500MiB on volume group vgO If there is not enough space in the volume group print a message "Not enough space for logical volume" and then make a 800MiB Iv0 instead. If the volume group still doesn't exist, create a message "Volume group doesn't exist" Create an xfs filesystem on all Iv0 logical volumes. Don't mount the logical volume.
- A. Solution as:

- B. Solution as:
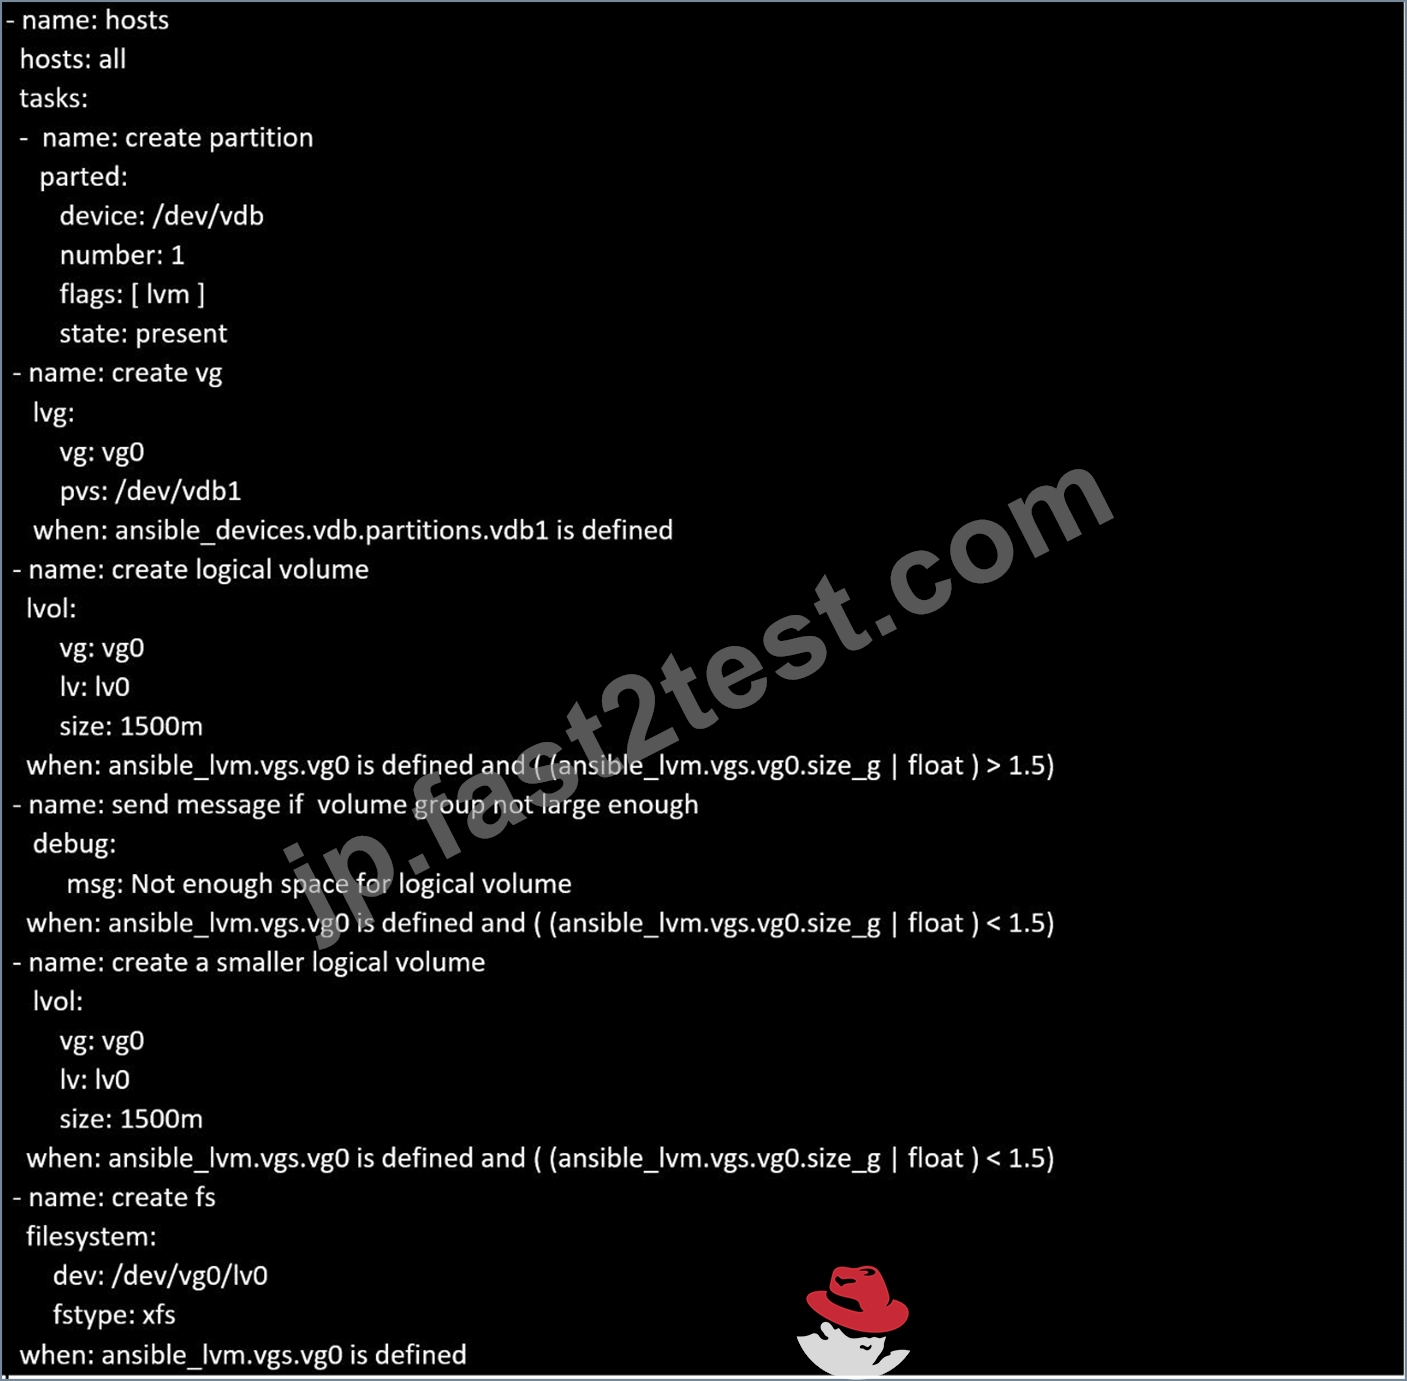
正解:B
質問 # 24
Create a file called requirements.yml in /home/sandy/ansible/roles to install two roles. The source for the first role is geerlingguy.haproxy and geerlingguy.php. Name the first haproxy-role and the second php-role. The roles should be installed in /home/sandy/ansible/roles.
- A. in /home/sandy/ansible/roles
vim requirements.yml
Run the requirements file from the roles directory:
ansible-galaxy install -r requirements.yml -p /home/sandy/ansible/roles - B. in /home/sandy/ansible/roles
vim requirements.yml
Run the requirements file from the roles directory:
ansible-galaxy install -r requirements.yml -p /home/sandy/ansible/roles
正解:A
質問 # 25
Install and configure ansible
User sandy has been created on your control node with the appropriate permissions already, do not change or modify ssh keys. Install the necessary packages to run ansible on the control node. Configure ansible.cfg to be in folder /home/sandy/ansible/ansible.cfg and configure to access remote machines via the sandy user. All roles should be in the path /home/sandy/ansible/roles. The inventory path should be in /home/sandy/ansible/invenlory.
You will have access to 5 nodes.
node1.example.com
node2.example.com
node3.example.com
node4.example.com
node5.example.com
Configure these nodes to be in an inventory file where node I is a member of group dev. nodc2 is a member of group test, node3 is a member of group proxy, nodc4 and node 5 are members of group prod. Also, prod is a member of group webservers.
- A. In/home/sandy/ansible/ansible.cfg
[defaults]
inventory=/home/sandy/ansible/inventory
roles_path=/home/sandy/ansible/roles
remote_user= sandy
host_key_checking=false
[privilegeescalation]
become=true
become_user=root
become_method=sudo
become_ask_pass=false
In /home/sandy/ansible/inventory
[dev]
node 1 .example.com
[test]
node2.example.com
[proxy]
node3 .example.com
[prod]
node4.example.com
node5 .example.com
[webservers:children]
prod - B. In/home/sandy/ansible/ansible.cfg
[defaults]
inventory=/home/sandy/ansible/inventory
roles_path=/home/sandy/ansible/roles
remote_user= sandy
host_key_checking=false
[privilegeescalation]
become=true
become_user=root
become_ask_pass=false
In /home/sandy/ansible/inventory
[dev]
node 1 .example.com
[test]
node2.example.com
node4.example.com
node5 .example.com
[webservers:children]
prod
正解:A
質問 # 26
Create a role called sample-apache in /home/sandy/ansible/roles that enables and starts httpd, enables and starts the firewall and allows the webserver service. Create a template called index.html.j2 which creates and serves a message from /var/www/html/index.html Whenever the content of the file changes, restart the webserver service.
Welcome to [FQDN] on [IP]
Replace the FQDN with the fully qualified domain name and IP with the ip address of the node using ansible facts. Lastly, create a playbook in /home/sandy/ansible/ called apache.yml and use the role to serve the index file on webserver hosts.
正解:
解説:
/home/sandy/ansible/apache.yml
/home/sandy/ansible/roles/sample-apache/tasks/main.yml
/home/sandy/ansible/roles/sample-apache/templates/index.html.j2
In /home/sandy/ansible/roles/sample-apache/handlers/main.yml
質問 # 27
Create a playbook /home/bob /ansible/motd.yml that runs on all inventory hosts and docs the following: The playbook should replaee any existing content of/etc/motd in the following text. Use ansible facts to display the FQDN of each host
On hosts in the dev host group the line should be "Welcome to Dev Server FQDN".
On hosts in the webserver host group the line should be "Welcome to Apache Server FQDN".
On hosts in the database host group the line should be "Welcome to MySQL Server FQDN".
正解:
解説:
/home/sandy/ansible/apache.yml
/home/sandy/ansible/roles/sample-apache/tasks/main.yml
Topic 2, LAB SETUP - 2
control.realmX.example.com _ workstation.lab.example.com
node1.realmX.example.com _ servera.lab.example.com
node2.realmX.example.com _ serverb.lab.example.com
node3.realmX.example.com _ serverc.lab.example.com
node4.realmX.example.com _ serverd.lab.example.com
node5.realmX.example.com
- username:root, password:redhat
- username:admin, password:redhat
note1. don't change 'root' or 'admin' password.
note2. no need to create ssh-keygen for access, its pre-defined
note3. SELinux is in enforcing mode and firewalld is disabled/stop on whole managed hosts.
質問 # 28
Create a role called apache in "/home/admin/ansible/roles" with the following
requirements:
--> The httpd package is installed, enabled on boot, and started.
--> The firewall is enabled and running with a rule to allow access to the web server.
--> template file index.html.j2 is used to create the file /var/www/html/index.html
with the output:
Welcome to HOSTNAME on IPADDRESS
--> Where HOSTNAME is the fqdn of the managed node and IPADDRESS is the IP-Address of
the managed node.
note: you have to create index.html.j2 file.
--> Create a playbook called httpd.yml that uses this role and the playbook runs on
hosts in the webservers host group.
正解:
解説:
Solution as:
----------
# pwd
/home/admin/ansible/roles/
# ansible-galaxy init apache
# vim apache/vars/main.yml
---
# vars file for apache
http_pkg: httpd
firewall_pkg: firewalld
http_srv: httpd
firewall_srv: firewalld
rule: http
webpage: /var/www/html/index.html
template: index.html.j2
:wq!
# vim apache/tasks/package.yml
---
- name: Installing packages
yum:
name:
- "{{http_pkg}}"
- "{{firewall_pkg}}"
state: latest
:wq!
# vim apache/tasks/service.yml
---
- name: start and enable http service
service:
name: "{{http_srv}}"
enabled: true
state: started
- name: start and enable firewall service
service:
name: "{{firewall_srv}}"
enabled: true
state: started
:wq!
# vim apache/tasks/firewall.yml
---
- name: Adding http service to firewall
firewalld:
service: "{{rule}}"
state: enabled
permanent: true
immediate: true
:wq!
# vim apache/tasks/webpage.yml
---
- name: creating template file
template:
src: "{{template}}"
dest: "{{webpage}}"
notify: restart_httpd
!wq
# vim apache/tasks/main.yml
# tasks file for apache
- import_tasks: package.yml
- import_tasks: service.yml
- import_tasks: firewall.yml
- import_tasks: webpage.yml
:wq!
# vim apache/templates/index.html.j2
Welcome to {{ ansible_facts.fqdn }} on {{ ansible_facts.default_ipv4.address }}
# vim apache/handlers/main.yml
---
# handlers file for apache
- name: restart_httpd
service:
name: httpd
state: restarted
:wq!
# cd ..
# pwd
/home/admin/ansible/
# vim httpd.yml
---
- name: Including apache role
hosts: webservers
pre_tasks:
- name: pretask message
debug:
msg: 'Ensure webserver configuration'
roles:
- ./roles/apache
post_tasks:
- name: Check webserver
uri:
url: "http://{{ ansible_facts.default_ipv4.address }}"
return_content: yes
status_code: 200
:wq!
# ansible-playbook httpd.yml --syntax-check
# ansible-playbook httpd.yml
# curl http://serverx
質問 # 29
Rekey an existing Ansible vault as follows:
-----------------------------------------------
* Download Ansible vault from http:// classroom.example.com /secret.yml to /home/
admin/ansible/
* The current vault password is curabete
* The new vault password is newvare
* The vault remains in an encrypted state with the new password
正解:
解説:
Solution as:
# pwd
/home/admin/ansible/
# wget http://classroom.example.com/secret.yml
# chmod 0600 newpassword.txt
# ansible-vault rekey vault.yml --new-vault-password-file=newpassword.txt
質問 # 30
Create an empty encrypted file called myvault.yml in /home/sandy/ansible and set the password to notsafepw. Rekey the password to iwejfj2331.
- A. ansible-vault create myvault.yml
Create new password: notsafepw Confirm password: notsafepw ansible-vault rekey myvault.yml Current password: notsafepw New password: iwejfj2331 Confirm password: iwejfj2221 - B. ansible-vault create myvault.yml
Create new password: notsafepw Confirm password: notsafepw ansible-vault rekey myvault.yml Current password: notsafepw New password: iwejfj2221 Confirm password: iwejfj2221
正解:B
質問 # 31
Create a file called requirements.yml in /home/sandy/ansible/roles a file called role.yml in /home/sandy/ansible/. The haproxy-role should be used on the proxy host. And when you curl http://node3.example.com it should display "Welcome to node4.example.com" and when you curl again "Welcome to node5.example.com" The php-role should be used on the prod host.
正解:
解説:
Solution as:
Check the proxy host by curl http://node3.example.com
質問 # 32
Modify file content.
------------------------
Create a playbook called /home/admin/ansible/modify.yml as follows:
* The playbook runs on all inventory hosts
* The playbook replaces the contents of /etc/issue with a single line of text as
follows:
--> On hosts in the dev host group, the line reads: "Development"
--> On hosts in the test host group, the line reads: "Test"
--> On hosts in the prod host group, the line reads: "Production"
正解:
解説:
Solution as:
# pwd
/home/admin/ansible
# vim modify.yml
---
- name:
hosts: all
tasks:
- name:
copy:
content: "Development"
dest: /etc/issue
when: inventory_hostname in groups['dev']
- name:
copy:
content: "Test"
dest: /etc/issue
when: inventory_hostname in groups['test']
- name:
copy:
content: "Production"
dest: /etc/issue
when: inventory_hostname in groups['prod']
:wq
# ansible-playbook modify.yml --syntax-check
# ansible-playbook modify.yml
質問 # 33
......
EX294問題集PDFでEX294リアルな試験問題アンサー:https://jp.fast2test.com/EX294-premium-file.html
EX294試験 [2023年最新] 問題集でRedHatのPDF問題:https://drive.google.com/open?id=1HbWzGLmL0OkPab8RDvqCVQ7QSKRFxxPZ