

2023年最新の実際のFast2test EX294問題集PDFで100%合格率を保証します
無料RedHat EX294試験問題と解答
Red Hat EX294は、Red Hat Enterprise Linux 8向けのRed Hat Certified Engineer(RHCE)試験としても知られる認定試験で、Red Hat Enterprise Linux 8で作業するITプロフェッショナルのスキルと知識を検証することを目的としています。この試験は、複雑なマルチユーザーシステムを管理し、Red Hat Enterprise Linux環境で高度な管理タスクを実行する能力を証明したい経験豊富なLinuxシステム管理者を対象としています。
RedHat EX294試験は、Red Hat Enterprise Linux 8システムの管理と運用のスキルを証明したいITプロフェッショナルを対象としています。この試験は、システム管理に関連する実世界のタスクを実行できる能力をテストするパフォーマンスベースの試験です。試験は、ネットワークサービス、セキュリティ、ストレージ、仮想化の管理と設定における受験者の熟練度を評価するように設計されています。この試験に合格すると、Red Hat Certified Engineer(RHCE)認定を取得し、業界で広く認知され、Red Hat Enterprise Linuxシステムの管理と運用の専門知識を持つことが証明されます。
質問 # 15
Create user accounts
------------------------
--> A list of users to be created can be found in the file called user_list.yml
which you should download from http://classroom.example.com/user_list.yml and
save to /home/admin/ansible/
--> Using the password vault created elsewhere in this exam, create a playbook called
create_user.yml
that creates user accounts as follows:
--> Users with a job description of developer should be:
--> created on managed nodes in the "dev" and "test" host groups assigned the
password from the "dev_pass"
variable and these user should be member of supplementary group "devops".
--> Users with a job description of manager should be:
--> created on managed nodes in the "prod" host group assigned the password from
the "mgr_pass" variable
and these user should be member of supplementary group "opsmgr"
--> Passwords should use the "SHA512" hash format. Your playbook should work using
the vault password file
created elsewhere in this exam.
while practising you to create these file hear. But in exam have to download as per
questation.
user_list.yml file consist:
---
user:
- name: user1
job: developer
- name: user2
job: manager
正解:
解説:
Solution as:
# pwd
/home/admin/ansible
# wget http://classroom.example.com/user_list.yml
# cat user_list.yml
# vim create_user.yml
---
- name:
hosts: all
vars_files:
- ./user_list.yml
- ./vault.yml
tasks:
- name: creating groups
group:
name: "{{ item }}"
state: present
loop:
- devops
- opsmgr
- name: creating user
user:
name: "{{ item.name }}"
state: present
groups: devops
password: "{{ dev_pass|password_hash ('sha512') }}"
loop: "{{ user }}"
when: (inventory_hostname in groups['dev'] or inventory_hostname in
groups['test']) and item.job == "developer"
- name: creating user
user:
name: "{{ item.name }}"
state: present
groups: opsmgr
password: "{{ mgr_pass|password_hash ('sha512') }}"
loop: "{{ user }}"
when: inventory_hostname in groups['prod'] and item.job == "manager"
:wq!
# ansible-playbook create_user.yml --vault-password-file=password.txt --syntax-check
# ansible-playbook create_user.yml --vault-password-file=password.txt
質問 # 16
Create an empty encrypted file called myvault.yml in /home/sandy/ansible and set the password to notsafepw. Rekey the password to iwejfj2331.
- A. ansible-vault create myvault.yml
Create new password: notsafepw Confirm password: notsafepw ansible-vault rekey myvault.yml Current password: notsafepw New password: iwejfj2221 Confirm password: iwejfj2221 - B. ansible-vault create myvault.yml
Create new password: notsafepw Confirm password: notsafepw ansible-vault rekey myvault.yml Current password: notsafepw New password: iwejfj2331 Confirm password: iwejfj2221
正解:A
質問 # 17
Create a file called adhoc.sh in /home/sandy/ansible which will use adhoc commands to set up a new repository.
The name of the repo will be 'EPEL' the description 'RHEL8' the baseurl is 'https://dl.fedoraproject.org/pub/epel/epel-release-latest-8.noarch.rmp' there is no gpgcheck, but you should enable the repo.
* You should be able to use an bash script using adhoc commands to enable repos.
Depending on your lab setup, you may need to make this repo "state=absent" after you pass this task.
正解:
解説:
chmod 0777 adhoc.sh
vim adhoc.sh
#I/bin/bash
ansible all -m yum_repository -a 'name=EPEL description=RHEL8
baseurl=https://dl.fedoraproject.org/pub/epel/epel-release-latest-8.noarch.rmp
gpgcheck=no enabled=yes'
質問 # 18
Create a playbook called regulartasks.yml which has the system that append the date to /root/datefile every day at noon. Name is job 'datejob'
- A. Solution as:

- B. Solution as:

正解:B
質問 # 19
Create the users in the file usersjist.yml file provided. Do this in a playbook called users.yml located at /home/sandy/ansible. The passwords for these users should be set using the lock.yml file from TASK7. When running the playbook, the lock.yml file should be unlocked with secret.txt file from TASK 7.
All users with the job of 'developer' should be created on the dev hosts, add them to the group devops, their password should be set using the pw_dev variable. Likewise create users with the job of 'manager' on the proxy host and add the users to the group 'managers', their password should be set using the pw_mgr variable.
正解:
解説:
ansible-playbook users.yml -vault-password-file=secret.txt
質問 # 20
Modify file content.
------------------------
Create a playbook called /home/admin/ansible/modify.yml as follows:
* The playbook runs on all inventory hosts
* The playbook replaces the contents of /etc/issue with a single line of text as
follows:
--> On hosts in the dev host group, the line reads: "Development"
--> On hosts in the test host group, the line reads: "Test"
--> On hosts in the prod host group, the line reads: "Production"
正解:
解説:
Solution as:
# pwd
/home/admin/ansible
# vim modify.yml
---
- name:
hosts: all
tasks:
- name:
copy:
content: "Development"
dest: /etc/issue
when: inventory_hostname in groups['dev']
- name:
copy:
content: "Test"
dest: /etc/issue
when: inventory_hostname in groups['test']
- name:
copy:
content: "Production"
dest: /etc/issue
when: inventory_hostname in groups['prod']
:wq
# ansible-playbook modify.yml --syntax-check
# ansible-playbook modify.yml
質問 # 21
Create a file in /home/sandy/ansible/ called report.yml. Using this playbook, get a file called report.txt (make it look exactly as below). Copy this file over to all remote hosts at /root/report.txt. Then edit the lines in the file to provide the real information of the hosts. If a disk does not exist then write NONE.
正解:
解説:
Solution as:

質問 # 22
Create an ansible vault password file called lock.yml with the password reallysafepw in the /home/sandy/ansible directory. In the lock.yml file define two variables. One is pw_dev and the password is 'dev' and the other is pw_mgr and the password is 'mgr' Create a regular file called secret.txt which contains the password for lock.yml.
正解:
解説:
ansible-vault create lock.yml
New Vault Password: reallysafepw
Confirm: reallysafepw
質問 # 23
Create a role called sample-apache in /home/sandy/ansible/roles that enables and starts httpd, enables and starts the firewall and allows the webserver service. Create a template called index.html.j2 which creates and serves a message from /var/www/html/index.html Whenever the content of the file changes, restart the webserver service.
Welcome to [FQDN] on [IP]
Replace the FQDN with the fully qualified domain name and IP with the ip address of the node using ansible facts. Lastly, create a playbook in /home/sandy/ansible/ called apache.yml and use the role to serve the index file on webserver hosts.
- A. Option

/home/sandy/ansible/roles/sample-apache/tasks/main.yml
/home/sandy/ansible/roles/sample-apache/templates/index.html.j2
In /home/sandy/ansible/roles/sample-apache/handlers/main.yml
- B. Option
/home/sandy/ansible/roles/sample-apache/tasks/main.yml
/home/sandy/ansible/roles/sample-apache/templates/index.html.j2
In /home/sandy/ansible/roles/sample-apache/handlers/main.yml
正解:A
質問 # 24
Create a playbook that changes the default target on all nodes to multi-user tarqet. Do this in playbook file called target.yml in /home/sandy/ansible
- A. - name: change default target
hosts: all
- name: change target
file:
src: /usr/lib/systemd/system/multi-user.target dest: /etc/systemd/system/default.target state: link - B. - name: change default target
hosts: all
tasks:
- name: change target
file:
src: /usr/lib/systemd/system/multi-user.target dest: /etc/systemd/system/default.target state: link
正解:B
質問 # 25
Create an Ansible vault to store user passwords as follows:
* The name of the vault is valut.yml
* The vault contains two variables as follows:
- dev_pass with value wakennym
- mgr_pass with value rocky
* The password to encrypt and decrypt the vault is atenorth
* The password is stored in the file /home/admin/ansible/password.txt
正解:
解説:
Solution as:
# pwd
/home/admin/ansible
# echo "atenorth" >password.txt
# chmod 0600 password.txt
# ansible-vault create vault.yml --vault-password-file=password.txt
---
- dev_pass: wakennym
- mgr_pass: rocky
:wq
# cat vault.yml
$ANSIBLE_VAULT;1.1;AES256
36383862376164316436353665343765643331393433373564613762666531313034336438353662
3464346331346461306337633632393563643531376139610a343531326130663266613533633562
38623439316631306463623761343939373263333134353264333834353264343934373765643737
3535303630626666370a643663366634383863393338616661666632353139306436316430616334
65386134393363643133363738656130636532346431376265613066326162643437643064313863
6633333537303334333437646163343666666132316639376531
# ansible-vault view vault.yml
password:******
---
- dev_pass: wakennym
- mgr_pass: rocky
質問 # 26
Create a playbook called timesvnc.yml in /home/sandy/ansible using rhel system role timesync. Set the time to use currently configured nip with the server 0.uk.pool.ntp.org. Enable burst. Do this on all hosts.
正解:
解説:
Solution as: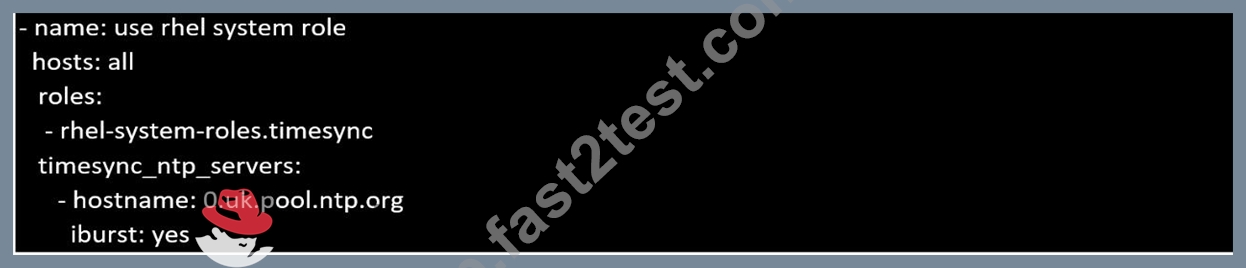
質問 # 27
Create a file called requirements.yml in /home/sandy/ansible/roles a file called role.yml in /home/sandy/ansible/. The haproxy-role should be used on the proxy host. And when you curl http://node3.example.com it should display "Welcome to node4.example.com" and when you curl again "Welcome to node5.example.com" The php-role should be used on the prod host.
正解:
解説:
Solution as:
Check the proxy host by curl http://node3.example.com
質問 # 28
Create a file called requirements.yml in /home/sandy/ansible/roles to install two roles. The source for the first role is geerlingguy.haproxy and geerlingguy.php. Name the first haproxy-role and the second php-role. The roles should be installed in /home/sandy/ansible/roles.
- A. in /home/sandy/ansible/roles
vim requirements.yml
Run the requirements file from the roles directory:
ansible-galaxy install -r requirements.yml -p /home/sandy/ansible/roles - B. in /home/sandy/ansible/roles
vim requirements.yml
Run the requirements file from the roles directory:
ansible-galaxy install -r requirements.yml -p /home/sandy/ansible/roles
正解:B
質問 # 29
Create a playbook called webdev.yml in 'home/sandy/ansible. The playbook will create a directory Avcbdev on dev host. The permission of the directory are 2755 and owner is webdev. Create a symbolic link from /Webdev to /var/www/html/webdev. Serve a file from Avebdev7index.html which displays the text "Development" Curl http://node1.example.com/webdev/index.html to test
- A. Solution as:

- B. Solution as:

正解:B
質問 # 30
Use Ansible Galaxy with a requirements file called /home/admin/ansible/roles/
install.yml to download and install roles to /home/admin/ansible/roles from the
following URLs:
http:// classroom.example.com /role1.tar.gz The name of this role should be balancer
http:// classroom.example.com /role2.tar.gz The name of this role should be phphello
正解:
解説:
Solution as:
# pwd
/home/admin/ansible/roles
# vim install.yml
---
- src: http://classroom.example.com/role1.tar.gz
name: balancer
- src: http://classroom.example.com/role2.tar.gz
name: phphello
:wq!
# pwd
/home/admin/ansible
# ansible-galaxy install -r roles/install.yml -p roles
質問 # 31
In /home/sandy/ansible/ create a playbook called logvol.yml. In the play create a logical volume called Iv0 and make it of size 1500MiB on volume group vgO If there is not enough space in the volume group print a message "Not enough space for logical volume" and then make a 800MiB Iv0 instead. If the volume group still doesn't exist, create a message "Volume group doesn't exist" Create an xfs filesystem on all Iv0 logical volumes. Don't mount the logical volume.
正解:
解説:
Solution as: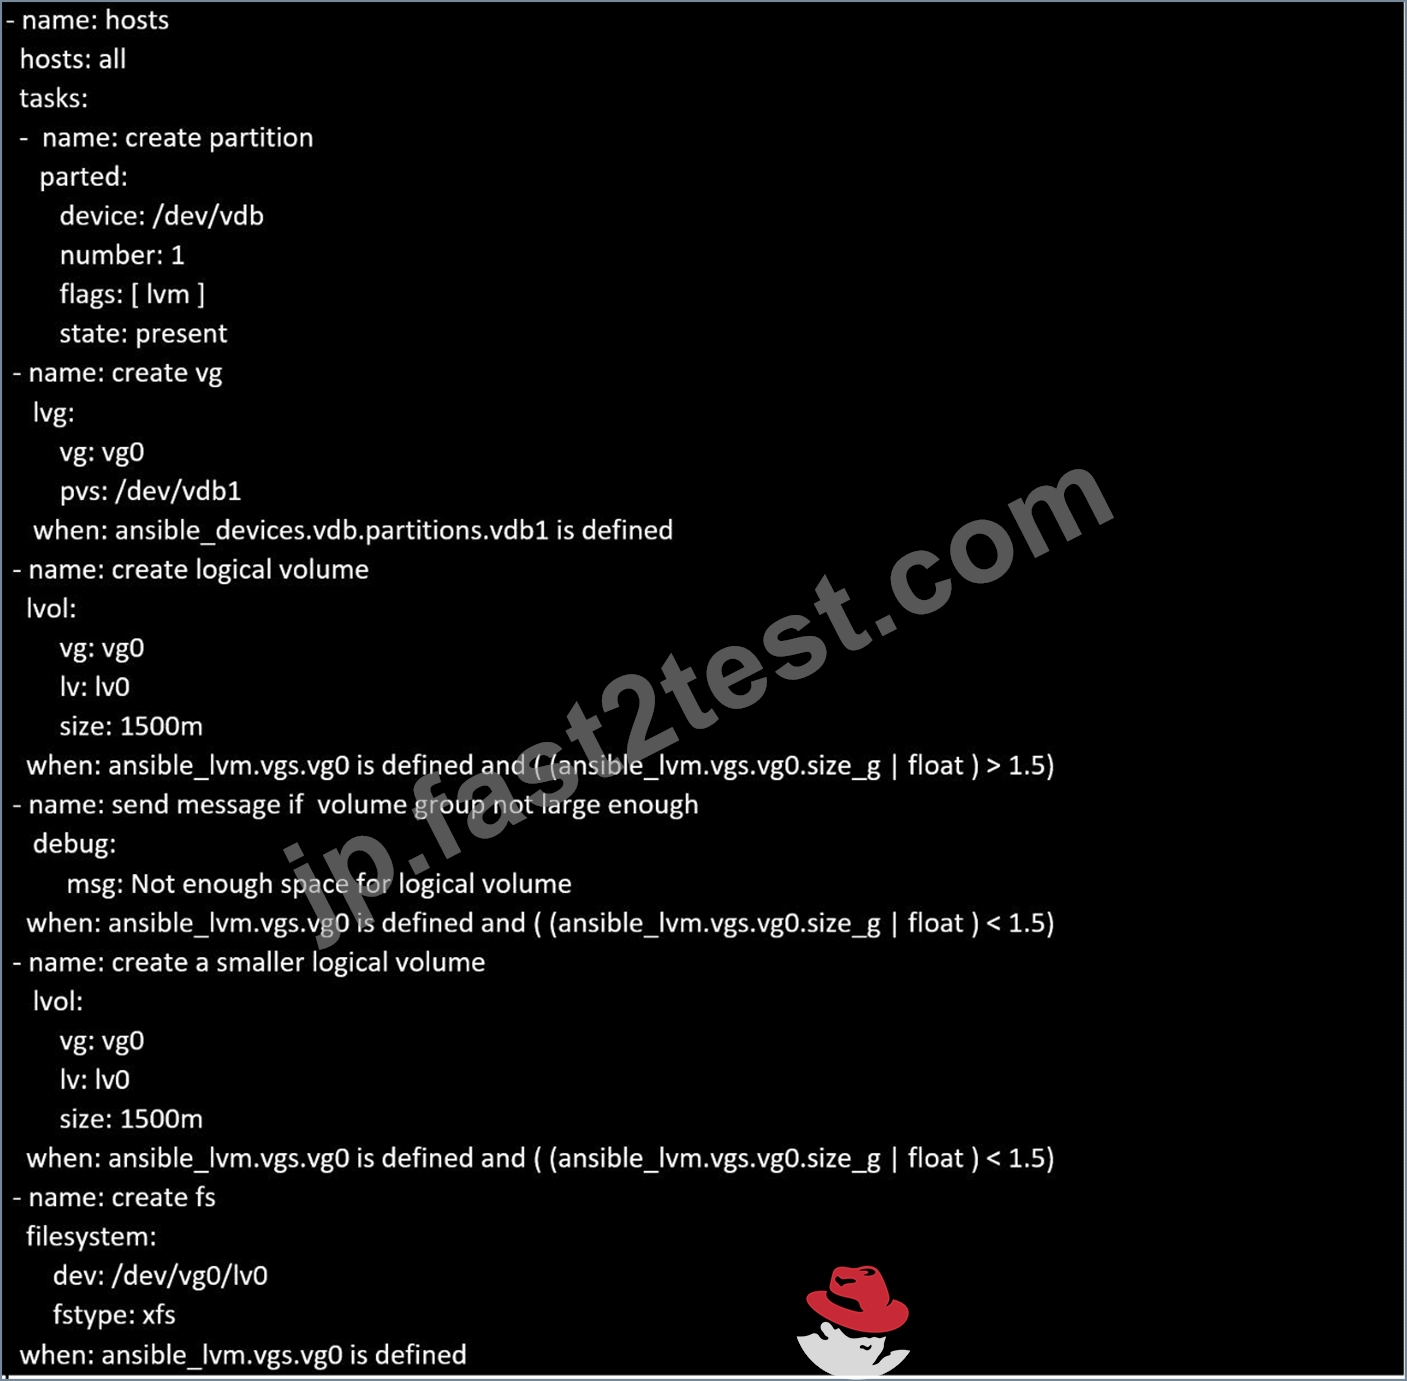
Topic 1, LAB SETUP
You will need to set up your lab by creating 5 managed nodes and one control node.
So 6 machines total. Download the free RHEL8 iso from Red Hat Developers website.
***Control node you need to set up***
You need to create some static ips on your managed nodes then on the control node set them up in the
/etc/hosts file as follows:
vim /etc/hosts
10.0.2.21 node1.example.com
10.0.2.22 node2.example.com
10.0.2.23 node3.example.com
10.0.2.24 node4.example.com
10.0.2.25 node5.example.com
yum -y install ansible
useradd ansible
echo password | passwd --stdin ansible
echo "ansible ALL=(ALL) NOPASSWD:ALL
su - ansible; ssh-keygen
ssh-copy-id node1.example.com
ssh-copy-id node2.example.com
ssh-copy-id node3.example.com
ssh-copy-id node4.example.com
ssh-copy-id node5.example.com
***Each manage node setup***
First, add an extra 2GB virtual harddisk to each control node 1,2,3. Then add an extra hard disk to control
node 4. Do not add an extra hard disk to node 5. When you start up these machines the extra disks should be
automatically located at /dev/sdb (or /dev/vdb depending on your hypervisor).
useradd ansible
echo password | passwd --stdin ansible
echo "ansible ALL=(ALL) NOPASSWD:ALL" > /etc/sudoers.d/ansible
Note python3 should be installed by default, however if it is not then on both the control node and managed
nodes you can install it also set the default python3 if you are having trouble with python2 being the default.
yum -y install python3
alternatives --set python /usr/bin/python3
All machines need the repos available. You did this in RHSCA. To set up locally you just need to do the same
for each machine. Attach the rhel8 iso as a disk to virtualbox, kvm or whatever hypervisor you are using (this
will be /dev/sr0). Then inside the machine:
mount /dev/sr0 to /mnt
Then you will have all the files from the iso in /mnt.
mkdir /repo
cp -r /mnt /repo
vim /etc/yum.repos.d/base.repo
Inside this file:
[baseos]
name=baseos
baseurl=file:///repo/BaseOS
gpgcheck=0
Also the appstream
vim /etc/yum.repos.d/appstream.repo
Inside this file:
[appstream]
name=appstream
baseurl=file:///repo/AppStream
gpgcheck=0
質問 # 32
Create a playbook called balance.yml as follows:
* The playbook contains a play that runs on hosts in balancers host group and uses
the balancer role.
--> This role configures a service to loadbalance webserver requests between hosts
in the webservers host group.curl
--> When implemented, browsing to hosts in the balancers host group (for example
http://node5.example.com) should produce the following output:
Welcome to node3.example.com on 192.168.10.z
--> Reloading the browser should return output from the alternate web server:
Welcome to node4.example.com on 192.168.10.a
* The playbook contains a play that runs on hosts in webservers host group and uses
the phphello role.
--> When implemented, browsing to hosts in the webservers host group with the URL /
hello.php should produce the following output:
Hello PHP World from FQDN
--> where FQDN is the fully qualified domain name of the host. For example,
browsing to http://node3.example.com/hello.php, should produce the following output:
Hello PHP World from node3.example.com
* Similarly, browsing to http://node4.example.com/hello.php, should produce the
following output:
Hello PHP World from node4.example.com
正解:
解説:
Solution as:
# pwd
/home/admin/ansible/
# vim balancer.yml
---
- name: Including phphello role
hosts: webservers
roles:
- ./roles/phphello
- name: Including balancer role
hosts: balancer
roles:
- ./roles/balancer
:wq!
# ansible-playbook balancer.yml --syntax-check
# ansible-playbook balancer.yml
質問 # 33
Create a playbook called issue.yml in /home/sandy/ansible which changes the file /etc/issue on all managed nodes: If host is a member of (lev then write "Development" If host is a member of test then write "Test" If host is a member of prod then write "Production"
正解:
解説:
Solution as:
質問 # 34
Create a file called packages.yml in /home/sandy/ansible to install some packages for the following hosts. On dev, prod and webservers install packages httpd, mod_ssl, and mariadb. On dev only install the development tools package. Also, on dev host update all the packages to the latest.
正解:
解説:
Solution as:
** NOTE 1 a more acceptable answer is likely 'present' since it's not asking to install the latest
state: present
** NOTE 2 need to update the development node
- name: update all packages on development node
yum:
name: '*'
state: latest
質問 # 35
......
Redhat Ex294認定試験は、企業環境でRed Hat Enterprise Linux 8の展開と管理におけるIT専門家のスキルと知識をテストするように設計されています。この認定は、Linuxシステム管理とエンジニアリングでのキャリアを進歩させようとしている人々にとって貴重な資格です。試験に合格すると、候補者は、企業環境のニーズを満たすためにRed Hat Enterprise Linux 8システムを管理および構成するために必要なスキルを持っていることを示しています。
検証済みEX294問題集と解答で最新EX294をダウンロード:https://jp.fast2test.com/EX294-premium-file.html
更新された100%カバー率でリアルEX294試験問題で100%合格保証が付きます:https://drive.google.com/open?id=1HbWzGLmL0OkPab8RDvqCVQ7QSKRFxxPZ