

[2022年02月]更新のCKA問題集完全版解答でKubernetes Administrator試験学習ガイド
試験問題と解答CKA学習ガイド
質問 29
Watch the job that runs 10 times one by one and verify 10 pods are created and delete those after it's completed
正解:
解説:
kubectl get job -w kubectl get po kubectl delete job hello-job
質問 30
Create the service as type NodePort with the port 32767 for the nginx pod with the pod selector app: my-nginx
正解:
解説:
kubectl run nginx --image=nginx --restart=Never -- labels=app=nginx --port=80 --dry-run -o yaml > nginx-pod.yaml
質問 31
Fix a node that shows as non-ready
- A. Kubectl get nodes
// Check which node shows a not ready
kubectl describe nodes "node-name"
// Login to the node which shows as not ready and check the
systemctl start kubelet / docker
// Verify
ps -auxxww | grep -i "process-name"
kubectl get nodes - B. Kubectl get nodes
// Check which node shows a not ready
kubectl describe nodes "node-name"
// Login to the node which shows as not ready and check the
process for kubelet, docker , kube-proxy.
// systemctl status kubelet (or) ps -aux | grep -i "processname"
// If the process is not started, then start using
systemctl start kubelet / docker
// Verify
ps -auxxww | grep -i "process-name"
kubectl get nodes
正解: B
質問 32
Get list of all pods in all namespaces and write it to file "/opt/pods-list.yaml"
正解:
解説:
kubectl get po -all-namespaces > /opt/pods-list.yaml
質問 33
Create a pod that echo "hello world" and then exists. Have the pod deleted automatically when it's completed
正解:
解説:
See the solution below.
Explanation
kubectl run busybox --image=busybox -it --rm --restart=Never --
/bin/sh -c 'echo hello world'
kubectl get po # You shouldn't see pod with the name "busybox"
質問 34
Perform the following tasks:
* Add an init container tohungry-bear(which has beendefined in spec file
/opt/KUCC00108/pod-spec-KUCC00108.yaml)
* The init container should createan empty file named/workdir/calm.txt
* If/workdir/calm.txtis notdetected, the pod should exit
* Once the spec file has beenupdatedwith the init containerdefinition, the pod should becreated
正解:
解説:
See the solution below.
Explanation
solution


質問 35
Change the Image version back to 1.17.1 for the pod you just updated and observe the changes
正解:
解説:
kubectl set image pod/nginx nginx=nginx:1.17.1 kubectl describe po nginx kubectl get po nginx -w # watch it
質問 36
List all persistent volumes sorted bycapacity, saving the fullkubectloutput to
/opt/KUCC00102/volume_list. Usekubectl 's own functionality forsorting the output, and do not manipulate it any further.
正解:
解説:
See the solution below.
Explanation
solution
質問 37
Evict all existing pods from a node-1 and make the node unschedulable for new pods.
- A. kubectl get nodes
kubectl drain node-1 #It will evict pods running on node-1 to
other nodes in the cluster
kubectl cordon node-1 # New pods cannot be scheduled to the
node
// Verify
kubectl get no
When you cordon a node, the status shows "SchedulingDisabled" - B. kubectl get nodes
kubectl drain node-1 #It will evict pods running on node-1 to
other nodes in the cluster
// Verify
kubectl get no
When you cordon a node, the status shows "SchedulingDisabled"
正解: A
質問 38
Create an nginx pod and set an env value as 'var1=val1'. Check the env value existence within the pod
- A. kubectl run nginx --image=nginx --restart=Never --env=var1=val1
# then
kubectl exec -it nginx -- env
# or
kubectl exec -it nginx -- sh -c 'echo $var1'
# or
kubectl describe po nginx | grep val1
# or
kubectl run nginx --restart=Never --image=nginx --env=var1=val1
-it --rm - env - B. kubectl run nginx --image=nginx --restart=Never --env=var1=val1
# then
kubectl exec -it nginx -- env
# or
kubectl run nginx --restart=Never --image=nginx --env=var1=val1
-it --rm -- env
正解: A
質問 39
Create a pod with environment variables as var1=value1.Check the environment variable in pod
- A. kubectl run nginx --image=nginx --restart=Never --env=var1=value1
# then
kubectl exec -it nginx -- env
# or
kubectl describe po nginx | grep value1 - B. kubectl run nginx --image=nginx --restart=Never --env=var1=value1
# then
kubectl exec -it nginx -- env
# or
kubectl exec -it nginx -- sh -c 'echo $var1'
# or
kubectl describe po nginx | grep value1
正解: B
質問 40
List pod logs named "frontend" and search for the pattern "started" and write it to a file "/opt/error-logs"
正解:
解説:
See the solution below.
Explanation
Kubectl logs frontend | grep -i "started" > /opt/error-logs
質問 41
Create a pod as follows:
Name: non-persistent-redis
container Image: redis
Volume with name: cache-control
Mount path: /data/redis
The pod should launch in the staging be persistent.
正解:
解説:
See the solution below.
Explanation
solution
F:\Work\Data Entry Work\Data Entry\20200827\CKA\13 B.JPG
F:\Work\Data Entry Work\Data Entry\20200827\CKA\13 C.JPG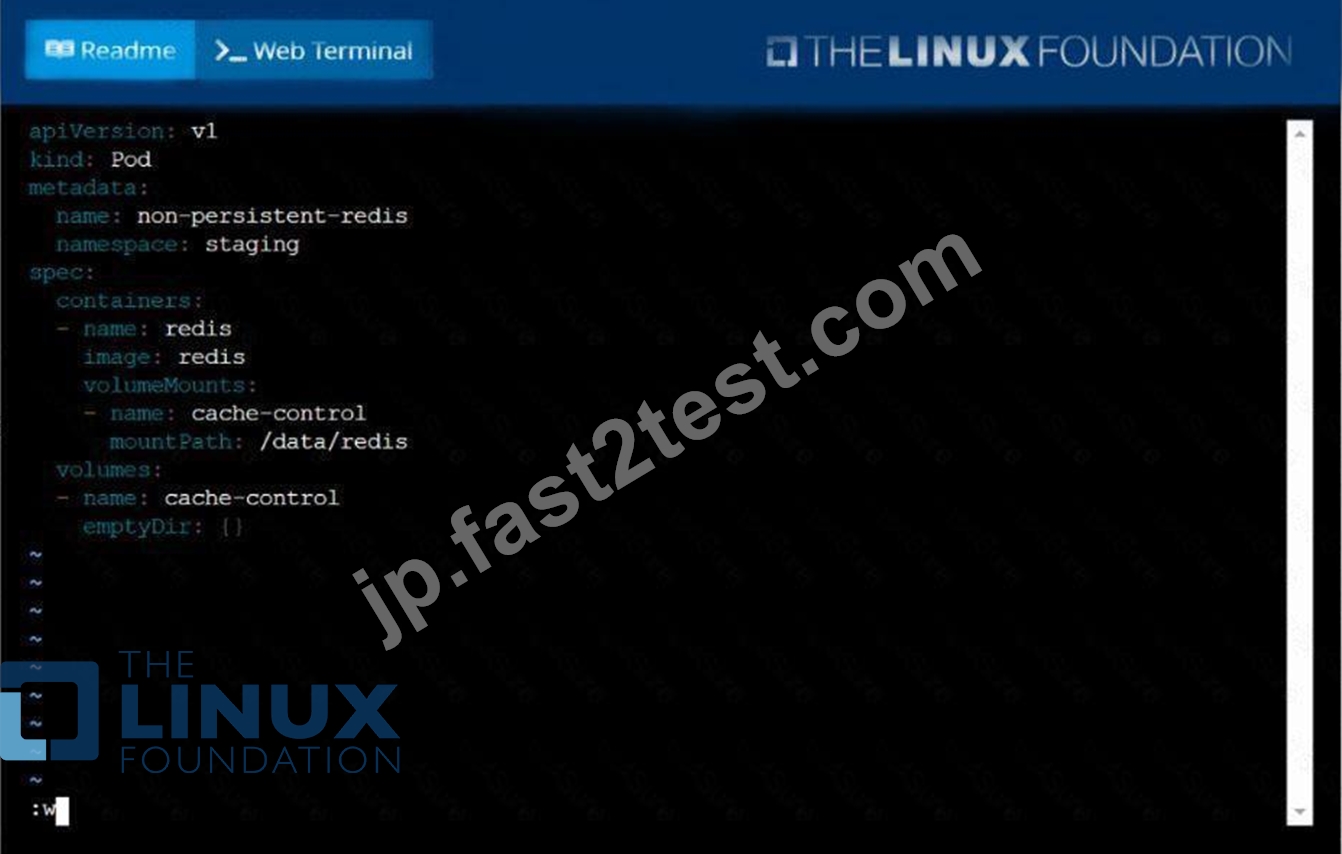
F:\Work\Data Entry Work\Data Entry\20200827\CKA\13 D.JPG
質問 42
Create a daemonset named "Prometheus-monitoring" using image=prom/Prometheus which runs in all the nodes in the cluster. Verify the pod running in all the nodes
- A. vim promo-ds.yaml
apiVersion: apps/v1
kind: DaemonSet
metadata:
name: prometheus-monitoring
spec:
selector:
matchLabels:
name: prometheus
template:
metadata:
labels:
name: prometheus
spec:
tolerations:
# remove it if your masters can't run pods
- key: node-role.kubernetes.io/master
effect: NoSchedule
containers:
- name: prometheus-container
image: prom/prometheus
volumeMounts:
- name: varlog
mountPath: /var/log
- name: varlibdockercontainers
mountPath: /var/lib/docker/containers
readOnly: true
volumes:
- name: varlog
emptyDir: {}
- name: varlibdockercontainers
emptyDir: {}
kubectl apply -f promo-ds.yaml
NOTE: Deamonset will get scheduled to "default" namespace, to
schedule deamonset in specific namespace, then add
"namespace" field in metadata
//Verify
kubectl get ds
NAME DESIRED CURRENT READY UP-TO-DATE
AVAILABLE NODE SELECTOR AGE
prometheus-monitoring 6 6 0 6
0 <none> 7s
kubectl get no # To get list of nodes in the cluster
// There are 6 nodes in the cluster, so a pod gets scheduled to
each node in the cluster - B. vim promo-ds.yaml
apiVersion: apps/v1
kind: DaemonSet
metadata:
name: prometheus-monitoring
spec:
selector:
matchLabels:
name: prometheus
template:
metadata:
labels:
name: prometheus
spec:
tolerations:
# remove it if your masters can't run pods
- key: node-role.kubernetes.io/master
effect: NoSchedule
containers:
- name: prometheus-container
- name: varlibdockercontainers
mountPath: /var/lib/docker/containers
readOnly: true
volumes:
- name: varlog
emptyDir: {}
- name: varlibdockercontainers
emptyDir: {}
kubectl apply -f promo-ds.yaml
NOTE: Deamonset will get scheduled to "default" namespace, to
schedule deamonset in specific namespace, then add
"namespace" field in metadata
//Verify
kubectl get ds
NAME DESIRED CURRENT READY UP-TO-DATE
AVAILABLE NODE SELECTOR AGE
prometheus-monitoring 8 8 0 6
0 <none> 7s
kubectl get no # To get list of nodes in the cluster
// There are 6 nodes in the cluster, so a pod gets scheduled to
each node in the cluster
正解: A
質問 43
For this item, you will have to ssh and complete all tasks on these
nodes. Ensure that you return to the base node (hostname: ) when you have completed this item.
Context
As an administrator of a small development team, you have been asked to set up a Kubernetes cluster to test the viability of a new application.
Task
You must use kubeadm to perform this task. Any kubeadm invocations will require the use of the
--ignore-preflight-errors=all option.
Configure the node ik8s-master-O as a master node. .
Join the node ik8s-node-o to the cluster.
正解:
解説:
See the solution below.
Explanation
solution
You must use the kubeadm configuration file located at /etc/kubeadm.conf when initializingyour cluster.
You may use any CNI plugin to complete this task, but if you don't have your favourite CNI plugin's manifest URL at hand, Calico is one popular option:
https://docs.projectcalico.org/v3.14/manifests/calico.yaml
Docker is already installed on both nodes and apt has been configured so that you can install the required tools.
質問 44
Score: 4%
Task
Check to see how many nodes are ready (not including nodes tainted NoSchedule ) and write the number to
/opt/KUSC00402/kusc00402.txt
正解:
解説:
See the solution below.
Explanation
Solution:
kubectl describe nodes | grep ready|wc -l
kubectl describe nodes | grep -i taint | grep -i noschedule |wc -l
echo 3 > /opt/KUSC00402/kusc00402.txt
#
kubectl get node | grep -i ready |wc -l
# taintsnoSchedule
kubectl describe nodes | grep -i taints | grep -i noschedule |wc -l
#
echo 2 > /opt/KUSC00402/kusc00402.txt
質問 45
An Administrator is configuring Authentication Enforcement and they would like to create an exemption rule to exempt a specific group from authentication. Which authentication enforcement object should they select?
- A. default-browser-challenge
- B. default-web-form
- C. default-authentication-bypass
- D. default-no-captive-port
正解: D
質問 46
Create a snapshot of theetcdinstance running at , saving thesnapshot to the file path
/srv/data/etcd-snapshot.db.
The following TLScertificates/key are suppliedfor connecting to the server withetcdctl:
* CA certificate:/opt/KUCM00302/ca.crt
* Client certificate:/opt/KUCM00302/etcd-client.crt
* Client key:Topt/KUCM00302/etcd-client.key
正解:
解説:
See the solution below.
Explanation
solution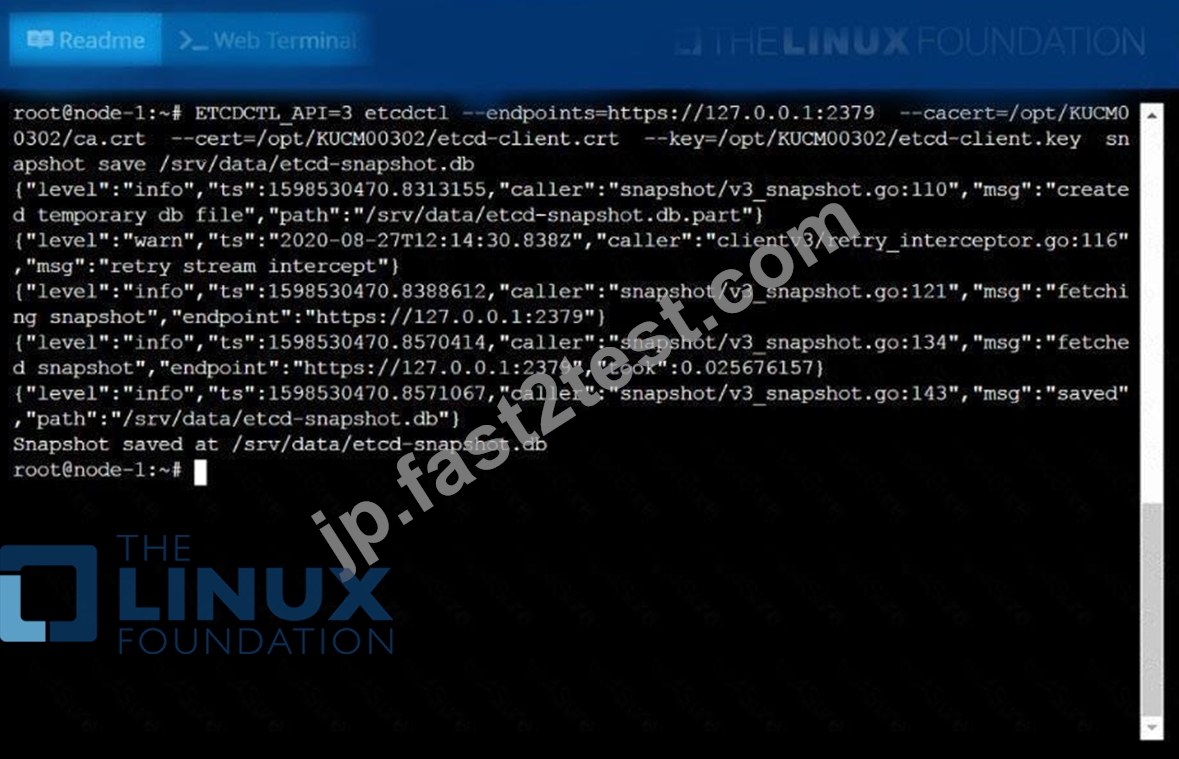
質問 47
A Kubernetes worker node, named wk8s-node-0 is in state NotReady. Investigate why this is the case, and perform any appropriate steps to bring the node to a state, ensuring that any changes are made permanent.
You can ssh to the failed node using:
[student@node-1] $ | ssh Wk8s-node-0
You can assume elevated privileges on the node with the following command:
[student@w8ks-node-0] $ | sudo -i
正解:
解説:
See the solution below.
Explanation
solution
F:\Work\Data Entry Work\Data Entry\20200827\CKA\20 C.JPG
F:\Work\Data Entry Work\Data Entry\20200827\CKA\20 D.JPG
F:\Work\Data Entry Work\Data Entry\20200827\CKA\20 E.JPG
質問 48
......
Certified Kubernetes Administrator (CKA) Program Exam無料で更新される100%試験高合格率保証:https://jp.fast2test.com/CKA-premium-file.html
リアル試験問題と解答でLinux Foundation CKA問題集はここにある:https://drive.google.com/open?id=1RvDZG4jdQlvfTKLS3XkRqfreTJhliFv1