

Fast2test CKAD問題集33問でKubernetes Application Developerを確実実践
リアル最新CKAD試験問題CKAD問題集
CKAD試験はKubernetesで作業することに興味がある開発者にとって貴重な認定資格です。この認定資格は世界的に認知されており、開発者のKubernetesの専門知識を示すものです。この認定資格は、キャリアアップを目指す開発者や、Kubernetesの専門知識が必要な役割に移行する開発者にとっても貴重な資産です。この認定資格は、Certified Kubernetes Administrator(CKA)やCertified Kubernetes Security Specialist(CKS)などの一部の高度なKubernetes認定資格の前提条件となっています。
CKAD認定試験は、実践的なパフォーマンスベースの試験です。つまり、候補者は実践的な演習を通じてスキルを実証する必要があります。試験はオンラインで実施され、候補者には作業するKubernetesクラスターが提供されます。試験は、2時間以内に完了する必要がある一連の実用的なタスクで構成されています。タスクは、候補者がKubernetesアプリケーションを展開、構成、および管理する能力をテストし、一般的な問題をトラブルシューティングするように設計されています。
質問 # 12
Refer to Exhibit.
Task:
1) First update the Deployment cka00017-deployment in the ckad00017 namespace:
*To run 2 replicas of the pod
*Add the following label on the pod:
Role userUI
2) Next, Create a NodePort Service named cherry in the ckad00017 nmespace exposing the ckad00017-deployment Deployment on TCP port 8888
正解:
解説:
Solution:


質問 # 13 
Context
You have been tasked with scaling an existing deployment for availability, and creating a service to expose the deployment within your infrastructure.
Task
Start with the deployment named kdsn00101-deployment which has already been deployed to the namespace kdsn00101 . Edit it to:
* Add the func=webFrontEnd key/value label to the pod template metadata to identify the pod for the service definition
* Have 4 replicas
Next, create ana deploy in namespace kdsn00l01 a service that accomplishes the following:
* Exposes the service on TCP port 8080
* is mapped to me pods defined by the specification of kdsn00l01-deployment
* Is of type NodePort
* Has a name of cherry
正解:
解説:
See the solution below.
Explanation
Solution:



質問 # 14
Context
Task:
A pod within the Deployment named buffale-deployment and in namespace gorilla is logging errors.
1) Look at the logs identify errors messages.
Find errors, including User "system:serviceaccount:gorilla:default" cannot list resource "deployment" [...] in the namespace "gorilla"
2) Update the Deployment buffalo-deployment to resolve the errors in the logs of the Pod.
The buffalo-deployment 'S manifest can be found at -/prompt/escargot/buffalo-deployment.yaml
正解:
解説:
Solution:
質問 # 15
Refer to Exhibit.
Set Configuration Context:
[student@node-1] $ | kubectl
Config use-context k8s
Context
A container within the poller pod is hard-coded to connect the nginxsvc service on port 90 . As this port changes to 5050 an additional container needs to be added to the poller pod which adapts the container to connect to this new port. This should be realized as an ambassador container within the pod.
Task
* Update the nginxsvc service to serve on port 5050.
* Add an HAproxy container named haproxy bound to port 90 to the poller pod and deploy the enhanced pod. Use the image haproxy and inject the configuration located at /opt/KDMC00101/haproxy.cfg, with a ConfigMap named haproxy-config, mounted into the container so that haproxy.cfg is available at /usr/local/etc/haproxy/haproxy.cfg. Ensure that you update the args of the poller container to connect to localhost instead of nginxsvc so that the connection is correctly proxied to the new service endpoint. You must not modify the port of the endpoint in poller's args . The spec file used to create the initial poller pod is available in /opt/KDMC00101/poller.yaml
正解:
解説:
Solution:
To update the nginxsvc service to serve on port 5050, you will need to edit the service's definition yaml file. You can use the kubectl edit command to edit the service in place.
kubectl edit svc nginxsvc
This will open the service definition yaml file in your default editor. Change the targetPort of the service to 5050 and save the file.
To add an HAproxy container named haproxy bound to port 90 to the poller pod, you will need to edit the pod's definition yaml file located at /opt/KDMC00101/poller.yaml.
You can add a new container to the pod's definition yaml file, with the following configuration:
containers:
- name: haproxy
image: haproxy
ports:
- containerPort: 90
volumeMounts:
- name: haproxy-config
mountPath: /usr/local/etc/haproxy/haproxy.cfg
subPath: haproxy.cfg
args: ["haproxy", "-f", "/usr/local/etc/haproxy/haproxy.cfg"]
This will add the HAproxy container to the pod and configure it to listen on port 90. It will also mount the ConfigMap haproxy-config to the container, so that haproxy.cfg is available at /usr/local/etc/haproxy/haproxy.cfg.
To inject the configuration located at /opt/KDMC00101/haproxy.cfg to the container, you will need to create a ConfigMap using the following command:
kubectl create configmap haproxy-config --from-file=/opt/KDMC00101/haproxy.cfg You will also need to update the args of the poller container so that it connects to localhost instead of nginxsvc. You can do this by editing the pod's definition yaml file and changing the args field to args: ["poller","--host=localhost"].
Once you have made these changes, you can deploy the updated pod to the cluster by running the following command:
kubectl apply -f /opt/KDMC00101/poller.yaml
This will deploy the enhanced pod with the HAproxy container to the cluster. The HAproxy container will listen on port 90 and proxy connections to the nginxsvc service on port 5050. The poller container will connect to localhost instead of nginxsvc, so that the connection is correctly proxied to the new service endpoint.
Please note that, this is a basic example and you may need to tweak the haproxy.cfg file and the args based on your use case.
質問 # 16 
Context
You are tasked to create a secret and consume the secret in a pod using environment variables as follow:
Task
* Create a secret named another-secret with a key/value pair; key1/value4
* Start an nginx pod named nginx-secret using container image nginx, and add an environment variable exposing the value of the secret key key 1, using COOL_VARIABLE as the name for the environment variable inside the pod See the solution below.
正解:
解説:
Explanation
Solution:


質問 # 17
Exhibit:
Context
As a Kubernetes application developer you will often find yourself needing to update a running application.
Task
Please complete the following:
* Update the app deployment in the kdpd00202 namespace with a maxSurge of 5% and a maxUnavailable of 2%
* Perform a rolling update of the web1 deployment, changing the Ifccncf/ngmx image version to 1.13
* Roll back the app deployment to the previous version
- A. Solution:


- B. Solution:

正解:B
質問 # 18
Exhibit:
Task
You have rolled out a new pod to your infrastructure and now you need to allow it to communicate with the web and storage pods but nothing else. Given the running pod kdsn00201 -newpod edit it to use a network policy that will allow it to send and receive traffic only to and from the web and storage pods.

- A. Pending
正解:A
質問 # 19 
Task
You are required to create a pod that requests a certain amount of CPU and memory, so it gets scheduled to-a node that has those resources available.
* Create a pod named nginx-resources in the pod-resources namespace that requests a minimum of 200m CPU and 1Gi memory for its container
* The pod should use the nginx image
* The pod-resources namespace has already been created
正解:
解説:
See the solution below.
Explanation
Solution:


質問 # 20
Context
Context
Your application's namespace requires a specific service account to be used.
Task
Update the app-a deployment in the production namespace to run as the restrictedservice service account. The service account has already been created.
正解:
解説:
Solution:
質問 # 21
Refer to Exhibit.
Task:
1- Update the Propertunel scaling configuration of the Deployment web1 in the ckad00015 namespace setting maxSurge to 2 and maxUnavailable to 59
2- Update the web1 Deployment to use version tag 1.13.7 for the Ifconf/nginx container image.
3- Perform a rollback of the web1 Deployment to its previous version
正解:
解説:
Solution:


質問 # 22
Exhibit:
Context
You are tasked to create a ConfigMap and consume the ConfigMap in a pod using a volume mount.
Task
Please complete the following:
* Create a ConfigMap named another-config containing the key/value pair: key4/value3
* start a pod named nginx-configmap containing a single container using the
nginx image, and mount the key you just created into the pod under directory /also/a/path
- A. Solution:


- B. Solution:
正解:A
質問 # 23
Context
Context
A pod is running on the cluster but it is not responding.
Task
The desired behavior is to have Kubemetes restart the pod when an endpoint returns an HTTP 500 on the /healthz endpoint. The service, probe-pod, should never send traffic to the pod while it is failing. Please complete the following:
* The application has an endpoint, /started, that will indicate if it can accept traffic by returning an HTTP 200. If the endpoint returns an HTTP 500, the application has not yet finished initialization.
* The application has another endpoint /healthz that will indicate if the application is still working as expected by returning an HTTP 200. If the endpoint returns an HTTP 500 the application is no longer responsive.
* Configure the probe-pod pod provided to use these endpoints
* The probes should use port 8080
正解:
解説:
Solution:
apiVersion: v1
kind: Pod
metadata:
labels:
test: liveness
name: liveness-exec
spec:
containers:
- name: liveness
image: k8s.gcr.io/busybox
args:
- /bin/sh
- -c
- touch /tmp/healthy; sleep 30; rm -rf /tmp/healthy; sleep 600
livenessProbe:
exec:
command:
- cat
- /tmp/healthy
initialDelaySeconds: 5
periodSeconds: 5
In the configuration file, you can see that the Pod has a single Container. The periodSeconds field specifies that the kubelet should perform a liveness probe every 5 seconds. The initialDelaySeconds field tells the kubelet that it should wait 5 seconds before performing the first probe. To perform a probe, the kubelet executes the command cat /tmp/healthy in the target container. If the command succeeds, it returns 0, and the kubelet considers the container to be alive and healthy. If the command returns a non-zero value, the kubelet kills the container and restarts it.
When the container starts, it executes this command:
/bin/sh -c "touch /tmp/healthy; sleep 30; rm -rf /tmp/healthy; sleep 600" For the first 30 seconds of the container's life, there is a /tmp/healthy file. So during the first 30 seconds, the command cat /tmp/healthy returns a success code. After 30 seconds, cat /tmp/healthy returns a failure code.
Create the Pod:
kubectl apply -f https://k8s.io/examples/pods/probe/exec-liveness.yaml
Within 30 seconds, view the Pod events:
kubectl describe pod liveness-exec
The output indicates that no liveness probes have failed yet:
FirstSeen LastSeen Count From SubobjectPath Type Reason Message
--------- -------- ----- ---- ------------- -------- ------ -------
24s 24s 1 {default-scheduler } Normal Scheduled Successfully assigned liveness-exec to worker0
23s 23s 1 {kubelet worker0} spec.containers{liveness} Normal Pulling pulling image "k8s.gcr.io/busybox"
23s 23s 1 {kubelet worker0} spec.containers{liveness} Normal Pulled Successfully pulled image "k8s.gcr.io/busybox"
23s 23s 1 {kubelet worker0} spec.containers{liveness} Normal Created Created container with docker id 86849c15382e; Security:[seccomp=unconfined]
23s 23s 1 {kubelet worker0} spec.containers{liveness} Normal Started Started container with docker id 86849c15382e After 35 seconds, view the Pod events again:
kubectl describe pod liveness-exec
At the bottom of the output, there are messages indicating that the liveness probes have failed, and the containers have been killed and recreated.
FirstSeen LastSeen Count From SubobjectPath Type Reason Message
--------- -------- ----- ---- ------------- -------- ------ -------
37s 37s 1 {default-scheduler } Normal Scheduled Successfully assigned liveness-exec to worker0
36s 36s 1 {kubelet worker0} spec.containers{liveness} Normal Pulling pulling image "k8s.gcr.io/busybox"
36s 36s 1 {kubelet worker0} spec.containers{liveness} Normal Pulled Successfully pulled image "k8s.gcr.io/busybox"
36s 36s 1 {kubelet worker0} spec.containers{liveness} Normal Created Created container with docker id 86849c15382e; Security:[seccomp=unconfined]
36s 36s 1 {kubelet worker0} spec.containers{liveness} Normal Started Started container with docker id 86849c15382e
2s 2s 1 {kubelet worker0} spec.containers{liveness} Warning Unhealthy Liveness probe failed: cat: can't open '/tmp/healthy': No such file or directory Wait another 30 seconds, and verify that the container has been restarted:
kubectl get pod liveness-exec
The output shows that RESTARTS has been incremented:
NAME READY STATUS RESTARTS AGE
liveness-exec 1/1 Running 1 1m
質問 # 24 
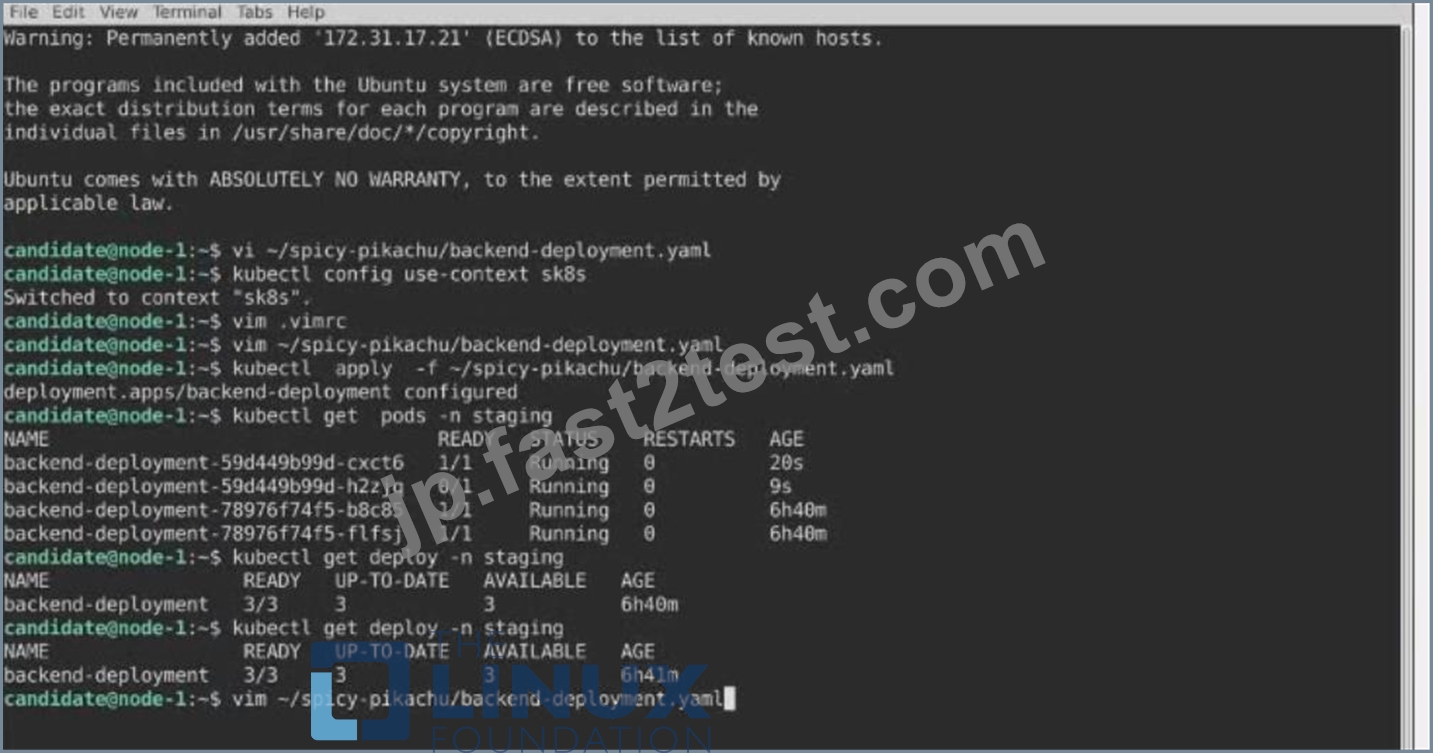
Task
A Deployment named backend-deployment in namespace staging runs a web application on port 8081.
正解:
解説:
See the solution below.
Explanation
Solution:
Text Description automatically generated
質問 # 25
Context
A web application requires a specific version of redis to be used as a cache.
Task
Create a pod with the following characteristics, and leave it running when complete:
* The pod must run in the web namespace.
The namespace has already been created
* The name of the pod should be cache
* Use the Ifccncf/redis image with the 3.2 tag
* Expose port 6379
正解:
解説:
Solution:
質問 # 26
Exhibit:
Context
A container within the poller pod is hard-coded to connect the nginxsvc service on port 90 . As this port changes to 5050 an additional container needs to be added to the poller pod which adapts the container to connect to this new port. This should be realized as an ambassador container within the pod.
Task
* Update the nginxsvc service to serve on port 5050.
* Add an HAproxy container named haproxy bound to port 90 to the poller pod and deploy the enhanced pod. Use the image haproxy and inject the configuration located at /opt/KDMC00101/haproxy.cfg, with a ConfigMap named haproxy-config, mounted into the container so that haproxy.cfg is available at /usr/local/etc/haproxy/haproxy.cfg. Ensure that you update the args of the poller container to connect to localhost instead of nginxsvc so that the connection is correctly proxied to the new service endpoint. You must not modify the port of the endpoint in poller's args . The spec file used to create the initial poller pod is available in /opt/KDMC00101/poller.yaml
- A. Solution:
apiVersion: apps/v1
kind: Deployment
metadata:
name: my-nginx
spec:
selector:
matchLabels:
run: my-nginx
replicas: 2
template:
metadata:
labels:
run: my-nginx
spec:
containers:
- name: my-nginx
image: nginx
ports:
- containerPort: 90
This makes it accessible from any node in your cluster. Check the nodes the Pod is running on:
kubectl apply -f ./run-my-nginx.yaml
kubectl get pods -l run=my-nginx -o wide
NAME READY STATUS RESTARTS AGE IP NODE
my-nginx-3800858182-jr4a2 1/1 Running 0 13s 10.244.3.4 kubernetes-minion-905m
my-nginx-3800858182-kna2y 1/1 Running 0 13s 10.244.2.5 kubernetes-minion-ljyd
Check your pods' IPs:
kubectl get pods -l run=my-nginx -o yaml | grep podIP
podIP: 10.244.3.4
podIP: 10.244.2.5 - B. Solution:
apiVersion: apps/v1
kind: Deployment
metadata:
name: my-nginx
spec:
selector:
matchLabels:
run: my-nginx
- name: my-nginx
image: nginx
ports:
- containerPort: 90
This makes it accessible from any node in your cluster. Check the nodes the Pod is running on:
kubectl apply -f ./run-my-nginx.yaml
kubectl get pods -l run=my-nginx -o wide
NAME READY STATUS RESTARTS AGE IP NODE
my-nginx-3800858182-jr4a2 1/1 Running 0 13s 10.244.3.4 kubernetes-minion-905m
my-nginx-3800858182-kna2y 1/1 Running 0 13s 10.244.2.5 kubernetes-minion-ljyd
Check your pods' IPs:
kubectl get pods -l run=my-nginx -o yaml | grep podIP
podIP: 10.244.3.4
podIP: 10.244.2.5
正解:A
質問 # 27
Context
Task:
1- Update the Propertunel scaling configuration of the Deployment web1 in the ckad00015 namespace setting maxSurge to 2 and maxUnavailable to 59
2- Update the web1 Deployment to use version tag 1.13.7 for the Ifconf/nginx container image.
3- Perform a rollback of the web1 Deployment to its previous version
正解:
解説:
Solution:


質問 # 28
Context
Task
You have rolled out a new pod to your infrastructure and now you need to allow it to communicate with the web and storage pods but nothing else. Given the running pod kdsn00201 -newpod edit it to use a network policy that will allow it to send and receive traffic only to and from the web and storage pods.
正解:
解説:
apiVersion: networking.k8s.io/v1
kind: NetworkPolicy
metadata:
name: internal-policy
namespace: default
spec:
podSelector:
matchLabels:
name: internal
policyTypes:
- Egress
- Ingress
ingress:
- {}
egress:
- to:
- podSelector:
matchLabels:
name: mysql
ports:
- protocol: TCP
port: 3306
- to:
- podSelector:
matchLabels:
name: payroll
ports:
- protocol: TCP
port: 8080
- ports:
- port: 53
protocol: UDP
- port: 53
protocol: TCP
質問 # 29
Exhibit:
Task
A deployment is falling on the cluster due to an incorrect image being specified. Locate the deployment, and fix the problem.
- A. Pending
正解:A
質問 # 30
Exhibit:
Context
You are tasked to create a secret and consume the secret in a pod using environment variables as follow:
Task
* Create a secret named another-secret with a key/value pair; key1/value4
* Start an nginx pod named nginx-secret using container image nginx, and add an environment variable exposing the value of the secret key key 1, using COOL_VARIABLE as the name for the environment variable inside the pod
- A. Solution:


- B. Solution:

正解:B
質問 # 31 
Context
It is always useful to look at the resources your applications are consuming in a cluster.
Task
* From the pods running in namespace cpu-stress , write the name only of the pod that is consuming the most CPU to file /opt/KDOBG030l/pod.txt, which has already been created.
正解:
解説:
See the solution below.
Explanation
Solution:
質問 # 32 
Context
A container within the poller pod is hard-coded to connect the nginxsvc service on port 90 . As this port changes to 5050 an additional container needs to be added to the poller pod which adapts the container to connect to this new port. This should be realized as an ambassador container within the pod.
Task
* Update the nginxsvc service to serve on port 5050.
* Add an HAproxy container named haproxy bound to port 90 to the poller pod and deploy the enhanced pod.
Use the image haproxy and inject the configuration located at /opt/KDMC00101/haproxy.cfg, with a ConfigMap named haproxy-config, mounted into the container so that haproxy.cfg is available at
/usr/local/etc/haproxy/haproxy.cfg. Ensure that you update the args of the poller container to connect to localhost instead of nginxsvc so that the connection is correctly proxied to the new service endpoint. You must not modify the port of the endpoint in poller's args . The spec file used to create the initial poller pod is available in /opt/KDMC00101/poller.yaml See the solution below.
正解:
解説:
Explanation
Solution:
apiVersion: apps/v1
kind: Deployment
metadata:
name: my-nginx
spec:
selector:
matchLabels:
run: my-nginx
replicas: 2
template:
metadata:
labels:
run: my-nginx
spec:
containers:
- name: my-nginx
image: nginx
ports:
- containerPort: 90
This makes it accessible from any node in your cluster. Check the nodes the Pod is running on:
kubectl apply -f ./run-my-nginx.yaml
kubectl get pods -l run=my-nginx -o wide
NAME READY STATUS RESTARTS AGE IP NODE
my-nginx-3800858182-jr4a2 1/1 Running 0 13s 10.244.3.4 kubernetes-minion-905m my-nginx-3800858182-kna2y 1/1 Running 0 13s 10.244.2.5 kubernetes-minion-ljyd Check your pods' IPs:
kubectl get pods -l run=my-nginx -o yaml | grep podIP
podIP: 10.244.3.4
podIP: 10.244.2.5
質問 # 33 
Given a container that writes a log file in format A and a container that converts log files from format A to format B, create a deployment that runs both containers such that the log files from the first container are converted by the second container, emitting logs in format B.
Task:
* Create a deployment named deployment-xyz in the default namespace, that:
*Includes a primary
lfccncf/busybox:1 container, named logger-dev
*includes a sidecar Ifccncf/fluentd:v0.12 container, named adapter-zen
*Mounts a shared volume /tmp/log on both containers, which does not persist when the pod is deleted
*Instructs the logger-dev
container to run the command
which should output logs to /tmp/log/input.log in plain text format, with example values:
* The adapter-zen sidecar container should read /tmp/log/input.log and output the data to /tmp/log/output.* in Fluentd JSON format. Note that no knowledge of Fluentd is required to complete this task: all you will need to achieve this is to create the ConfigMap from the spec file provided at /opt/KDMC00102/fluentd-configma p.yaml , and mount that ConfigMap to /fluentd/etc in the adapter-zen sidecar container See the solution below.
正解:
解説:
Explanation
Solution:


質問 # 34
......
CKAD別格な問題集で最上級の成績にさせるCKAD問題:https://jp.fast2test.com/CKAD-premium-file.html
手に入れよう!最新CKAD認定の有効な試験問題集解答:https://drive.google.com/open?id=1YHGdZkd7WuWAlMl6oRk5eRZxcJ0_vo_K