

無料でゲット!2024年最新のに更新されたLinux Foundation CKAD試験問題と解答
CKAD問題集PDFとテストエンジン試験問題
CKAD試験は、Kubernetesアプリケーション開発の専門知識を示したい開発者にとって絶好の機会です。この試験は、Kubernetesのコアコンセプト、ポッドおよびサービスの展開、デバッグ、トラブルシューティング、自動化など、多岐にわたるトピックをカバーしています。試験に合格した候補者は、Kubernetesアプリケーション開発の熟練度を示すCKAD認定を受け取ります。この認定は、テクノロジー業界の多くの組織に認められており、開発者がキャリアを進めるのに役立ちます。さらに、CKAD認定は、Kubernetesクラスタを管理するシステム管理者向けに設計された認定資格であるCertified Kubernetes Administrator(CKA)認定の前提条件となっています。
CKAD認定は、Kubernetesアプリケーション開発の分野でキャリアを進めたい開発者にとって貴重な資格です。この認定は、業界で認められ、Kubernetesアプリケーション開発の候補者の熟練度を証明するものです。また、DevOpsやクラウドコンピューティングの分野で求人ポジションに必要な資格でもあります。CKAD認定は、開発者が最新の技術やプラクティスに精通し、専門知識を証明する素晴らしい方法です。
Linux Foundation Certified Kubernetes Application Developer(CKAD)認定試験は、Kubernetesアプリケーション開発のスキルと専門知識を実証する機会を開発者に提供する人気のある試験です。この試験は、毎日Kubernetesと協力し、スキルと知識を検証しようとしている開発者のスキルを評価するように設計されています。
質問 # 19
Refer to Exhibit.
Task:
A pod within the Deployment named buffale-deployment and in namespace gorilla is logging errors.
1) Look at the logs identify errors messages.
Find errors, including User "system:serviceaccount:gorilla:default" cannot list resource "deployment" [...] in the namespace "gorilla"
2) Update the Deployment buffalo-deployment to resolve the errors in the logs of the Pod.
The buffalo-deployment 'S manifest can be found at -/prompt/escargot/buffalo-deployment.yaml
正解:
解説:
Solution:


質問 # 20 
Task
A deployment is falling on the cluster due to an incorrect image being specified. Locate the deployment, and fix the problem.
正解:
解説:
See the solution below
Explanation
create deploy hello-deploy --image=nginx --dry-run=client -o yaml > hello-deploy.yaml Update deployment image to nginx:1.17.4: kubectl set image deploy/hello-deploy nginx=nginx:1.17.4
質問 # 21 
Context
You sometimes need to observe a pod's logs, and write those logs to a file for further analysis.
Task
Please complete the following;
* Deploy the counter pod to the cluster using the provided YAMLspec file at /opt/KDOB00201/counter.yaml
* Retrieve all currently available application logs from the running pod and store them in the file
/opt/KDOB0020l/log_Output.txt, which has already been created
正解:
解説:
See the solution below.
Explanation
Solution:


質問 # 22
Context
Task:
1) First update the Deployment cka00017-deployment in the ckad00017 namespace:
To run 2 replicas of the pod
Add the following label on the pod:
Role userUI
2) Next, Create a NodePort Service named cherry in the ckad00017 nmespace exposing the ckad00017-deployment Deployment on TCP port 8888
正解:
解説:
Solution:


質問 # 23
Exhibit:
Context
A container within the poller pod is hard-coded to connect the nginxsvc service on port 90 . As this port changes to 5050 an additional container needs to be added to the poller pod which adapts the container to connect to this new port. This should be realized as an ambassador container within the pod.
Task
* Update the nginxsvc service to serve on port 5050.
* Add an HAproxy container named haproxy bound to port 90 to the poller pod and deploy the enhanced pod. Use the image haproxy and inject the configuration located at /opt/KDMC00101/haproxy.cfg, with a ConfigMap named haproxy-config, mounted into the container so that haproxy.cfg is available at /usr/local/etc/haproxy/haproxy.cfg. Ensure that you update the args of the poller container to connect to localhost instead of nginxsvc so that the connection is correctly proxied to the new service endpoint. You must not modify the port of the endpoint in poller's args . The spec file used to create the initial poller pod is available in /opt/KDMC00101/poller.yaml
- A. Solution:
apiVersion: apps/v1
kind: Deployment
metadata:
name: my-nginx
spec:
selector:
matchLabels:
run: my-nginx
- name: my-nginx
image: nginx
ports:
- containerPort: 90
This makes it accessible from any node in your cluster. Check the nodes the Pod is running on:
kubectl apply -f ./run-my-nginx.yaml
kubectl get pods -l run=my-nginx -o wide
NAME READY STATUS RESTARTS AGE IP NODE
my-nginx-3800858182-jr4a2 1/1 Running 0 13s 10.244.3.4 kubernetes-minion-905m
my-nginx-3800858182-kna2y 1/1 Running 0 13s 10.244.2.5 kubernetes-minion-ljyd
Check your pods' IPs:
kubectl get pods -l run=my-nginx -o yaml | grep podIP
podIP: 10.244.3.4
podIP: 10.244.2.5 - B. Solution:
apiVersion: apps/v1
kind: Deployment
metadata:
name: my-nginx
spec:
selector:
matchLabels:
run: my-nginx
replicas: 2
template:
metadata:
labels:
run: my-nginx
spec:
containers:
- name: my-nginx
image: nginx
ports:
- containerPort: 90
This makes it accessible from any node in your cluster. Check the nodes the Pod is running on:
kubectl apply -f ./run-my-nginx.yaml
kubectl get pods -l run=my-nginx -o wide
NAME READY STATUS RESTARTS AGE IP NODE
my-nginx-3800858182-jr4a2 1/1 Running 0 13s 10.244.3.4 kubernetes-minion-905m
my-nginx-3800858182-kna2y 1/1 Running 0 13s 10.244.2.5 kubernetes-minion-ljyd
Check your pods' IPs:
kubectl get pods -l run=my-nginx -o yaml | grep podIP
podIP: 10.244.3.4
podIP: 10.244.2.5
正解:B
質問 # 24
Context
Task:
1) Fix any API depreciation issues in the manifest file -/credible-mite/www.yaml so that this application can be deployed on cluster K8s.
2) Deploy the application specified in the updated manifest file -/credible-mite/www.yaml in namespace cobra
正解:
解説:
Solution:
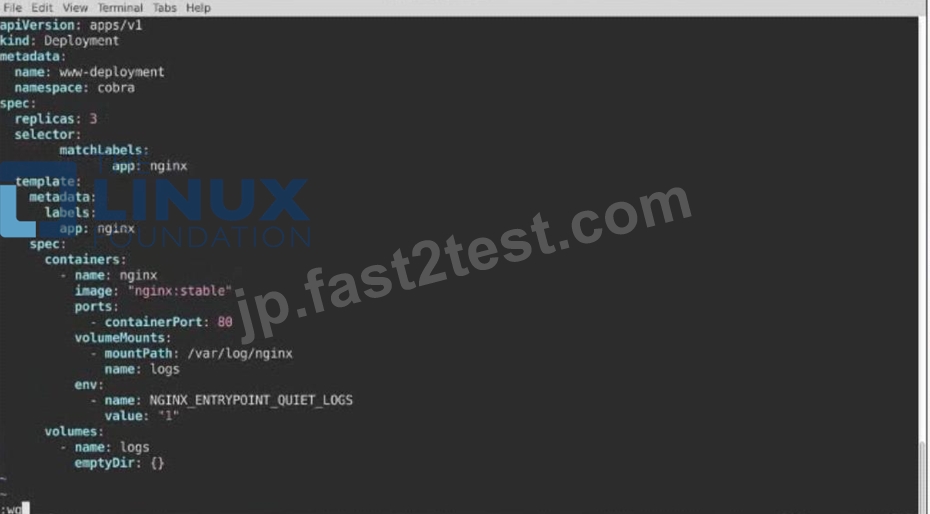
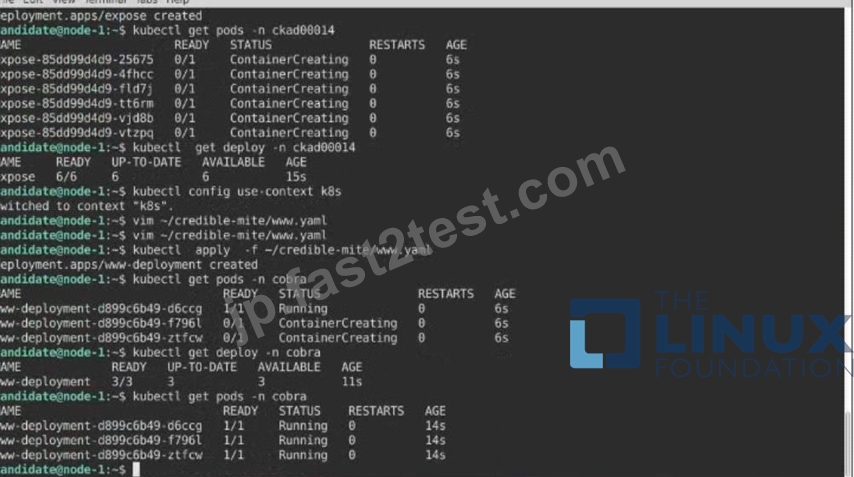
質問 # 25
Refer to Exhibit.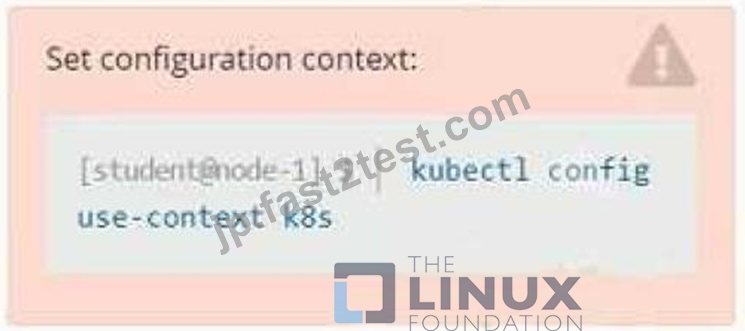
Set Configuration Context:
[student@node-1] $ | kubectl
Config use-context k8s
Context
You sometimes need to observe a pod's logs, and write those logs to a file for further analysis.
Task
Please complete the following;
* Deploy the counter pod to the cluster using the provided YAMLspec file at /opt/KDOB00201/counter.yaml
* Retrieve all currently available application logs from the running pod and store them in the file /opt/KDOB0020l/log_Output.txt, which has already been created
正解:
解説:
Solution:
To deploy the counter pod to the cluster using the provided YAML spec file, you can use the kubectl apply command. The apply command creates and updates resources in a cluster.
kubectl apply -f /opt/KDOB00201/counter.yaml
This command will create the pod in the cluster. You can use the kubectl get pods command to check the status of the pod and ensure that it is running.
kubectl get pods
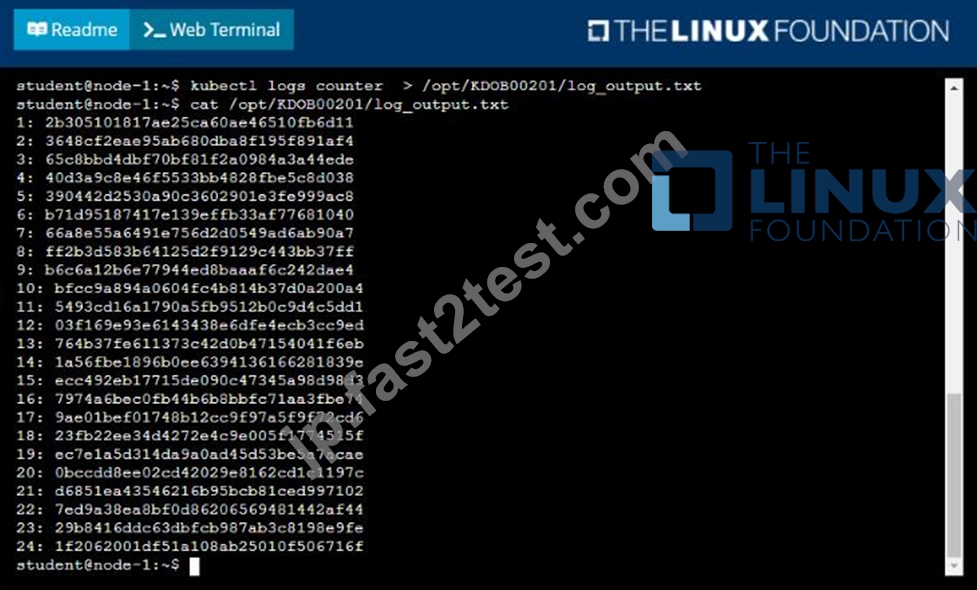
To retrieve all currently available application logs from the running pod and store them in the file /opt/KDOB0020l/log_Output.txt, you can use the kubectl logs command. The logs command retrieves logs from a container in a pod.
kubectl logs -f <pod-name> > /opt/KDOB0020l/log_Output.txt
Replace <pod-name> with the name of the pod.
You can also use -f option to stream the logs.
kubectl logs -f <pod-name> > /opt/KDOB0020l/log_Output.txt &
This command will retrieve the logs from the pod and write them to the /opt/KDOB0020l/log_Output.txt file.
Please note that the above command will retrieve all logs from the pod, including previous logs. If you want to retrieve only the new logs that are generated after running the command, you can add the --since flag to the kubectl logs command and specify a duration, for example --since=24h for logs generated in the last 24 hours.
Also, please note that, if the pod has multiple containers, you need to specify the container name using -c option.
kubectl logs -f <pod-name> -c <container-name> > /opt/KDOB0020l/log_Output.txt The above command will redirect the logs of the specified container to the file.

質問 # 26
Context
Anytime a team needs to run a container on Kubernetes they will need to define a pod within which to run the container.
Task
Please complete the following:
* Create a YAML formatted pod manifest
/opt/KDPD00101/podl.yml to create a pod named app1 that runs a container named app1cont using image Ifccncf/arg-output with these command line arguments: -lines 56 -F
* Create the pod with the kubect1 command using the YAML file created in the previous step
* When the pod is running display summary data about the pod in JSON format using the kubect1 command and redirect the output to a file named /opt/KDPD00101/out1.json
* All of the files you need to work with have been created, empty, for your convenience
正解:
解説:
Solution:


質問 # 27
Refer to Exhibit.
Context
It is always useful to look at the resources your applications are consuming in a cluster.
Task
* From the pods running in namespace cpu-stress , write the name only of the pod that is consuming the most CPU to file /opt/KDOBG030l/pod.txt, which has already been created.
正解:
解説:
Solution:
質問 # 28
Context
Task:
A Dockerfile has been prepared at -/human-stork/build/Dockerfile
1) Using the prepared Dockerfile, build a container image with the name macque and lag 3.0. You may install and use the tool of your choice.
2) Using the tool of your choice export the built container image in OC-format and store it at -/human stork/macque 3.0 tar
正解:
解説:
Solution:
質問 # 29 
Task:
1) Fix any API depreciation issues in the manifest file -/credible-mite/www.yaml so that this application can be deployed on cluster K8s.
2) Deploy the application specified in the updated manifest file -/credible-mite/www.yaml in namespace cobra See the solution below.
正解:
解説:
Explanation
Solution:
Text Description automatically generated
Text Description automatically generated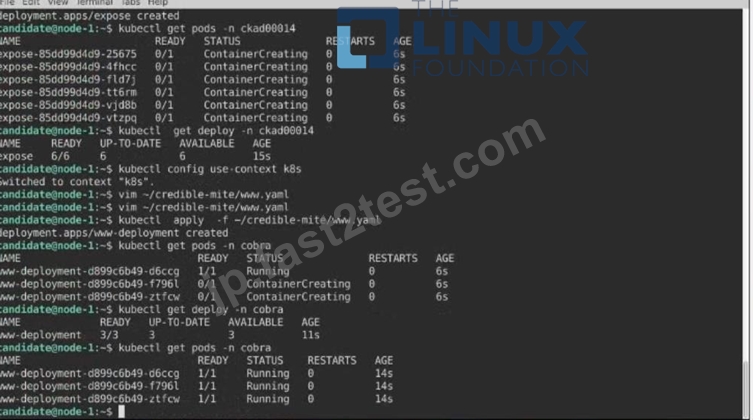
質問 # 30 
Context
You are tasked to create a secret and consume the secret in a pod using environment variables as follow:
Task
* Create a secret named another-secret with a key/value pair; key1/value4
* Start an nginx pod named nginx-secret using container image nginx, and add an environment variable exposing the value of the secret key key 1, using COOL_VARIABLE as the name for the environment variable inside the pod See the solution below.
正解:
解説:
Explanation
Solution:


質問 # 31 
Context
Your application's namespace requires a specific service account to be used.
Task
Update the app-a deployment in the production namespace to run as the restrictedservice service account. The service account has already been created.
正解:
解説:
See the solution below.
Explanation
Solution:
質問 # 32
Refer to Exhibit.
Task:
Update the Pod ckad00018-newpod in the ckad00018 namespace to use a NetworkPolicy allowing the Pod to send and receive traffic only to and from the pods web and db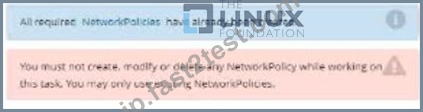
正解:
解説:
Solution:

質問 # 33
Refer to Exhibit.
Set Configuration Context:
[student@node-1] $ | kubectl
Config use-context k8s
Task
You have rolled out a new pod to your infrastructure and now you need to allow it to communicate with the web and storage pods but nothing else. Given the running pod kdsn00201 -newpod edit it to use a network policy that will allow it to send and receive traffic only to and from the web and storage pods.

正解:
解説:
To allow a pod to send and receive traffic only to and from specific pods, you can use network policies in Kubernetes.
First, you will need to create a network policy that defines the allowed traffic. You can create a network policy yaml file with the following rules:
apiVersion: networking.k8s.io/v1
kind: NetworkPolicy
metadata:
name: newpod-network-policy
namespace: default
spec:
podSelector:
matchLabels:
app: kdsn00201-newpod
ingress:
- from:
- podSelector:
matchLabels:
app: web
- podSelector:
matchLabels:
app: storage
This policy will only allow incoming traffic to the pod with the label app=kdsn00201-newpod from pods with the label app=web or app=storage. If you have different labels on your web and storage pods please update the matchLabels accordingly.
Once you have created the network policy, you can apply it to the cluster by running the following command:
kubectl apply -f <network-policy-file>.yaml
This will apply the network policy to the cluster, and the newpod will only be able to send and receive traffic to and from the web and storage pods.
Please note that, NetworkPolicy resource is not available by default, you need to enable the NetworkPolicy feature on your Kubernetes cluster. This feature is enabled by default on some clusters and must be explicitly enabled on others. You can check if NetworkPolicy is available by running the command kubectl api-versions | grep networking Also, you need to ensure that the pods that you want to allow traffic to and from are running on the same namespace.
質問 # 34
Task:
1) Create a secret named app-secret in the default namespace containing the following single key-value pair:
Key3: value1
2) Create a Pod named ngnix secret in the default namespace.Specify a single container using the nginx:stable image.
Add an environment variable named BEST_VARIABLE consuming the value of the secret key3.
正解:
解説:
See the solution below.
Explanation
Solution:
Text Description automatically generated
Text Description automatically generated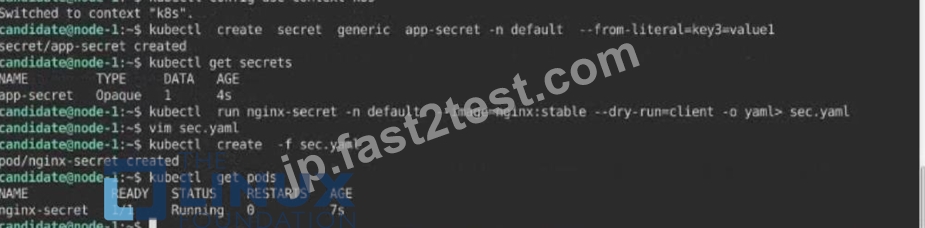
質問 # 35
Context
Anytime a team needs to run a container on Kubernetes they will need to define a pod within which to run the container.
Task
Please complete the following:
* Create a YAML formatted pod manifest
/opt/KDPD00101/podl.yml to create a pod named app1 that runs a container named app1cont using image Ifccncf/arg-output with these command line arguments: -lines 56 -F
* Create the pod with the kubect1 command using the YAML file created in the previous step
* When the pod is running display summary data about the pod in JSON format using the kubect1 command and redirect the output to a file named /opt/KDPD00101/out1.json
* All of the files you need to work with have been created, empty, for your convenience
正解:
解説:
Solution:


質問 # 36
Context
Context
You sometimes need to observe a pod's logs, and write those logs to a file for further analysis.
Task
Please complete the following;
* Deploy the counter pod to the cluster using the provided YAMLspec file at /opt/KDOB00201/counter.yaml
* Retrieve all currently available application logs from the running pod and store them in the file /opt/KDOB0020l/log_Output.txt, which has already been created
正解:
解説:
Solution:


質問 # 37
Context
Context
A user has reported an aopticauon is unteachable due to a failing livenessProbe .
Task
Perform the following tasks:
* Find the broken pod and store its name and namespace to /opt/KDOB00401/broken.txt in the format:
The output file has already been created
* Store the associated error events to a file /opt/KDOB00401/error.txt, The output file has already been created. You will need to use the -o wide output specifier with your command
* Fix the issue.
正解:
解説:
Solution:
Create the Pod:
kubectl create -f http://k8s.io/docs/tasks/configure-pod-container/exec-liveness.yaml Within 30 seconds, view the Pod events:
kubectl describe pod liveness-exec
The output indicates that no liveness probes have failed yet:
FirstSeen LastSeen Count From SubobjectPath Type Reason Message
--------- -------- ----- ---- ------------- -------- ------ -------
24s 24s 1 {default-scheduler } Normal Scheduled Successfully assigned liveness-exec to worker0
23s 23s 1 {kubelet worker0} spec.containers{liveness} Normal Pulling pulling image "gcr.io/google_containers/busybox"
23s 23s 1 {kubelet worker0} spec.containers{liveness} Normal Pulled Successfully pulled image "gcr.io/google_containers/busybox"
23s 23s 1 {kubelet worker0} spec.containers{liveness} Normal Created Created container with docker id 86849c15382e; Security:[seccomp=unconfined]
23s 23s 1 {kubelet worker0} spec.containers{liveness} Normal Started Started container with docker id 86849c15382e After 35 seconds, view the Pod events again:
kubectl describe pod liveness-exec
At the bottom of the output, there are messages indicating that the liveness probes have failed, and the containers have been killed and recreated.
FirstSeen LastSeen Count From SubobjectPath Type Reason Message
--------- -------- ----- ---- ------------- -------- ------ -------
37s 37s 1 {default-scheduler } Normal Scheduled Successfully assigned liveness-exec to worker0
36s 36s 1 {kubelet worker0} spec.containers{liveness} Normal Pulling pulling image "gcr.io/google_containers/busybox"
36s 36s 1 {kubelet worker0} spec.containers{liveness} Normal Pulled Successfully pulled image "gcr.io/google_containers/busybox"
36s 36s 1 {kubelet worker0} spec.containers{liveness} Normal Created Created container with docker id 86849c15382e; Security:[seccomp=unconfined]
36s 36s 1 {kubelet worker0} spec.containers{liveness} Normal Started Started container with docker id 86849c15382e
2s 2s 1 {kubelet worker0} spec.containers{liveness} Warning Unhealthy Liveness probe failed: cat: can't open '/tmp/healthy': No such file or directory Wait another 30 seconds, and verify that the Container has been restarted:
kubectl get pod liveness-exec
The output shows that RESTARTS has been incremented:
NAME READY STATUS RESTARTS AGE
liveness-exec 1/1 Running 1 m
質問 # 38
......
検証済みのCKADテスト問題集と解答で正確な33問題と解答あります:https://jp.fast2test.com/CKAD-premium-file.html
最新をゲットせよ!CKAD認定有効な試験問題集解答:https://drive.google.com/open?id=1P2CBrT0BDzyyTg0lvb9eEbSaB6yBR-l7