

最新の2023年06月24日 MS-500問題集は学習ガイドは試験合格するための秘訣
MS-500問題集の無料PDFをゲットせよ!最近更新された問題
MS-500試験に備えて、候補者はMicrosoftが提供する様々なリソースを活用することができます。これには、オンライントレーニングコース、学習ガイド、および模擬試験が含まれます。Microsoft 365セキュリティテクノロジーに対する実践的な経験と、セキュリティコンセプトとベストプラクティスについての良好な理解も推奨されています。この試験に合格することは、Microsoft 365セキュリティ管理の専門知識を証明し、キャリアを進めたいITプロフェッショナルにとって有益な資格です。
質問 # 184
Please wait while the virtual machine loads. Once loaded, you may proceed to the lab section. This may take a few minutes, and the wait time will not be deducted from your overall test time.
When the Next button is available, click it to access the lab section. In this section, you will perform a set of tasks in a live environment. While most functionality will be available to you as it would be in a live environment, some functionality (e.g., copy and paste, ability to navigate to external websites) will not be possible by design.
Scoring is based on the outcome of performing the tasks stated in the lab. In other words, it doesn't matter how you accomplish the task, if you successfully perform it, you will earn credit for that task.
Labs are not timed separately, and this exam may more than one lab that you must complete. You can use as much time as you would like to complete each lab. But, you should manage your time appropriately to ensure that you are able to complete the lab(s) and all other sections of the exam in the time provided.
Please note that once you submit your work by clicking the Next button within a lab, you will NOT be able to return to the lab.
Username and password
Use the following login credentials as needed:
To enter your username, place your cursor in the Sign in box and click on the username below.
To enter your password, place your cursor in the Enter password box and click on the password below.
Microsoft 365 Username:
admin@[email protected]
Microsoft 365 Password: &=Q8v@2qGzYz
If the Microsoft 365 portal does not load successfully in the browser, press CTRL-K to reload the portal in a new browser tab.
The following information is for technical support only:
Lab instance: 11032396
You need to ensure that email messages in Exchange Online and documents in SharePoint Online are retained for eight years.
To complete this task, sign in to the Microsoft Office 365 admin center.
正解:
解説:
NB: For our purposes, the retention period will be 8 years.
For retaining email messages in Exchange Online:
Step 1: Create a retention tag
1. Navigate to the Exchange Admin Center
2. Navigate to Compliance management > Retention tags, and then click Add +
3. Select one of the following options:
Applied automatically to entire mailbox (default): Select this option to create a default policy tag (DPT). You can use DPTs to create a default deletion policy and a default archive policy, which applies to all items in the mailbox.
Applied automatically to a specific folder: Select this option to create a retention policy tag (RPT) for a default folder such as Inbox or Deleted Items.
Applied by users to items and folders (Personal): Select this option to create personal tags. These tags allow Outlook and Outlook on the web (formerly known as Outlook Web App) users to apply archive or deletion settings to a message or folders that are different from the settings applied to the parent folder or the entire mailbox.
4. The New retention tag page title and options will vary depending on the type of tag you selected. Complete the following fields:
Name: Enter a name for the retention tag. The tag name is for display purposes and doesn't have any impact on the folder or item a tag is applied to. Consider that the personal tags you provision for users are available in Outlook and Outlook on the web.
Apply this tag to the following default folder: This option is available only if you selected Applied automatically to a specific folder.
Retention action: Select one of the following actions to be taken after the item reaches its retention period:
Delete and Allow Recovery: Select this action to delete items but allow users to recover them using the Recover Deleted Items option in Outlook or Outlook on the web. Items are retained until the deleted item retention period configured for the mailbox database or the mailbox user is reached.
Permanently Delete: Select this option to permanently delete the item from the mailbox database.
Move to Archive: This action is available only if you're creating a DPT or a personal tag. Select this action to move items to the user's In-Place Archive.
Retention period: Select one of the following options:
Never: Select this option to specify that items should never be deleted or moved to the archive.
When the item reaches the following age (in days): Select this option and specify the number of days to retain items before they're moved or deleted. The retention age for all supported items except Calendar and Tasks is calculated from the date an item is received or created. Retention age for Calendar and Tasks items is calculated from the end date.
Comment: User this optional field to enter any administrative notes or comments. The field isn't displayed to users.
Step 2: Create a retention policy
1. Navigate to Compliance management > Retention policies, and then click Add +
2. In New Retention Policy, complete the following fields:
Name: Enter a name for the retention policy.
Retention tags: Click Add + to select the tags you want to add to this retention policy.
A retention policy can contain the following tags:
One DPT with the Move to Archive action.
One DPT with the Delete and Allow Recovery or Permanently Delete actions.
One DPT for voice mail messages with the Delete and Allow Recovery or Permanently Delete actions.
One RPT per default folder such as Inbox to delete items.
Any number of personal tags.
Step 3: Apply a retention policy to mailbox users
After you create a retention policy, you must apply it to mailbox users. You can apply different retention policies to different set of users.
Navigate to Recipients > Mailboxes.
In the list view, use the Shift or Ctrl keys to select multiple mailboxes.
In the details pane, click More options.
Under Retention Policy, click Update.
In Bulk Assign Retention Policy, select the retention policy you want to apply to the mailboxes, and then click Save.
For retaining documents in SharePoint Online
Access Security & Compliance Admin Center
1. Navigate to the Office 365 Admin Centers
2. From the list of available Admin Centers, click on Security & Compliance
How to create and publish a Retention Policy on a SharePoint site
Now that we are in the Security & Compliance Admin Center, we are ready to create and publish a Retention Policy on a SharePoint site.
Under Data Governance, click Retention
1. Hit Create button to create new Retention Policy
2. Give your policy a name and description. Hit Next
3. On the next screen is where you set up the logic. You can configure how many days, months, or years to retain the content for, specify whether you want the math (retention period) to be calculated from the Created Date or Last Modified Date. Lastly, you can also specify whether you want to keep or delete content after the Retention period expires. Hit Next
4. On the next screen, you get to choose where to apply the policy. You can apply it to email (Exchange), SharePoint sites, OneDrive accounts as well as Office 365 Groups.
5. In my case, I applied a policy to a single Office 365 Group Site
6. On a final screen, you need to review and confirm the settings and click Create this policy button. It is imperative to note the message you get to see at the bottom. It warns you that content might be deleted as soon as the policy takes effect according to the logic you set up in previous steps.
References:
https://docs.microsoft.com/en-us/exchange/security-and-compliance/messaging-records-management/create-a-retention-policy#step-2-create-a-retention-policy
https://docs.microsoft.com/en-us/exchange/security-and-compliance/messaging-records-management/apply-retention-policy#use-the-eac-to-apply-a-retention-policy-to-multiple-mailboxes
https://sharepointmaven.com/how-to-set-a-retention-policy-on-a-sharepoint-site/
質問 # 185
You have a Microsoft 365 tenant.
You have 500 computers that run Windows 10.
You plan to monitor the computers by using Windows Defender Advanced Threat Protection (Windows Defender ATP) after the computers are enrolled in Microsoft Intune.
You need to ensure that the computers connect to Windows Defender ATP.
How should you prepare Intune for Windows Defender ATP?
- A. Configure an enrollment restriction
- B. Create a Windows Autopilot deployment profile
- C. Create a conditional access policy
- D. Create a device configuration profile
正解:D
解説:
Explanation/Reference:
Reference:
https://docs.microsoft.com/en-us/intune/advanced-threat-protection
質問 # 186
You have an Azure Active Directory (Azure AD) tenant named contoso.com that contains the users shown in the following table.
You discover that several security alerts are visible from the Microsoft Defender for Identity portal.
You need to identify which users in contoso.com can close the security alerts.
Which users should you identify?
- A. User3 and User4 only
- B. User1 and User2 only
- C. User3 only
- D. User1 only
- E. User1 and User3 only
正解:C
解説:
Reference:
https://docs.microsoft.com/en-us/defender-for-identity/role-groups
質問 # 187
You have a Microsoft Defender Advanced Threat Protection (Microsoft Defender ATP) deployment that has the custom network indicators turned on. Microsoft Defender ATP protects two computers that run Windows
10 as shown in the following table.
Microsoft Defender ATP has the machine groups shown in the following table.
From Microsoft Defender Security Center, you create the URLs/Domains indicators shown in the following table.
For each of the following statements, select Yes if the statement is true. Otherwise, select No.
NOTE: Each correct selection is worth one point.
正解:
解説:
Explanation
質問 # 188
You have the Microsoft conditions shown in the following table.
You have the Azure Information Protection labels shown in the following table.
You have the Azure Information Protection policies shown in the following table.
For each of the following statements, select Yes if the statement is true. Otherwise, select No.
正解:
解説:
Explanation
質問 # 189
Please wait while the virtual machine loads. Once loaded, you may proceed to the lab section. This may take a few minutes, and the wait time will not be deducted from your overall test time.
When the Next button is available, click it to access the lab section. In this section, you will perform a set of tasks in a live environment. While most functionality will be available to you as it would be in a live environment, some functionality (e.g., copy and paste, ability to navigate to external websites) will not be possible by design.
Scoring is based on the outcome of performing the tasks stated in the lab. In other words, it doesn't matter how you accomplish the task, if you successfully perform it, you will earn credit for that task.
Labs are not timed separately, and this exam may more than one lab that you must complete. You can use as much time as you would like to complete each lab. But, you should manage your time appropriately to ensure that you are able to complete the lab(s) and all other sections of the exam in the time provided.
Please note that once you submit your work by clicking the Next button within a lab, you will NOT be able to return to the lab.
Username and password
Use the following login credentials as needed:
To enter your username, place your cursor in the Sign in box and click on the username below.
To enter your password, place your cursor in the Enter password box and click on the password below.
Microsoft 365 Username:
admin@[email protected]
Microsoft 365 Password: #HSP.ug?$p6un
If the Microsoft 365 portal does not load successfully in the browser, press CTRL-K to reload the portal in a new browser tab.
The following information is for technical support only:
Lab instance: 11122308


You need to ensure that all the email messages in the mailbox of a user named Allan Deyoung are retained for a period of 90 days, even if the messages are deleted.
To complete this task, sign in to the Microsoft 365 admin center.
正解:
解説:
See explanation below.
Explanation
1. Navigate to the Exchange Admin Center
2. Navigate to Compliance management > Retention tags, and then click Add +
3. Select the Applied automatically to entire mailbox (default) option.
4. The New retention tag page title and options will vary depending on the type of tag you selected. Complete the following fields:
Name: Enter a name for the retention tag.
Retention action: Select Delete and Allow Recovery option.
Retention period: Select When the item reaches the following age (in days) option.
Comment: User this optional field to enter any administrative notes or comments. The field isn't displayed to users.
5. Navigate to Compliance management Retention policies, and then click Add +
6. In New Retention Policy, complete the following fields:
Name: Enter a name for the retention policy.
Retention tags: Click Add + to select the tags you want to add to this retention policy.
After you create a retention policy, you must apply it.
1. Navigate to Recipients > Mailboxes
2. In the list view, select the mailbox to which you want to apply the retention policy, and then click Edit.
3. In User Mailbox, click Mailbox features
4. In the Retention policy list, select the policy you want to apply to the mailbox, and then click Save.
Reference:
https://docs.microsoft.com/en-us/exchange/security-and-compliance/messaging-records-management/create-a-re
https://docs.microsoft.com/en-us/exchange/security-and-compliance/messaging-records-management/apply-reten
質問 # 190
Note: This question is part of a series of questions that present the same scenario. Each question in the series contains a unique solution that might meet the stated goals. Some questions sets might have more than one correct solution, while others might not have a After you answer a question in this section, you will NOT be able to return to it. As a result, these questions will not appear in the review screen.
You have a Microsoft 365 subscription.
You have a user named User1. Several users have full access to the mailbox of User1.
Some email messages sent to User1 appear to have been read and deleted before the user viewed them.
When you search the audit log in Security & Compliance to identify who signed in to the mailbox of User1, the results are blank.
You need to ensure that you can view future sign-ins to the mailbox of User1.
You run the Set-AdminAuditLogConfig -AdminAuditLogEnabled $true
-AdminAuditLogCmdlets *Mailbox* command.
Does that meet the goal?
- A. Yes
- B. No
正解:B
解説:
Explanation
References:
https://docs.microsoft.com/en-us/powershell/module/exchange/policy-and-compliance-audit/setadminauditlogco
質問 # 191
You need to recommend a solution that meets the technical and security requirements for sharing data with the partners.
What should you include in the recommendation? Each correct answer presents part of the solution.
NOTE: Each correct selection is worth one point.
- A. Assign the Guest inviter role to User1.
- B. Create an access review.
- C. Assign the Global administrator role to User1.
- D. Modify the External collaboration settings in the Azure Active Directory admin center.
正解:A、D
解説:
Reference:
https://docs.microsoft.com/en-us/azure/active-directory/external-identities/delegate-invitations
Topic 3, Contoso, Ltd
Existing Environment
Infrastructure
The network contains an Active Directory domain named contoso.com that is synced to a Microsoft Azure Active Directory (Azure AD) tenant. Password writeback is enabled.
The domain contains servers that run Windows Server 2016. The domain contains laptops and desktop computers that run Windows 10 Enterprise.
Each client computer has a single volume.
Each office connects to the Internet by using a NAT device. The offices have the IP addresses shown in the following table.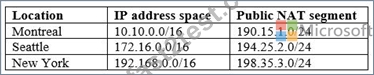
Named locations are defined in Azure AD as shown in the following table.
From the Multi-Factor Authentication page, an address space of 198.35.3.0/24 is defined in the trusted IPs list.
Azure Multi-Factor Authentication (MFA) is enabled for the users in the finance department.
The tenant contains the users shown in the following table.
The tenant contains the groups shown in the following table.
Customer Lockbox is enabled in Microsoft 365.
Microsoft Intune Configuration
The devices enrolled in Intune are configured as shown in the following table.
The device compliance policies in Intune are configured as shown in the following table.
The device compliance policies have the assignments shown in the following table.
The Mark devices with no compliance policy assigned as setting is set to Compliant.
Requirements
Technical Requirements
Contoso identifies the following technical requirements:
Use the principle of least privilege
Enable User1 to assign the Reports reader role to users
Ensure that User6 approves Customer Lockbox requests as quickly as possible Ensure that User9 can implement Azure AD Privileged Identity Management
質問 # 192
Your network contains an on-premises Active Directory domain named contoso.com. The domain contains the groups shown in the following table.
The domain is synced to a Microsoft Azure Active Directory (Azure AD) tenant that contains the groups shown in the following table.
You create an Azure Information Protection policy named Policy1.
You need to apply Policy1.
To which groups can you apply Policy1? To answer, select the appropriate options in the answer area.
NOTE: Each correct selection is worth one point.
正解:
解説:
Reference:
https://docs.microsoft.com/en-us/azure/information-protection/prepare
質問 # 193
Please wait while the virtual machine loads. Once loaded, you may proceed to the lab section. This may take a few minutes, and the wait time will not be deducted from your overall test time.
When the Next button is available, click it to access the lab section. In this section, you will perform a set of tasks in a live environment. While most functionality will be available to you as it would be in a live environment, some functionality (e.g., copy and paste, ability to navigate to external websites) will not be possible by design.
Scoring is based on the outcome of performing the tasks stated in the lab. In other words, it doesn't matter how you accomplish the task, if you successfully perform it, you will earn credit for that task.
Labs are not timed separately, and this exam may more than one lab that you must complete. You can use as much time as you would like to complete each lab. But, you should manage your time appropriately to ensure that you are able to complete the lab(s) and all other sections of the exam in the time provided.
Please note that once you submit your work by clicking the Next button within a lab, you will NOT be able to return to the lab.
Username and password
Use the following login credentials as needed:
To enter your username, place your cursor in the Sign in box and click on the username below.
To enter your password, place your cursor in the Enter password box and click on the password below.
Microsoft 365 Username:
admin@[email protected]
Microsoft 365 Password: &=Q8v@2qGzYz
If the Microsoft 365 portal does not load successfully in the browser, press CTRL-K to reload the portal in a new browser tab.
The following information is for technical support only:
Lab instance: 11032396
You need to create a case that prevents the members of a group named Operations from deleting email messages that contain the word IPO.
To complete this task, sign in to the Microsoft Office 365 admin center.
正解:
解説:
See explanation below.
Explanation
1. Navigate to the Security & Compliance Center.
2. In the Security & Compliance Center, click , and then click Create a case.
3. On the New Case page, give the case a name, type an optional description, and then click Save. The case name must be unique in your organization.
The new case is displayed in the list of cases on the eDiscovery page.
After you create a case, the next step is to add members to the case. The eDiscovery Manager who created the case is automatically added as a member. Members have to be assigned the appropriate eDiscovery permissions so they can access the case after you add them.
4. In the Security & Compliance Center, click eDiscovery > eDiscovery to display the list of cases in your organization.
5. Click the name of the case that you want to add members to.
The Manage this case flyout page is displayed.
6. Under Manage members, click Add to add members to the case.You can also choose to add a role group to the case. Under Manage role groups, click Add.
7. In the list of people or role groups that can be added as members of the case, click the check box next to the names of the people or role groups that you want to add.
8. After you select the people or role groups to add as members of the group, click Add.In Manage this case, click Save to save the new list of case members.
9. Click Save to save the new list of case members.
You can use an eDiscovery case to create holds to preserve content that might be relevant to the case. You can place a hold on the mailboxes and OneDrive for Business sites of people who are custodians in the case. You can also place a hold on the group mailbox, SharePoint site, and OneDrive for Business site for an Office 365 Group. Similarly, you can place a hold on the mailboxes and sites that are associated with Microsoft Teams or Yammer Groups. When you place content locations on hold, content is held until you remove the hold from the content location or until you delete the hold.
To create a hold for an eDiscovery case:
1. In the Security & Compliance Center, click to display the list of cases in your organization.
2. Click Open next to the case that you want to create the holds in.
3. On the Home page for the case, click the
4. On the Hold page, click Create.
5. On the Name your hold page, give the hold a name. The name of the hold must be unique in your organization.
6. (Optional) In the Description box, add a description of the hold.
7. Click Next.
8. Choose the content locations that you want to place on hold. You can place mailboxes, sites, and public folders on hold.
a. Exchange email - Click Choose users, groups, or teams and then click Choose users, groups, or teams again. to specify mailboxes to place on hold. Use the search box to find user mailboxes and distribution groups (to place a hold on the mailboxes of group members) to place on hold. You can also place a hold on the associated mailbox for a Microsoft Team, a Yammer Group, or an Office 365 Group. Select the user, group, team check box, click Choose, and then click Done.
a. In the box under Keywords, type a search query in the box so that only the content that meets the search criteria is placed on hold. You can specify keywords, message properties, or document properties, such as file names. You can also use more complex queries that use a Boolean operator, such as AND, OR, or NOT. If you leave the keyword box empty, then all content located in the specified content locations will be placed on hold.
b. Click Add conditions to add one or more conditions to narrow the search query for the hold. Each condition adds a clause to the KQL search query that is created and run when you create the hold. For example, you can specify a date range so that email or site documents that were created within the date ranged are placed on hold. A condition is logically connected to the keyword query (specified in the keyword box) by the AND operator. That means that items have to satisfy both the keyword query and the condition to be placed on hold.
9. After configuring a query-based hold, click
10. Review your settings, and then click
Reference:
https://docs.microsoft.com/en-us/microsoft-365/compliance/ediscovery-cases?view=o365-worldwide
質問 # 194
You have a Microsoft 365 subscription for a company named Contoso, Ltd. All data is in Microsoft 365.
Contoso works with a partner company named Litware, Inc. Litware has a Microsoft 365 subscription.
You need to allow users at Contoso to share files from Microsoft OneDrive to specific users at Litware.
Which two actions should you perform from the OneDrive admin center? Each correct answer presents part of the solution.
NOTE: Each correct selection is worth one point.
- A. Change the permissions for OneDrive External sharing to the least permissive level
- B. Modify the Device access settings
- C. Increase the permission level for OneDrive External sharing
- D. Modify the Sync settings
- E. Decrease the permission level for OneDrive External sharing
- F. Modify the Links settings
正解:E、F
解説:
References:
https://docs.microsoft.com/en-us/sharepoint/turn-external-sharing-on-or-off
質問 # 195
You have a Microsoft 365 Enterprise E5 subscription.
You use Windows Defender Advanced Threat Protection (Windows Defender ATP).
You need to integrate Microsoft Office 365 Threat Intelligence and Windows Defender ATP.
Where should you configure the integration?
- A. From the Microsoft 365 admin center, select Settings, and then select Services & add-ins.
- B. From the Microsoft 365 admin center, select Reports, and then select Security & Compliance.
- C. From the Security & Compliance admin center, select Threat management, and then select Explorer.
- D. From the Security & Compliance admin center, select Threat management and then select Threat tracker.
正解:C
解説:
References:
https://docs.microsoft.com/en-us/office365/securitycompliance/integrate-office-365-ti-with-wdatp
質問 # 196
Note: This question is part of series of questions that present the same scenario. Each question in the series contains a unique solution that might meet the stated goals. Some question sets might have more than one correct solution, while others might not have a correct solution.
After you answer a question in this section, you will NOT be able to return to it. As a result, these questions will not appear in the review screen.
You have a Microsoft 365 tenant. You create a label named CompanyConfidential in Microsoft Azure Information Protection.
You add CompanyConfidential to a global policy.
A user protects an email message by using CompanyConfidential and sends the label to several external recipients. The external recipients report that they cannot open the email message.
You need to ensure that the external recipients can open protected email messages sent to them.
Solution: You modify the encryption settings of the label.
Does this meet the goal?
- A. Yes
- B. No
正解:B
質問 # 197
How should you configure Group3? To answer, select the appropriate options in the answer area.
NOTE: Each correct selection is worth one point.
正解:
解説:
Explanation
質問 # 198
You have a Microsoft 365 tenant.
You need to retain Azure Active Directory (Azure AD) audit logs for two years. Administrators must be able to query the audit log information by using the Azure Active Directory admin center.
What should you do? To answer, select the appropriate options in the answer area.
NOTE: Each correct selection is worth one point.
正解:
解説:
Reference:
https://docs.microsoft.com/en-gb/azure/active-directory/reports-monitoring/howto-analyze-activity-logs-log-analytics
質問 # 199
......
最新MS-500試験問題集には高得点で一発合格:https://jp.fast2test.com/MS-500-premium-file.html
MS-500認定試験問題集には309練習テスト問題はこちら:https://drive.google.com/open?id=1Dd0BQJD6TY7yKtagANZgqTGQhCmYsrAs