
試験名称: SAP Certified - Implementation Consultant - SAP S/4HANA Cloud Public Edition (C_S4CPB_2602)
認証ベンダー: SAP
対応認証: SAP Certified Associate

オーバー 11429+ 人満足している顧客
C_S4CPB PDF版
- 印刷可能なC_S4CPB PDF版
- SAP専門家による準備
- インスタントダウンロード
- いつでもどこでも勉強
- 365日無料アップデート
- C_S4CPB無料PDFデモをご利用
- PDF版試用をダウンロードする
- 問題と解答: 20
- 最近更新時間: 2026-10-06
- 価格: ¥6500
C_S4CPB ソフト版
- インストール可能なソフトウェア応用
- 本番の試験環境をシミュレート
- 人にC_S4CPB試験の自信をもたせる
- MSシステムをサポート
- 練習用の2つモード
- いつでもオフラインで練習
- ソフト版キャプチャーをチェックする
- 問題と解答: 20
- 最近更新時間: 2026-10-06
- 価格: ¥6500
C_S4CPB オンライン版
- 学習を簡単に、便利オンラインツール
- インスタントオンラインアクセス
- すべてのWebブラウザをサポート
- いつでもオンラインで練習
- テスト履歴と性能レビュー
- Windows/Mac/Android/iOSなどをサポート
- オンラインテストエンジンを試用する
- 問題と解答: 20
- 最近更新時間: 2026-10-06
- 価格: ¥6500
SAP C_S4CPB問題集

インスタントダウンロード: 支払いが完了すると、システムから購入した商品がメールで自動的にメールボックスに送信されます。 (12時間以内に受信されない場合は、ご連絡ください。注意:スパムを確認することを忘れないでください)。
100%返金保証
Fast2testは、顧客の間で初めて合格率99.6%を達成しています。  弊社は製品に自信を持っており、面倒な製品を提供していません。
- 高品質試験問題集参考書
- 三つバージョンは選択可能
- 十年の優位性
- 365日無料アップデット
- いつでもどこで勉強
- 100%安全なショッピング体験
弊社は無料でSAP Certified Associate試験のDEMOを提供します。
Fast2testの試験問題集はPDF版とソフト版があります。PDF版のC_S4CPB問題集は印刷されることができ、ソフト版のC_S4CPB問題集はどのパソコンでも使われることもできます。両方の問題集のデモを無料で提供し、ご購入の前に問題集をよく理解することができます。
簡単で便利な購入方法:ご購入を完了するためにわずか2つのステップが必要です。弊社は最速のスピードでお客様のメールボックスに製品をお送りします。あなたはただ電子メールの添付ファイルをダウンロードする必要があります。 領収書について:社名入りの領収書が必要な場合には、メールで社名に記入して頂き送信してください。弊社はPDF版の領収書を提供いたします。一年間無料で問題集をアップデートするサービスを提供します。
弊社の商品をご購入になったことがあるお客様に一年間の無料更新サービスを提供いたします。弊社は毎日問題集が更新されたかどうかを確認しますから、もし更新されたら、弊社は直ちに最新版のC_S4CPB問題集をお客様のメールアドレスに送信いたします。ですから、試験に関連する情報が変わったら、あなたがすぐに知ることができます。弊社はお客様がいつでも最新版のSAP C_S4CPB学習教材を持っていることを保証します。
弊社のC_S4CPB問題集のメリット
Fast2testの人気SAP認定試験問題集は的中率が高くて、100%試験に合格できるように作成されたものです。Fast2testの問題集は弊社SAP専門家が長年の経験を活かして最新のシラバスに従って研究し出した学習教材です。
Fast2testは効率が良い受験法を教えてさしあげます。弊社のC_S4CPB問題集は精確に実際試験の範囲を絞ります。弊社のC_S4CPB問題集を利用すると、試験の準備をするときに時間をたくさん節約することができます。弊社の問題集によって、あなたは試験に関連する専門知識をよく習得し、自分の能力を高めることができます。それだけでなく、弊社のC_S4CPB問題集はあなたがC_S4CPB認定試験に一発合格できることを保証いたします。
行き届いたサービス、お客様の立場からの思いやり、高品質の学習教材を提供するのは弊社の目標です。 お客様がご購入の前に、無料で弊社のC_S4CPB試験「SAP Certified - Implementation Consultant - SAP S/4HANA Cloud Public Edition (C_S4CPB_2602)」のサンプルをダウンロードして試用することができます。PDF版とソフト版の両方がありますから、あなたに最大の便利を捧げます。それに、C_S4CPB試験問題は最新の試験情報に基づいて定期的にアップデートされています。
弊社のSAP Certified Associate問題集を利用すれば必ず試験に合格できます。
Fast2testのSAP C_S4CPB問題集はSAP認定試験に関連する豊富な経験を持っている弊社の専門家によって研究された最新バージョンの試験参考書です。SAP C_S4CPB問題集は最新のSAP C_S4CPB試験内容を含んでいてヒット率がとても高いです。Fast2testのSAP C_S4CPB問題集を真剣に勉強する限り、簡単に試験に合格することができます。弊社の問題集は100%の合格率を持っています。これは数え切れない受験者の皆さんに証明されたことです。100%一発合格!失敗一回なら、全額返金を約束します!
SAP C_S4CPB 試験シラバストピック:
| セクション | 比重 | 目標 |
|---|---|---|
| データの管理と移行 | 15% | - マスタデータの設定
|
| システム設定と管理運用 | 25% | - 権限とアクセスの管理
|
| 業務プロセスの設定 | 30% | - プロセス間の連携
|
| Cloud ERP導入の基礎知識 | 20% | - 導入の方法論
|
| 拡張性とライフサイクル管理 | 10% | - ライフサイクルにおける運用業務
|
SAP Certified - Implementation Consultant - SAP S/4HANA Cloud Public Edition (C_S4CPB_2602) 認定 C_S4CPB 試験問題:
SIMULATION
Create a Custom Business Role with Restrictions
Business Scenario:
You are building a custom business role with restrictions to ensure the end users assigned the role have only the minimum level of access necessary to complete their core job tasks. The end users are project managers based in the United States. They should only be able to create projects, edit projects, and access projects that are occurring in the United States. They should not be able to staff any resources outside of the United States. Write, Read, and Value Help access should be restricted to only the United States for all relevant fields.
Prerequisites:
Note: In the task below, always replace ###### with the last 6 digits of your group number.
Note: Make sure to use the EXACT names/values/spaces as they are listed in the task. Even forgetting a space or a number will cause the validation of the task to fail and be marked as incorrect.
Task:
Use the template for the business role Project Manager - Professional Services (SAP_BR_PROJECT_MANAGER_PROF) to create a new business role with the following information:
正解:
See Explanation below for all solution
Explanation:
Objective
The purpose of this task is to create a custom business role for project managers in the United States by using the standard SAP template role Project Manager - Professional Services and then restricting the role so users only have the minimum access needed for their job.
The template role used is:
Template Business Role ID: SAP_BR_PROJECT_MANAGER_PROF
Template Business Role Description: Project Manager - Professional Services The new custom role must be created with exact values defined in the task.
Business Scenario Explanation
In this simulation, you are building a restricted custom role for project managers who work only in the United States.
The goal is to ensure that these end users:
can create and edit projects,
can access only projects occurring in the United States,
cannot work with projects or staffing outside the US,
have only the minimum level of authorization needed.
This is done in two major parts:
Create a new custom business role from the standard SAP template
Restrict the role values so only US-related data is allowed
Important Notes
Always replace ###### with the last 6 digits of your group number.
Every value must be entered exactly as shown.
Even one missing space or incorrect character can cause the simulation validation to fail.
You must also create and assign a launchpad space as part of the custom role creation.
Required Values for Role Creation
Use the following values exactly as shown in the task image.
Parameter
Value
New Business Role ID
BR_PROJECT_MANAGER_PROF_US_######
New Business Role Description
Project Manager - Professional Services - US - ######
Option for Launchpad Spaces
Create and Assign Spaces Based on Space Templates
New Space ID
ZBR_PROJECT_MANAGER_PROF_US_######
Activate IAM Apps
Yes (check the box)
Example
If your suffix is 000457, the values become:
BR_PROJECT_MANAGER_PROF_US_000457
Project Manager - Professional Services - US - 000457
ZBR_PROJECT_MANAGER_PROF_US_000457
Detailed Step-by-Step Procedure
Part 1: Open the standard template role
Step 1: Open the app "Maintain Business Roles"
From the SAP S/4HANA Cloud launchpad:
Log in to SAP S/4HANA Cloud.
Use the app search.
Search for:
Maintain Business Roles
Open the app.
Explanation:
This app is used to maintain standard and custom business roles.
Because this task requires creating a custom role from an existing template, this is the correct starting app.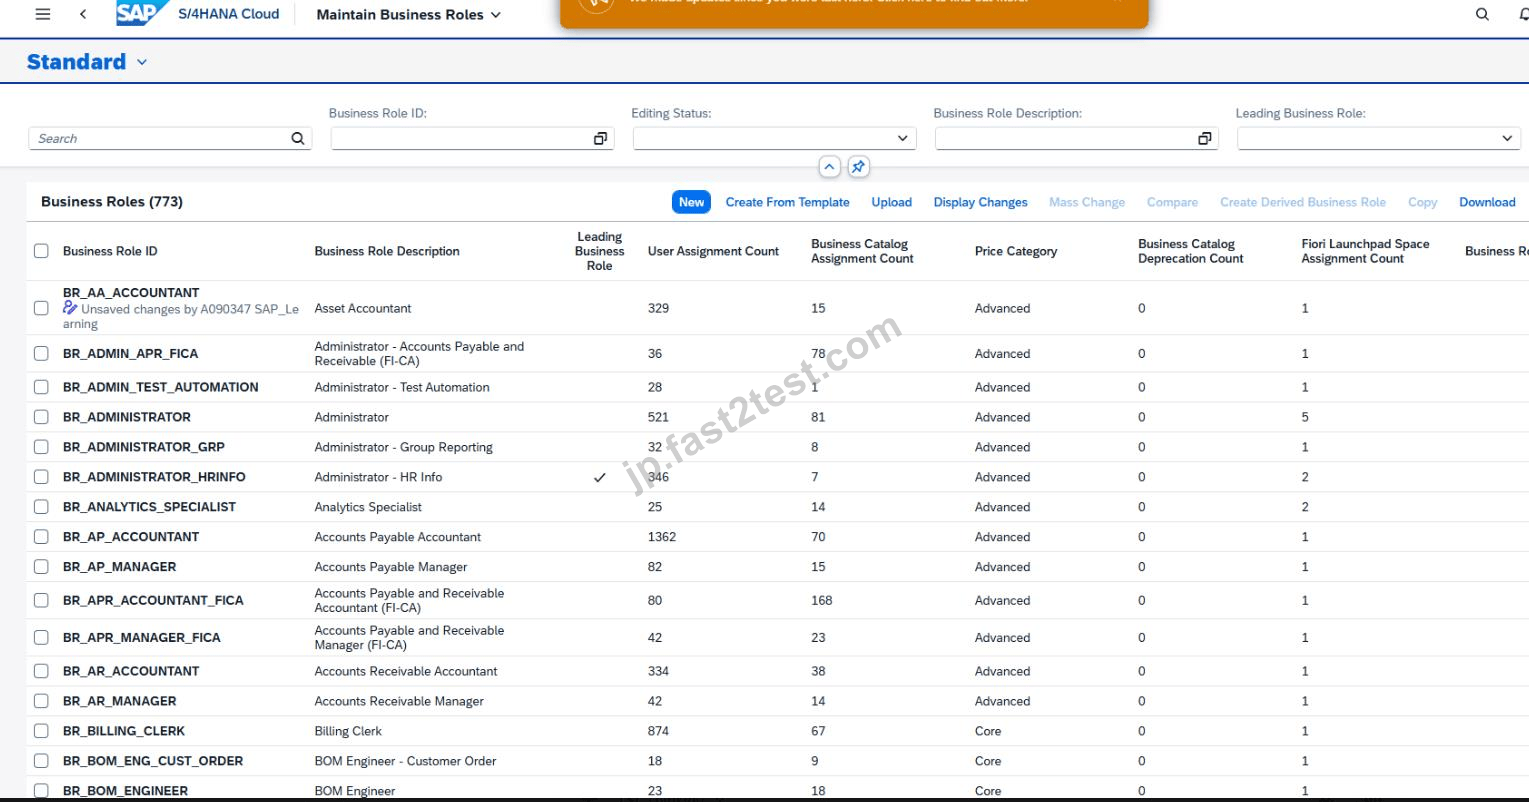
Step 2: Search for the template role
Inside Maintain Business Roles:
In the search/filter area, search for:
SAP_BR_PROJECT_MANAGER_PROF
or
Project Manager - Professional Services
Open the standard SAP template role.
Explanation:
You must start from the standard template role because the task explicitly says to use the template for:
Project Manager - Professional Services
SAP_BR_PROJECT_MANAGER_PROF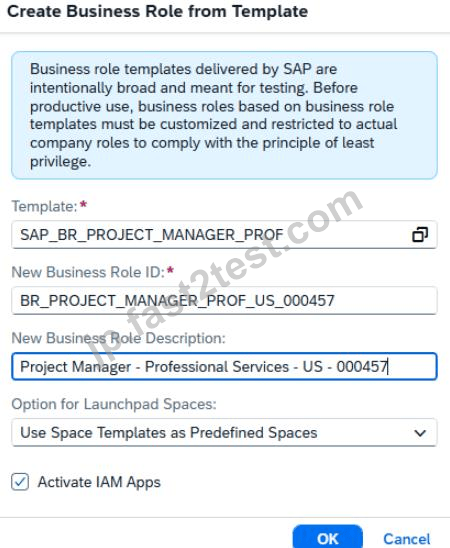
Part 2: Create the custom role from the template
Step 3: Click "Create Derived Business Role"
On the template role page:
Click:
Create Derived Business Role
Explanation:
This function creates a customer-specific copy based on the standard SAP business role template.
It preserves the delivered role content but allows you to define your own role ID, description, restrictions, and launchpad space.
Step 4: Enter the custom role information
In the creation popup, enter the values exactly as follows:
Template = SAP_BR_PROJECT_MANAGER_PROF
New Business Role ID = BR_PROJECT_MANAGER_PROF_US_######
New Business Role Description = Project Manager - Professional Services - US - ###### Option for Launchpad Spaces = Create and Assign Spaces Based on Space Templates New Space ID = ZBR_PROJECT_MANAGER_PROF_US_###### Activate IAM Apps = checked Explanation:
These values define the new custom project manager role that will later be restricted to US-only access.
The space option is important because the task expects the role to include its own launchpad space.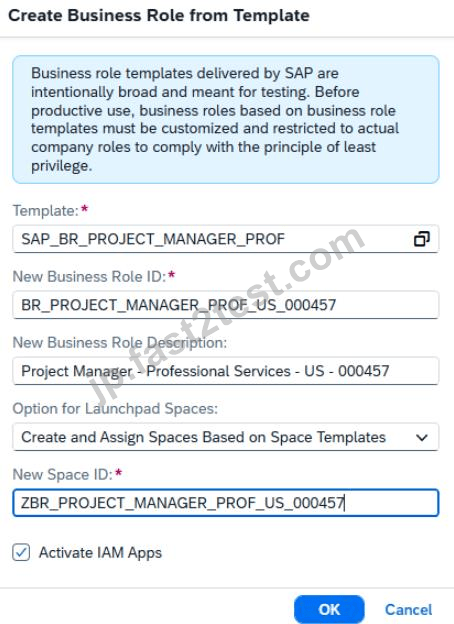
Step 5: Confirm creation
Click OK
Explanation:
SAP now creates the custom role derived from the template and assigns the new launchpad space at the same time.
Part 3: Verify the newly created custom role
Step 6: Review the new custom role
After creation, SAP opens the new custom role.
Verify:
Business Role ID = BR_PROJECT_MANAGER_PROF_US_######
Business Role Description = Project Manager - Professional Services - US - ###### Business Role Template ID = SAP_BR_PROJECT_MANAGER_PROF Explanation:
This confirms the derived role was created correctly from the right SAP template.
Part 4: Maintain role restrictions
Step 7: Open "Maintain Restrictions"
On the custom role page:
Click:
Maintain Restrictions
Explanation:
This is the most important part of the task.
You are not only creating a role - you are also limiting the role so it only allows US-related values.
Step 8: Understand the rule for restriction maintenance
The PDF/task logic is:
Fields explicitly listed in the restriction table → keep them Restricted and enter the required values All other fields not listed in the task table → set them to Not Maintained Explanation:
This is essential.
If extra fields remain restricted or blank, the role may not validate correctly.
The safest approach is:
only maintain the required fields,
mark all unrelated fields as Not Maintained.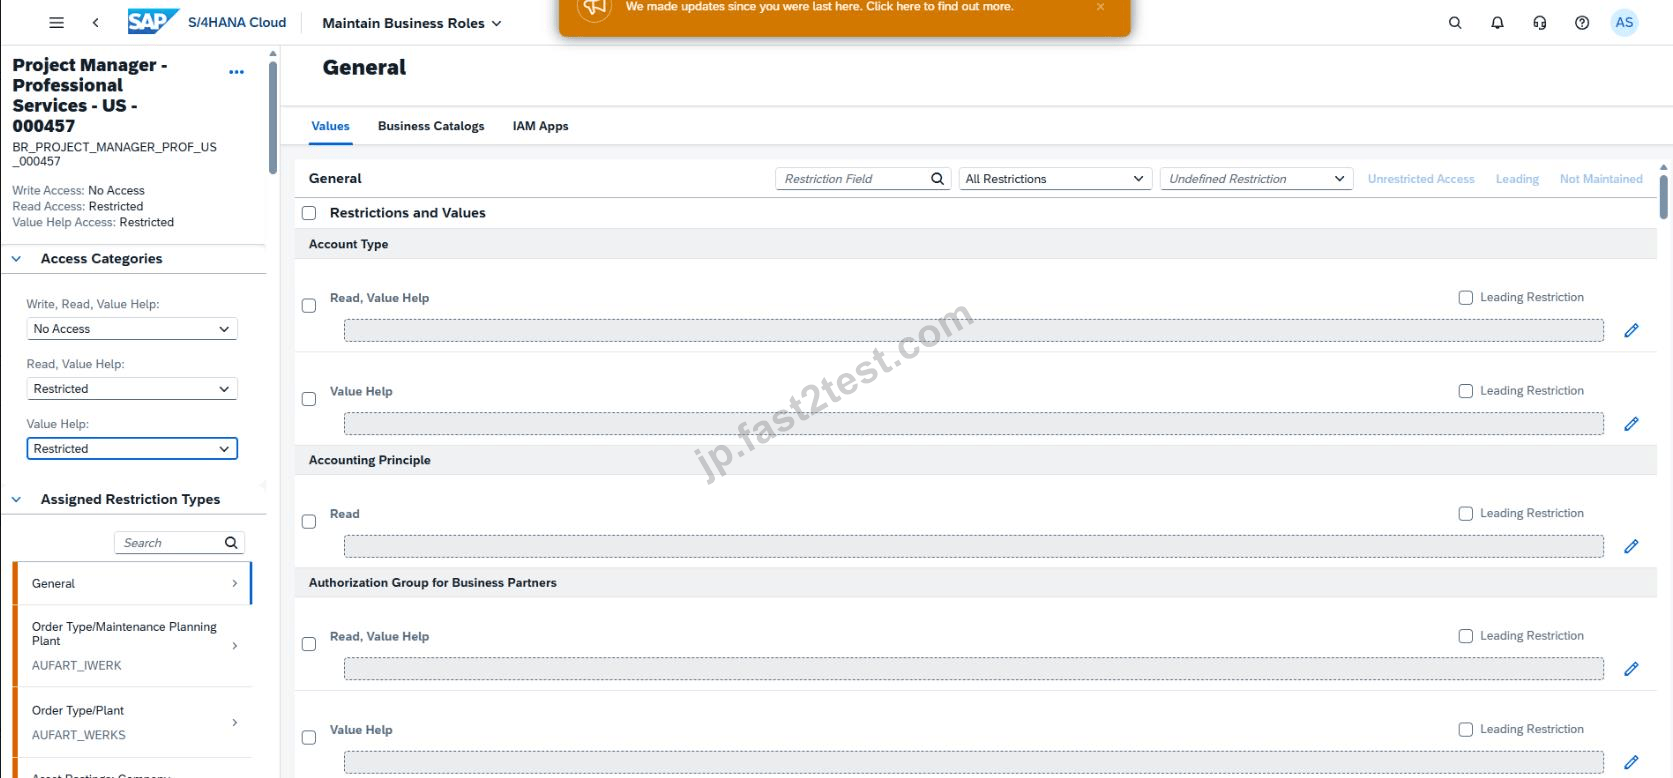
Part 5: Enter the required US restrictions
From your exercise run, the maintained values included restrictions such as:
Keep these kinds of fields restricted with US/1710 values where required Examples from your run:
Bank Country/Region Key
Read, Value Help = US
Value Help = US
Company Code
use 1710 only where the task table explicitly requires it
Purchasing Organization
use 1710 where required
Valuation Area
use 1710 where required
Explanation:
These are the exact business restrictions that make the role usable only for the intended geography and business scope.
Step 9: Set unrelated restriction fields to "Not Maintained"
For every field not included in the task's restriction list, choose:
Not Maintained
Examples from your screenshots included fields like:
Accounting Principle
Authorization Group for Business Partners
Billing Type
These should be Not Maintained unless they are explicitly listed in the task's required restriction table.
Explanation:
This removes unnecessary access and matches the task wording that all other fields should be set to Not Maintained.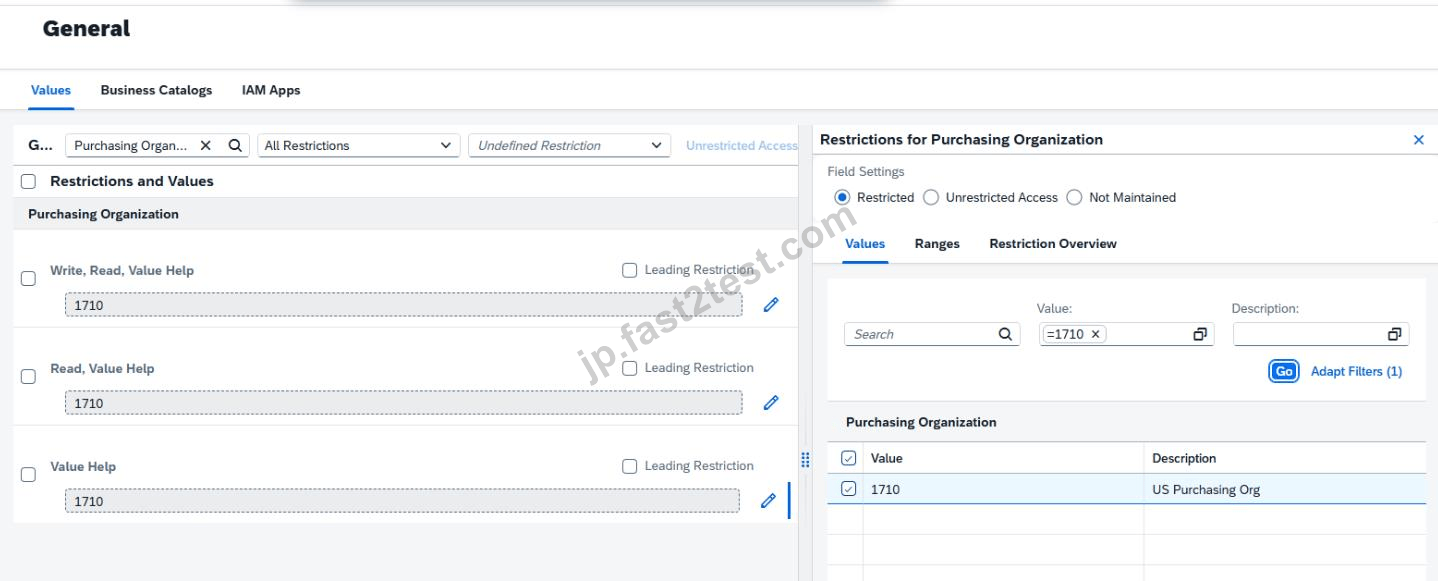
Step 10: Save the restrictions
After all required values are entered and unrelated fields are marked Not Maintained:
Click Save
Explanation:
This saves the restriction profile of the role.
If you do not save here, the role will remain incomplete or in draft.
Part 6: Verify launchpad space and page creation
Step 11: Go to Launchpad Spaces
In the custom role:
Open the tab:
Launchpad Spaces
Verify that the assigned space exists:
ZBR_PROJECT_MANAGER_PROF_US_######
Explanation:
Because you selected Create and Assign Spaces Based on Space Templates, SAP should have created and assigned the launchpad space automatically.
Step 12: Verify the created space
Open the assigned space and confirm:
the custom space exists,
it is customer-managed,
the pages are assigned correctly.
Explanation:
This proves that the new business role has its own launchpad structure as required by the task.
Expected Result
After this task is completed successfully:
a new custom role exists based on SAP_BR_PROJECT_MANAGER_PROF,
the role uses the exact required ID and description,
the role has a custom launchpad space,
IAM apps are activated,
restrictions are maintained for US-only access,
all irrelevant fields are set to Not Maintained,
the role is saved successfully.
SIMULATION
Migrate Bank Data
Business Scenario
You are responsible for migrating bank data into the SAP S/4HANA Cloud Public Edition system. You have determined the best method is Migrate Data Using Staging Tables, as you only have a couple banks to migrate.
Prerequisites:
Note:
In the task below, always replace ###### with the last 6 digits of your group number.
Note:
Make sure to use the EXACT names/values/spaces as they are listed in the task. Even forgetting a space or a number will cause the validation of the task to fail and be marked as incorrect.
Task:
Migrate the bank data listed below.
Table 1: Bank 1

正解:
See Explanation below for all solution
Explanation:
Objective
The purpose of this task is to migrate two bank master records into SAP S/4HANA Cloud Public Edition using the Migrate Data Using Staging Tables approach.
This task is performed inside the migration project created earlier:
Migration Project Name: Bank Data ######
Migration Object: Bank
The bank master data must be entered exactly as provided in the task tables.
Business Scenario Explanation
In this scenario, you are responsible for loading a small number of bank records into the system. Because there are only two banks to migrate, the selected migration method is:
Migrate Data Using Staging Tables
This method requires you to:
open the existing migration project,
download the Bank templates,
populate the required CSV file with the bank data,
upload the files,
validate the data,
transfer the data to staging tables,
complete any required mapping tasks,
migrate the bank instances,
verify the migrated banks in the target app.
Important Notes
Always replace ###### with the last 6 digits of your group number.
Use the values exactly as shown in the task.
Keep names, spaces, and numbers exactly correct.
During your execution, mappings may be required for:
Country/Region Key
Language Key (ISO)
Regional Code
Bank Key
If regional text values like Pennsylvania or Georgia are rejected, mapping may be needed to:
PA
GA
Example
If the suffix is 000013, the values become:
Bank 1
Bank Country/Region = US
Bank Key = A000013
Bank Name = Bank of A000013
Street = West Chester Pike
House Number = 3999
City = Newtown Square
Postal Code = 19073
Country/Region = US
Language = EN
Location = Pennsylvania
Bank 2
Bank Country/Region = US
Bank Key = Z000013
Bank Name = Bank of Z000013
Street = Lenox Road
House Number = 3580
City = Atlanta
Postal Code = 30326
Country/Region = US
Language = EN
Location = Georgia
Detailed Step-by-Step Procedure
Step 1: Open the app "Migrate Your Data"
From the SAP S/4HANA Cloud launchpad:
Log in to SAP S/4HANA Cloud.
Search for:
Migrate Your Data
or
Migration Projects
Open the app.
Explanation:
This app is the migration cockpit where the project and Bank migration object are maintained.
Step 2: Open the migration project
In the migration projects list:
Search for your project:
Bank Data ######
Open the project.
Example
If your suffix is 000013, open:
Bank Data 000013
Explanation:
This is the migration project created in the previous task and it contains the migration object Bank.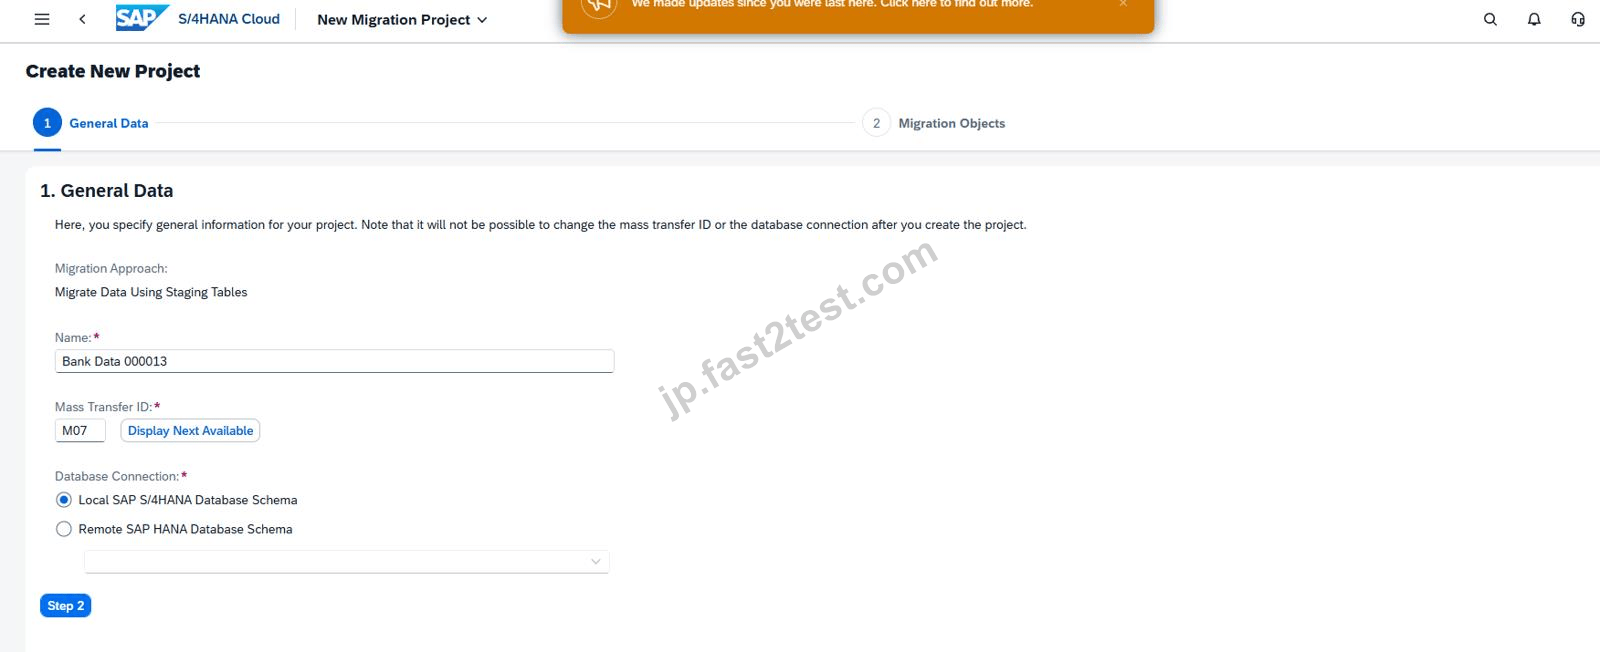
Step 3: Open the Bank migration object
Inside the migration project:
Locate the migration object:
Bank
Open it.
Explanation:
The Bank migration object is where the templates, uploads, mapping tasks, and migration instances are handled.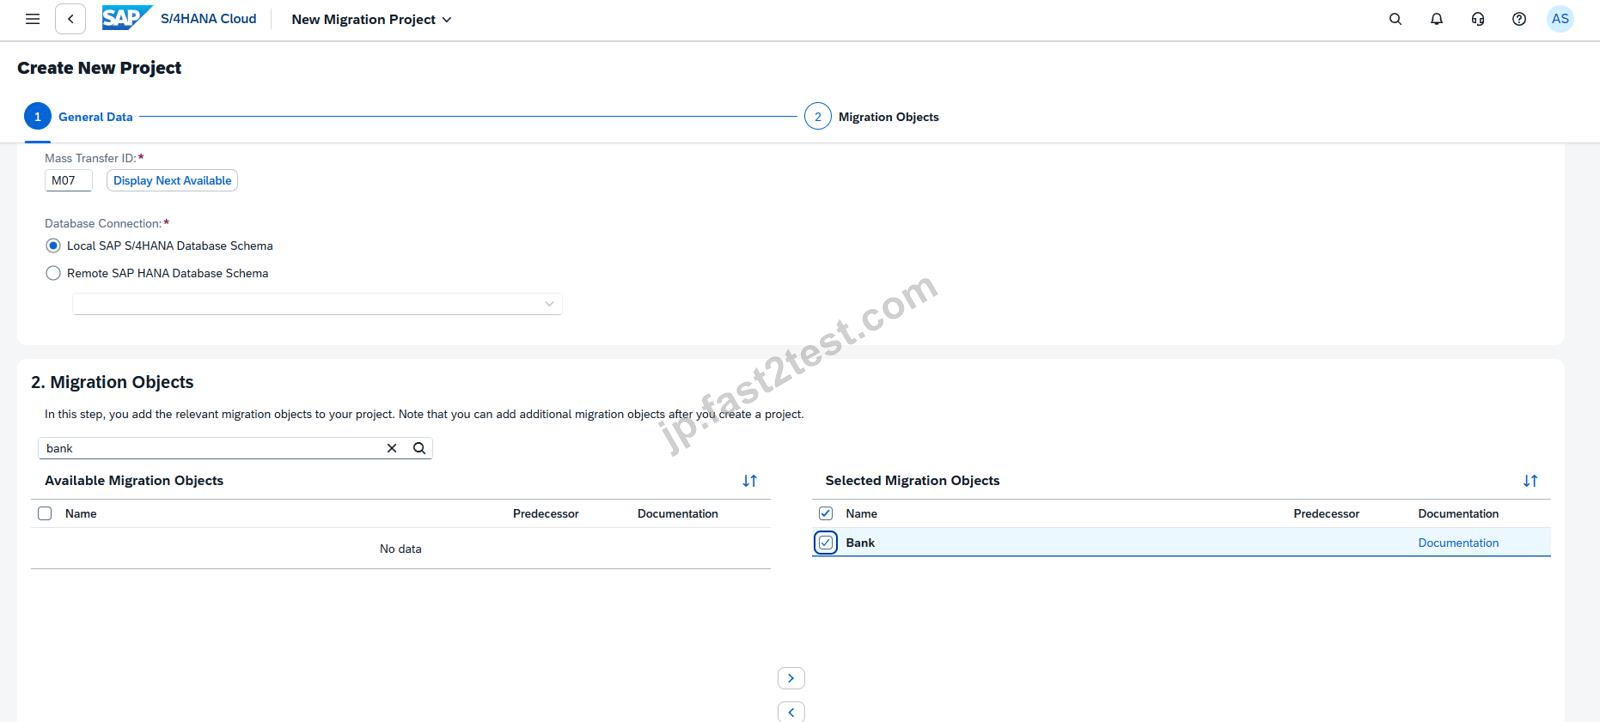
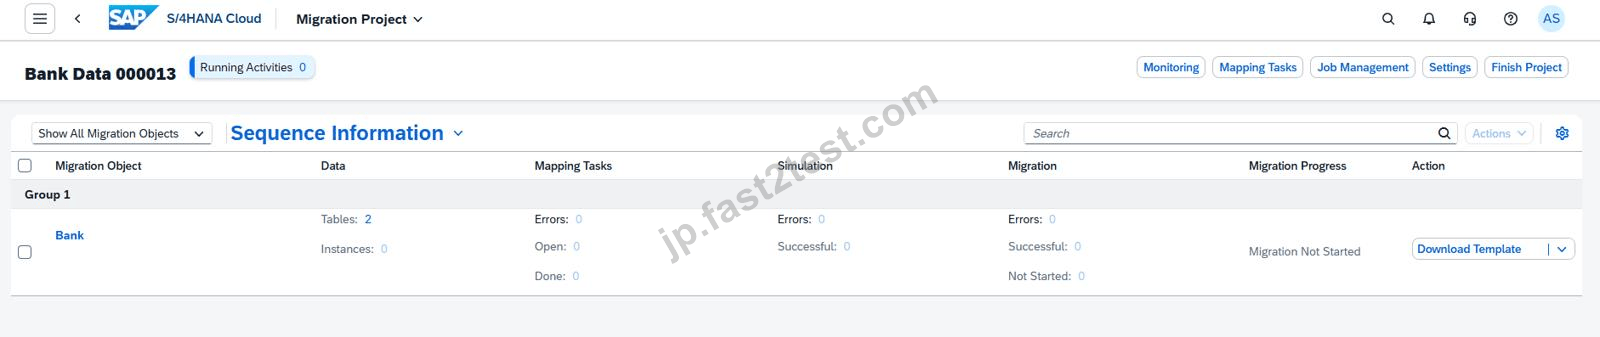
Step 4: Download the template files
On the Bank migration object screen:
Click:
Download Template
This provides the CSV template files needed for migration.
Explanation:
For the Bank migration object, the main files typically include:
S_BNKA#FreeText_Mandatory.csv
S_SCRIPT_ADRC#FreeText.csv
The mandatory file contains the bank master structure; the second file is optional for international address versions.
Step 5: Populate the mandatory Bank CSV file
Open the mandatory CSV file:
S_BNKA#FreeText_Mandatory.csv
Enter the two bank records exactly as required from the task tables.
Explanation:
This file must contain the bank master data that will be loaded into the staging tables.
The data must match the required values exactly.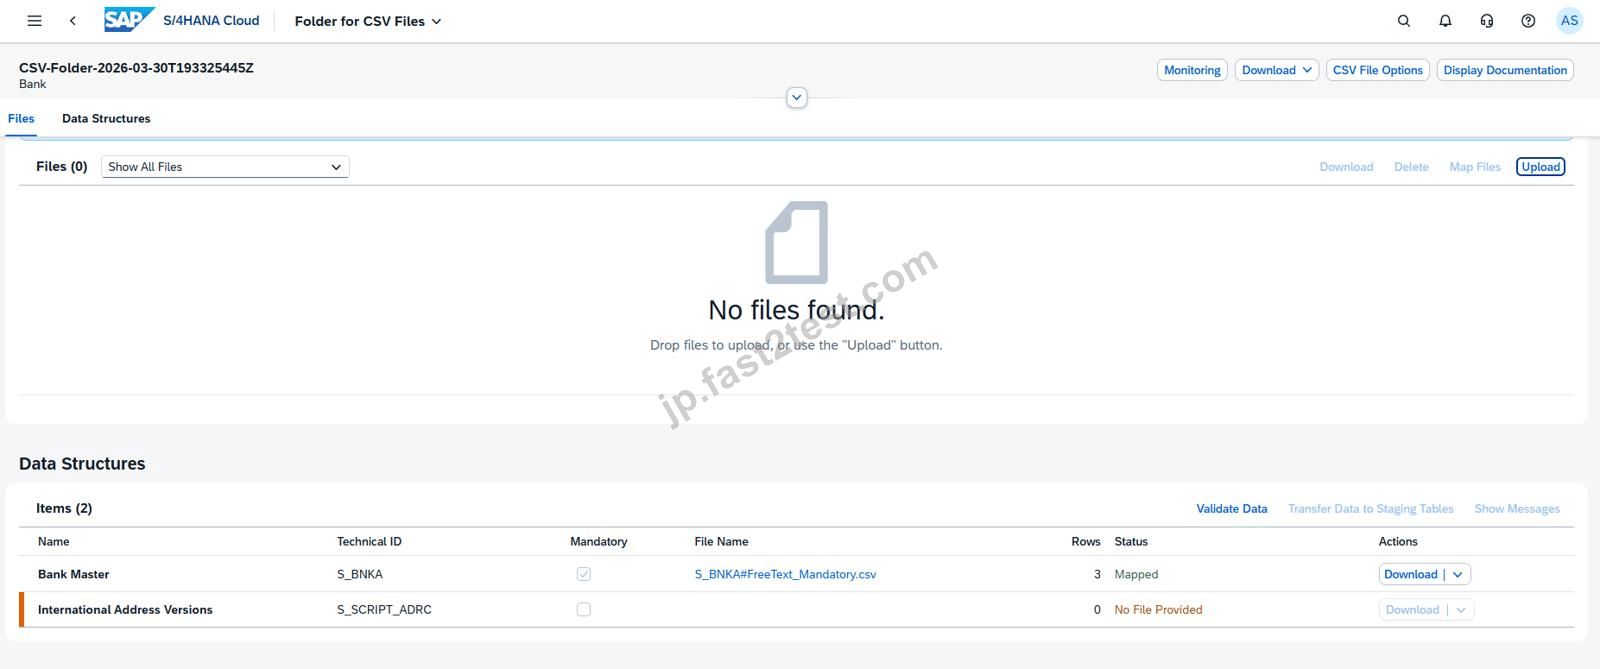
Step 6: Use the correct values in the Bank CSV
Populate the mandatory file with the two records.
Bank 1
Bank Country/Region = US
Bank Key = A######
Bank Name = Bank of A######
Street = West Chester Pike
House Number = 3999
City = Newtown Square
Postal Code = 19073
Country/Region = US
Language = EN
Location = Pennsylvania
Bank 2
Bank Country/Region = US
Bank Key = Z######
Bank Name = Bank of Z######
Street = Lenox Road
House Number = 3580
City = Atlanta
Postal Code = 30326
Country/Region = US
Language = EN
Location = Georgia
Explanation:
These values create two bank master records, one beginning with key A###### and the other with key Z######.
Step 7: Keep the optional international address file empty if not needed For the file:
S_SCRIPT_ADRC#FreeText.csv
leave it with header only if no separate international address version data is required.
Explanation:
During your execution, the optional file was not required and the Bank migration still proceeded because only the mandatory Bank Master structure had to be populated.
Step 8: Open Upload Files
In the Bank migration object:
Go to:
Upload Files
Explanation:
This is where the CSV folder is created and the files are uploaded to the migration cockpit.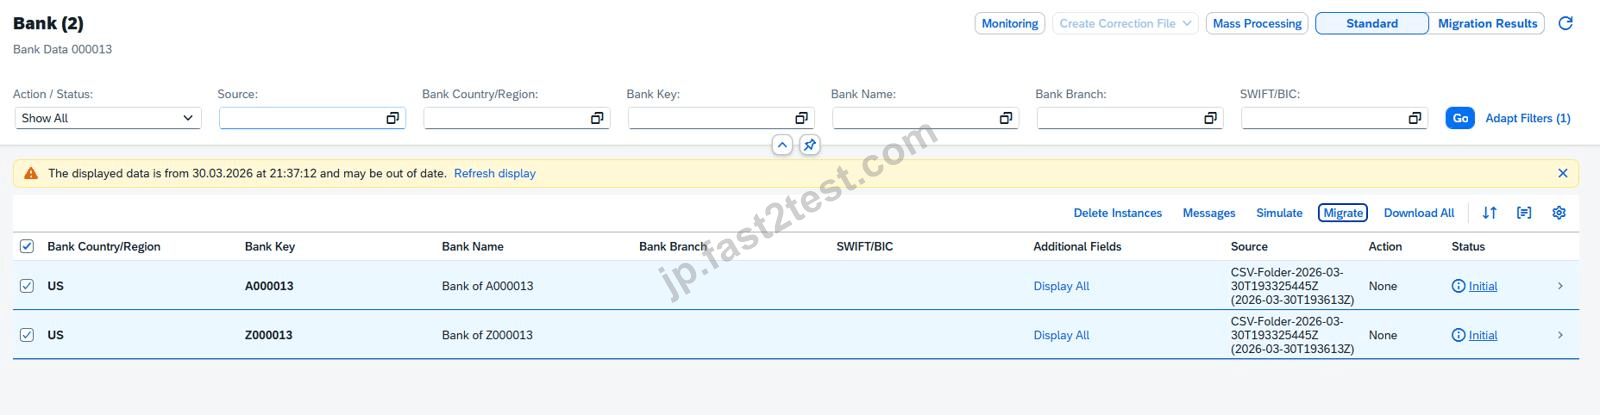
Step 9: Create a CSV Folder
Click:
Create CSV Folder
Explanation:
When using CSV with staging tables, SAP groups the upload into a CSV folder structure.
Step 10: Upload the CSV files
Upload:
S_BNKA#FreeText_Mandatory.csv
S_SCRIPT_ADRC#FreeText.csv (optional / empty if not used)
Explanation:
The mandatory file is required.
The optional file may remain empty or not provided depending on the migration object's structure.
Step 11: Validate the data
After upload:
Click:
Validate Data
Explanation:
This checks:
file readability,
required columns,
correct structure,
duplicate keys,
and data consistency.
Step 12: Correct any file or format errors if needed
During execution, common issues included:
wrong file mapping,
UTF-8 / CSV reading problems,
missing mandatory fields,
duplicate key values,
region value mismatches.
Explanation:
You must resolve validation errors before continuing to staging tables.
Examples from your run:
duplicate key values had to be corrected,
file structure mapping had to be adjusted,
CSV encoding had to be corrected.
Step 13: Transfer data to staging tables
After validation is successful, click:
Transfer Data to Staging Tables
Explanation:
This moves the validated CSV data into SAP's staging tables so the Bank migration object can create migration instances.
Step 14: Go to Mapping Tasks if required
If the system shows mapping tasks, open:
Mapping Tasks
Explanation:
For your run, the following mappings had to be confirmed:
Country/Region Key
Language Key (ISO)
Regional Code
Bank Key
Step 15: Maintain mapping values
If mappings appear, confirm or maintain them as follows:
Country/Region Key
source US → target US
Language Key (ISO)
source EN → target EN
Regional Code
If text values are shown:
source Pennsylvania → target PA
source Georgia → target GA
Bank Key
Confirm the system-generated source values to the correct target values for:
A######
Z######
Explanation:
These mappings are required when the migration object needs target-system value confirmation before posting the records.
Step 16: Confirm the mapping tasks
After maintaining the mappings:
Click:
Confirm
Explanation:
All mapping task statuses should change to Confirmed before running migration again.
Step 17: Open the Bank instances
Return to the Bank migration object and open:
Instances
Explanation:
This screen shows the individual bank records created from the staging-table data.
Step 18: Select the bank instances
Select both bank records.
Expected rows:
US / A######
US / Z######
Explanation:
Both bank records must be selected so they can be migrated into the target system.
Step 19: Click Migrate
Click:
Migrate
Explanation:
This starts the actual creation of bank master records in the target SAP S/4HANA Cloud system.
Step 20: Resolve authorization issue if it appears
During your execution, migration initially failed with:
You are not authorized to create bank data for country/region US
The fix was to assign the additional business role:
Master Data Specialist - Bank Data
SAP_BR_MD_SPECIALIST_BNK
Explanation:
The migration cockpit role alone is not always enough.
Bank creation also requires bank master data authorization.
Step 21: Refresh and check migration status
After migration:
Refresh the screen.
Check the status of both bank instances.
Expected final result:
Success
Success
Explanation:
Both bank rows must finish successfully for the task to be considered complete.
Step 22: Verify in "Manage Banks - Master Data"
Open:
Manage Banks - Master Data
Search for:
US / A######
US / Z######
Explanation:
This is the final business verification step that proves the bank master records were created successfully in the system.
Expected Result
After this task is completed successfully:
both bank records are loaded through staging tables,
all mapping tasks are confirmed,
both migration instances complete successfully,
the two banks are visible in Manage Banks - Master Data.
 925 お客様のコメント最新のコメント 「一部の類似なコメント・古いコメントは隠されています」
C_S4CPB問題集で準備するのに数日しかかかりませんでした。最近C_S4CPB試験を受験しました
姫嶋**

何を理解してのぞむべきかがわかり仕組みを理解していないと解けないものがありますが、それらを仕分けて掲載されているので受かるためには何を覚えました
Hanai
試験合格だけを狙うのであればもっと簡易版のテキストでも十分だと思います。Fast2testさんに感謝です。
Hara

C_S4CPB学習の仕方をガイドしてくれるのが、ありがたいです。Fast2testの問題集C_S4CPBを使って試験に合格しました。ここで感謝を申し上げます。ありがとうございました。
Adachi
C_S4CPB試験に受かることだけの目的としても最適だね。本当に急に買いまして三日後に受験して受かったってっ感じ。Fast2testさんありがとう。
Kiyohara
Fast2testのおかげでスラスラ内容を理解できます。この一冊やり抜けば、余裕があれば別途問題集もやれば合格が視野に入ると思います。
Shiraishi
C_S4CPB受験者のためのやさしい問題集だと思います
演習問題も多数収録していますので合格。
铃木**
C_S4CPB問題集は最新だけではなく、最も有効で値します。高い点数で試験に合格しました。疑わないでください、買いましょう!
Honda
Fast2test及び御社の担当者様に誠にありがとうございました。高い点数でC_S4CPB試験に合格しました。それに、今はほかの試験に準備しています。御社の問題集は確かに言ったように同じです。この問題集を探して大変嬉しいです。
水树**
C_S4CPBのこういう問題集はあると非常に重宝します。加点ポイント高いです。Fast2testさんのお陰でいい内容に出会いました。しかも試験の問題にも入ていて、高得点で受かりました。
原田**
前回の試験では及ばず落ちましが4月の試験でFast2testのこの問題集を購入して今回合格出来ました。
説明が非常に分かりやすく
松浦**
初心者にとってはわかりやすい素晴らしい問題集になっております。試験に受かりましたよ。誠に有難うございます
Miyakawa
私は他のサイトで以前に試験に失敗し、そこでGoogleからFast2test推薦され、C_S4CPB製品を購入しました。
山崎**
C_S4CPBは完全網羅された頻出ポイントをおさえ、理解し、
さらに精選された過去問題の演習問題で復習、確認することにより独学でも力がつく内容になっている。
Itoh
関連製品
関する文章
セキュリティ&プライバシー
我々は顧客のプライバシーを尊重する。McAfeeセキュリティサービスを使用して、お客様の個人情報および安心のために最大限のセキュリティを提供します。
365日無料アップデート
購入日から365日無料アップデートをご利用いただけます。365日後、更新版がほしく続けて50%の割引を与えれます。

返金保証
購入後60日以内に、試験に合格しなかった場合は、全額返金します。 そして、無料で他の製品を入手できます。
インスタントダウンロードC_S4CPB
お支払い後、弊社のシステムは、1分以内に購入した商品をあなたのメールボックスにお送りします。 2時間以内に届かない場合に、お問い合わせください。
